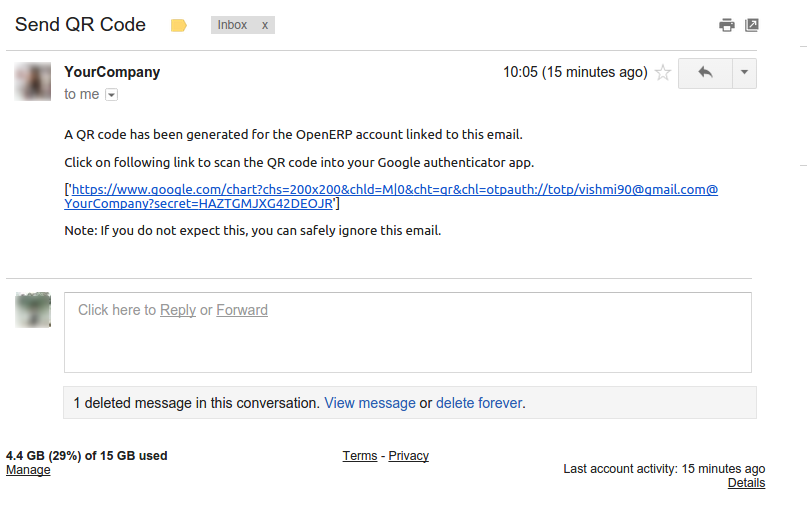
Power BI for Manufacturing Industry

Power BI For Manufacturing Businesses

We implemented PowerBI for one of the leading Manufacturing products companies. Since the company was into Manufacturing and Sales distribution located in a different geographic location including complete European countries. It was observed during the analysis phase that the Client was having a tough time tracking the sales records from all the units and based on the same, planning their production effectively. So to give them a robust solution, we suggested them Microsoft Power BI for manufacturing as an effective BI solution.
Let us share some of our experience in implementing PowerBI in a Sales were driven and Manufacturing industry which might be useful to your business as well.
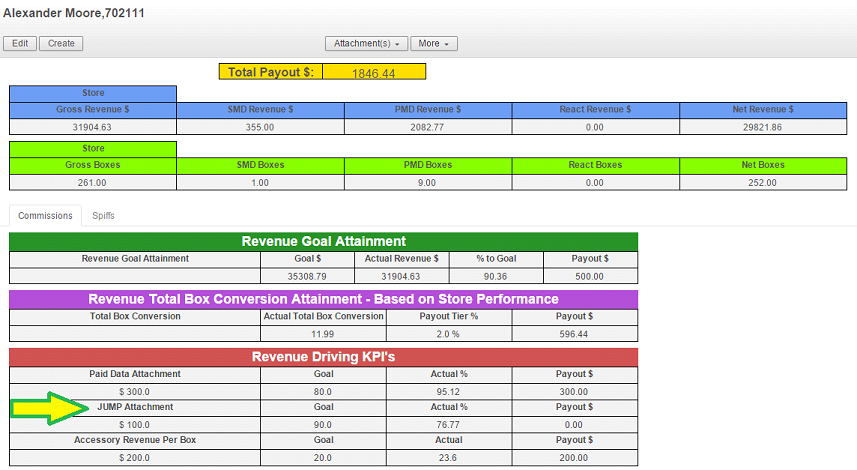
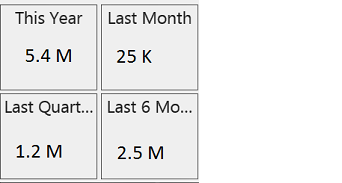
Sales Counter:
So to begin with, the first feature that we set up was Sales Counter which gives the complete sales with certain attributes. As seen in the image, the sales represent the total value across all the locations by Current year, Last month, Last Quarter, and Last 6 months accordingly. There can be more parameters but as per the requirement, we created these four counter visuals which will keep updating and display their appropriate value to get the exact track of Sales figures.

Sales Tracking:
Under this feature, the User was able to track his sales based on the months, quarters, and Products. At some point even these visuals can drill down to the day level as well, so by looking into quarters visual, if a user feels to see it further then he can simply use the drill feature and he can go up from a complete year to single day level drill-downs. Also with the help of Product visuals, it can easily be figured out which are the top-selling products, and based on that production can be managed effectively.

Sales Tracking Worldwide:
This feature is somewhere similar to the Sales tracking feature, but as we mentioned the Client had business over multiple geographic locations so to track the sales location-wise, we used this feature which represents sales on a world map. Also to get more clarity the graph represents the top-performing countries business-wise. Going one step further it also provides a list of top Customers, so that their needs and buying patterns can be considered to improve sales performances.

Target Tracking:
Likewise, in every sale-based industry, even here Clients wanted to keep track of the targets they had set and get timely updates on the same. With the help of this feature, the progress of targets was transparent with the management and easily trackable as well. Also, a feature like Products sales month-wise was provided, to understand the individual products’ sales behavior season-wise. And to get a summarized view, again counters were provided representing Top Country, Top Customer, Top month, and Top product based on the total sales.
After these successful implementations, we are more confident in bringing more value to your business once again. If you are looking forward to any of such implementations or any of the discussed features, you can contact us or email us at sales@bistasolutions.com 
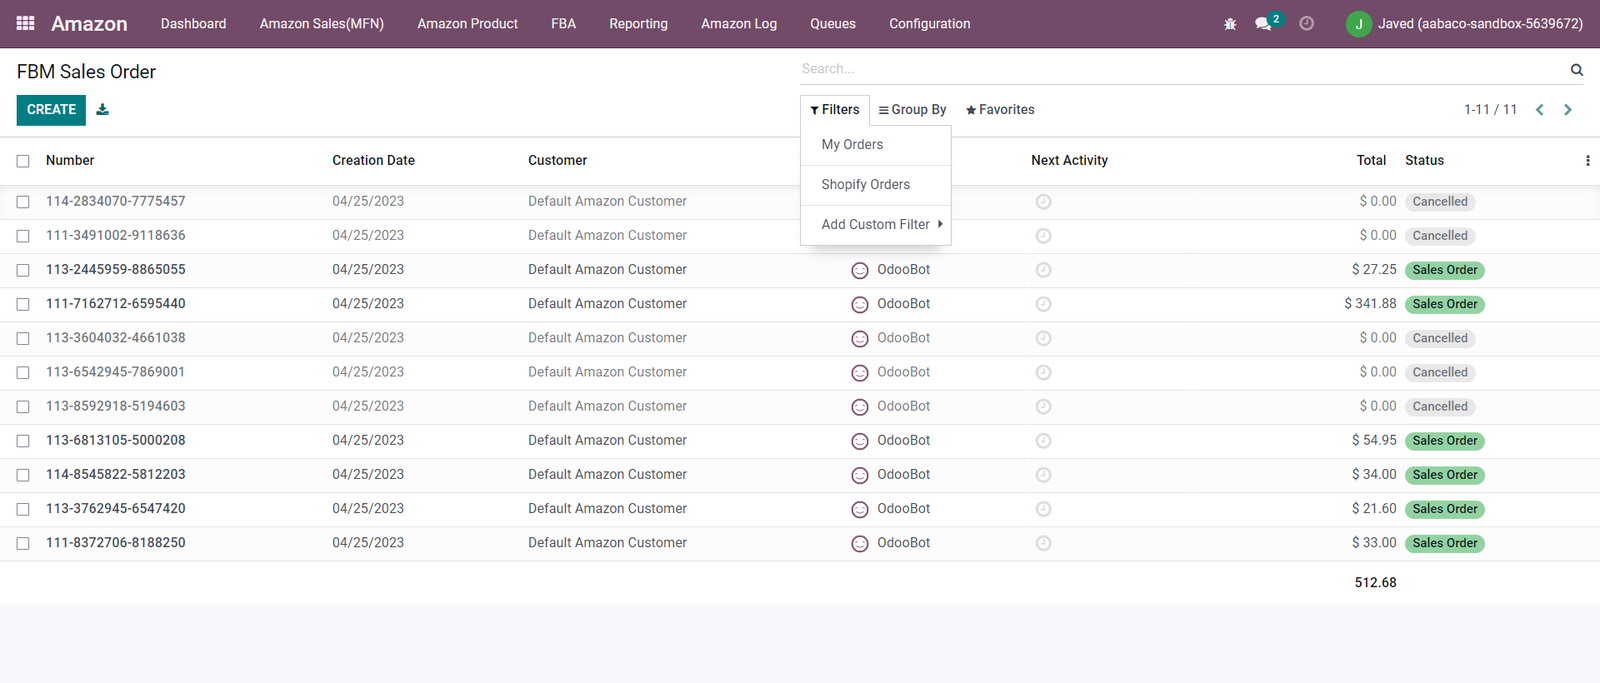
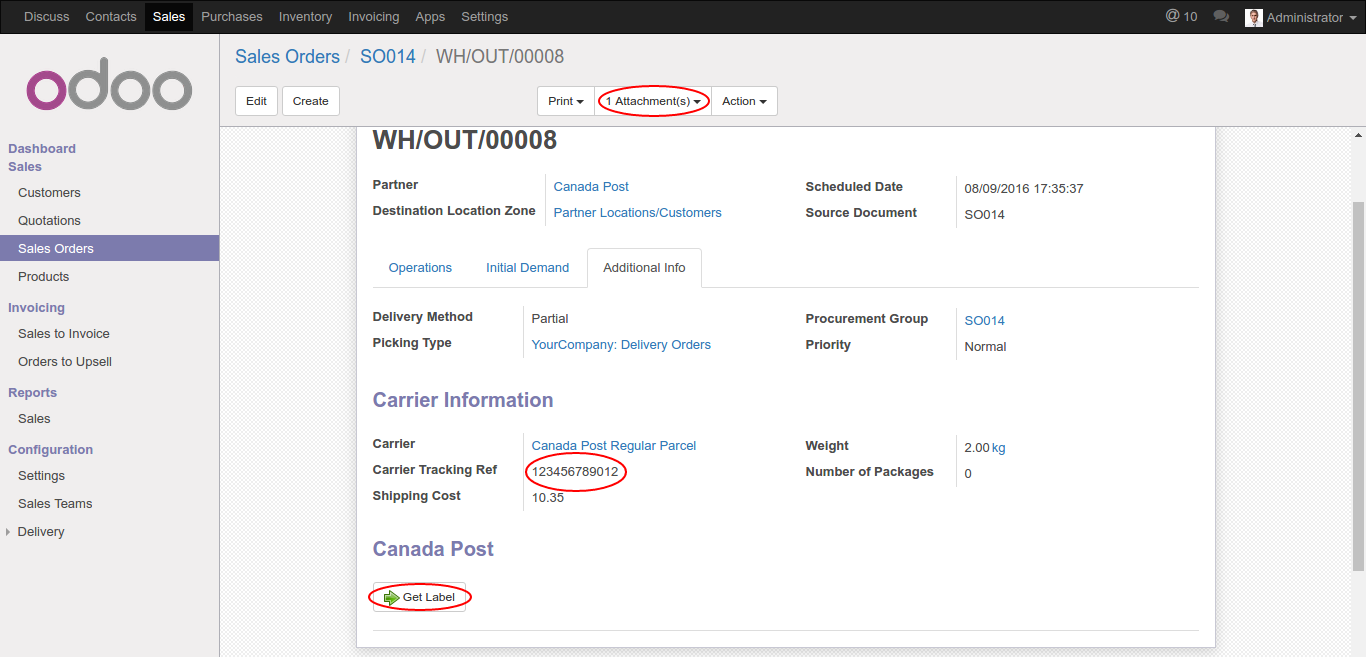
Two Factor Authentication In Odoo

Introduction

Unfortunately, our system Passwords are not as secure as they need to be. If someone gets access to your passwords, they can access your documents and information without any difficulty. Even if you have a very strong password it will not protect your system completely. In this blog, we are demonstrating how you can secure your systems and avoid mishaps like hacking and compromise on sensitive data. We at Bista Solutions have developed a Two- factor Authentication module in Odoo, which is one of the best ways to ensure that your account does not get hacked and your data stays intact. 


Two- Factor Authentication module


This is the only super method to make sure your user is authenticated. It will be an additional layer of security to your ERP System. It makes the user login through two factors :

1. Password.

2. Code

We have implemented a Time-Based One-Time Password Algorithm (TOTP). This method is flexible enough and allows your users to generate their authentication tokens directly on their smartphones. To enable this access users should have Google Authenticator App installed on their smartphone, furthermore, you can also get the token sent to your smartphone through an SMS. Let’s  now have a look at how the Two- Factor Authentication process works, here is a step-by-step explanation  :

First of all, the user needs to install the Two- factor Authentication module in Odoo 

A) Process of Admin configuration with Two-Factor Authentication :

Step 1: After you have installed the module you will find a new tab called Two Factor Authentication and if you have the admin rights, you can create Two-Factor Authentication for your user through the Odoo login as shown below.

two-facto-bista

Step 2: You have two ways to Enable Two-Factor Authentication for User using which are

  • Enable Two-Factor Authentication via the Google Authenticator app

  • Enable Two-Factor Authentication via SMS

You can choose either of these and click on the “Send Secret Key By Email” button to get your Secret Code:

two-facto-bista-solutions

Step 3: The user will immediately get an Email on his registered Email Id:

qr-code


B) Process of User configuration with Two Factor Authentication

Step 1: If the user is using the Google Authenticator app then the user has to scan this QR Code using his Smartphone.

google-authentication

Step 2: The user will now get the secret key via SMS generated by the Google authenticator app.


C. Login Step for User:

Step 1: Finally user can log in to the OpenERP System.

odoo-login

Step 2: Now the User will be asked to add the secret code password.

Noteworthy: This password would be for only one-time use, in addition, we can also decide the validity time of each password.

odoo-email


Successful Login into Odoo!!!!

We hope this snippet of Two Factor Authentication helps you secure your process in Odoo.

For more information on this module, you can get in touch with us through sales@bistasolutions.com. You can also see the demonstration of this module on our YouTube channel.

Unlocking Efficiency and Compliance with HIPAA- EDI Integration

EDI Connect for HIPAA Integration

HIPAA EDI Integration

In the ever-changing world of healthcare, how information is managed and exchanged has undergone a remarkable transformation. This shift has brought together two powerful elements: the Health Insurance Portability and Accountability Act (HIPAA) and Electronic Data Interchange (EDI). Together, they are set to revolutionize how healthcare organizations handle data. By ensuring compliance, privacy, and efficient processes, this dynamic combination has the power to unlock significant possibilities. And having a HIPAA EDI Integrated solution can help you get a more secure, efficient, and patient-centered healthcare ecosystem.

What is HIPAA Compliance?

HIPAA, which stands for the Health Insurance Portability and Accountability Act, was created to address challenges related to privacy, portability, and administrative efficiency in the healthcare industry. When implementing an ERP solution in the healthcare industry, it is crucial to ensure HIPAA compliance.

HIPAA Compliance serves to:

  • Improve access to health insurance
  • Mitigate fraud and abuse
  • Streamline administrative processes
  • Lower administrative costs

What is EDI?

EDI, which stands for Electronic Data Interchange, is a way for organizations to exchange business documents electronically. It’s like a standardized language that allows different companies to easily share structured data in a format that computers can understand.

EDI Benefits for HealthCare: 

  • Efficient Communication
  • Improved Data Accuracy
  • Faster Transactions
  • Cost Savings
  • Regulatory Compliance Assurance
  • Improved Workflow Efficiency

Key Documents exchanged in EDI Data Exchange 

While these examples illustrate a few common types of documents exchanged through EDI, the scope of EDI extends to a wide range of other documents that can be exchanged seamlessly.

  • Health Care Payment/Advice (835): Provides electronic payment and advice information to healthcare providers.
  • Health Care Claim: Professional, Institutional, and Dental (837): It submits healthcare claims electronically, covering professional, institutional, and dental services, providing detailed information.
  • Health Care Eligibility/Benefit Inquiry and Information Response (270/271): Inquires about patient eligibility and benefits (270) and provides detailed responses (271) from insurance providers regarding various information.
  • Exchanging Inventory Information between Manufacturers and Specialty Pharmacies (852): It facilitates the exchange of inventory information between manufacturers and specialty pharmacies, including details on product availability and other relevant data.
  • Implementation Acknowledgment for Health Care Insurance (999): Serves as an acknowledgment of receipt and acceptance/rejection of health care insurance implementation.
  • Implementation Guide and Application Reporting (824): Provides information on the implementation status of an EDI transaction set, reporting acceptance, rejection, etc.

KEY HIPAA Rules for EDI

  • HIPAA Privacy Rule: Protects patient information
  • HIPAA Security Rule: Sets a model for patient data security
  • HIPAA Enforcement Rule: Provides guidelines for investigating HIPAA violations

Why you needed HIPAA-Compliant EDI Solution for your Healthcare Business?

  • Data Security: With a HIPAA-compliant EDI solution, you are assured that all sensitive healthcare data, such as patient records, medical claims, and billing information, is safe and secure against unauthorized access or breaches, giving you peace of mind.
  • Regulatory Compliance: Compliance with HIPAA standards can help healthcare organization to avoid penalties and legal difficulties. With HIPAA-EDI Integration, ensure you adhere to HIPAA’s privacy, security, and transaction standards.
  • Efficient Data Exchange: An HIPAA-compliant EDI solution designed specifically for healthcare facilitates the seamless and efficient electronic data exchange between healthcare providers, insurers, and other entities. It eliminates manual processes, reduces errors, and improves operational efficiency.
  • Trust and Reputation: HIPAA EDI integration builds trust, enhances reputation, and instills confidence by demonstrating a commitment to protecting patient information and ensuring HIPAA compliance.
  • Streamlined Administrative Processes: HIPAA-EDI integration reduces administrative burdens, improves efficiency, and minimizes errors associated with paper-based systems.
  • Improved Patient Care and Coordination: Seamless integration of EDI with HIPAA enables the secured and timely exchange of patient information, facilitating better coordination among healthcare providers, insurers, and other entities involved in the patient’s healthcare journey.
  • Efficient Claims Processing and Reimbursement: HIPAA-EDI integration streamlines healthcare claim submission and processing, reducing paperwork, enhancing accuracy, and expediting reimbursement for healthcare providers.
  • Auditability: HIPAA-EDI integration ensures that all data transactions are accurately captured, logged, and auditable, allowing for better tracking and accountability in compliance with HIPAA regulations.

Enhancing Healthcare Data Integrity With HIPAA EDI Integration Services

  • Comprehensive Healthcare ERP Consulting
  • Aligned Technology Recommendations
  • Cloud-based/On-premise HIPAA EDI Integrated Solution
  • HIPAA Level 7 Compliance
  • EDI Workflow Review and Testing
  • Best Healthcare ERP Solutions 
  • Turnkey Project Management Approach

Why Choose Bista Solutions?

  • 3 decades of Expertise in ERP Implementation 
  • Awarded as “Best Odoo Gold Partner” (2022, 2021, 2018, 2016 & 2014)
  • 200+ Successful Custom App developments
  • 250+ Expert Developers at your service
  • 350+ Successful Project Implementations Completed
  • Global Presence in 10+ Countries
  • 24/7 Support Available

Bista Solutions is successfully implementing HIPAA-EDI-compliant solutions for clients worldwide. Discover how we can help your organization achieve HIPAA compliance and streamline your data exchange processes with EDI. Contact Us Today!

Unleashing the Power of E-commerce with our Odoo Amazon Connector

The Odoo Amazon Connector is an important solution for online business owners who rely on Amazon.com web stores. With seamless integration, you gain effortless control over key aspects such as order management, product listing, and order status imports, FBA Order management. Our Expert team has created easy to customize connector for a swift integration process across your entire Amazon store. Experience a world of efficiency and convenience by managing your Amazon store directly from your Odoo ERP software with the Odoo Amazon Connector.

Configuration Menu & Core Design

The Configuration Menu and Core Design of our Odoo Amazon connector support scalability and growth for your business helping you to achieve a seamless and efficient integration between Odoo and Amazon, unlocking the full potential of their e-commerce operations.

Odoo Amazon Connector


  • We have developed a user-friendly configuration menu for seamless connection with Amazon seller accounts.
  • We have comprehensive mapping menus with intuitive tree view and form view interfaces.

Dashboard

  • Odoo Amazon ConnectorKanban View: Visualize data, navigate easily, and access details effortlessly.
  • Streamlined Sync: Bulk synchronization for efficient data alignment between Odoo and Amazon.
  • Intuitive Buttons: Initiate specific sync tasks with ease, enhancing operational efficiency.
  • At-a-Glance Insights: Quickly grasp key information without extensive data exploration.

Amazon Seller Management

The Amazon Seller Table is designed to store and manage information related to Amazon sellers within Odoo. It provides a centralized location to store seller-specific details, such as seller ID, contact information, pricing settings, and other relevant data.

Odoo Amazon Connector

  • Seller Management: Businesses can add, edit, and maintain seller information, allowing for efficient management of multiple Amazon seller accounts.
  • Pricing Configuration: Sellers can configure pricing settings, such as pricing rules, discounts, or promotions, specific to each seller account.
  • Communication and Support: Seller contact information stored in the table enables seamless communication and support interactions with individual sellers.

Amazon Marketplace  

The Amazon Marketplace Table manages information related to different Amazon marketplaces within Odoo. It allows businesses to track and handle multiple marketplaces where they sell their products.

Odoo Amazon Connector

  • Marketplace Management: Businesses can add and configure multiple Amazon marketplaces, such as Amazon US, Amazon UK, or any other supported marketplace.
  • Marketplace-Specific Settings: Each marketplace can have specific settings, such as currency, tax rules, shipping methods, and fulfillment options, which can be customized and managed within Odoo.
  • Data Segmentation: The table facilitates the separation of data and settings specific to each marketplace, ensuring accurate management and control for different regions or market segments.

Clear Mapping Relationship 

We have a dedicated mapping table within the Odoo Amazon Connector, which establishes clear and visible relationships between Amazon sellers and their associated marketplaces.

Odoo Amazon Connector

  • Sales Analysis: Analyze sales data for each marketplace individually, enabling in-depth analysis of revenue, profit margins, customer preferences, and other sales-related metrics specific to each marketplace.
  • Accurate Identification: Ensure accurate identification of marketplaces associated with each Amazon seller, providing clarity and eliminating confusion in seller-marketplace relationships.
  • Strategic Adjustments: Monitor and compare sales performance across multiple marketplaces to make informed decisions and adjustments to selling strategies.
  • Resource Allocation: Efficiently allocate resources, marketing efforts, and inventory management strategies based on the performance and potential of each marketplace.

Amazon Product Management 

With our Odoo Amazon Connector, you can efficiently manage your Amazon product listings & Variants, ensuring automatic updates and synchronization with your Odoo products that help in minimizing manual effort, and maintains data consistency across platforms.

Odoo Amazon Connector

  • Streamlined Product Updates – Our Odoo Amazon Connector enables efficient management of Amazon product listings by establishing direct associations with Odoo products. Updates or changes made in Odoo are automatically reflected on Amazon, reducing manual effort and ensuring data consistency.
  • Accurate Inventory Control – With our Odoo Amazon Connector you can effectively control inventory levels, preventing stockouts or overselling scenarios.
  • Product Variant Mapping –  It simplifies the process of organizing and maintaining product variants, ensuring accurate and consistent information across platforms.
  • Granular Product Control: This enables you to offer a diverse range of products to customers, such as different colors or sizes while maintaining accurate inventory tracking.

Amazon Order Management

Our Odoo Amazon Connector provides robust functionality to manage Amazon orders directly within Odoo, offering a seamless and centralized approach to order management.

  • Flexible Order Filtering

Odoo Amazon Connector

    • Fulfillment Type Filtering: Manage Amazon orders based on fulfillment methods, such as FBM (Fulfilled by Merchant), FBA (Fulfilled by Amazon), or both.
    • Date Range Filtering: Orders can be filtered based on a specific date range, allowing businesses to handle orders within a specified time frame efficiently.
    • Specific Order ID: Flexibility to manage orders based on specific order IDs, enabling targeted order management as needed.
  • Amazon Order FBA – Optimize your Amazon FBA order management, improve efficiency, and provide a seamless customer experience.

Odoo Amazon Connector

    • Simplify FBA order management within Odoo
    • View, track, and process FBA orders from Odoo Dashboard
    • Seamless Inbound Shipment Planning
    • Seamlessly receive and process inbound orders
    • Centralized Outbound Order Management
    • Streamlined Return /Refund Process
  • Autoflow setup-  It streamlines various aspects of order management and financial processes. Our Odoo Amazon Connector simplifies and accelerates tasks with
    • Order Flow Automation
    • Confirm Order Automation
    • Invoice Creation Automation
    • Payment Creation Automation
  • Order Consolidation – You can efficiently process and manage orders from multiple marketplaces, simplifying order fulfillment and reducing operational complexity.
  • Order Tracking and Updates – Real-time order tracking and status updates within Odoo enable businesses to provide prompt customer support.
  • Amazon Shipment Management Integrated features to manage Amazon shipments and tracking information within Odoo.

Reports & Analytics 

Our Odoo Amazon Connector provides you with valuable insights and streamlines various processes.

Odoo Amazon Connector

  • Amazon Inventory Report- This offers insights into Amazon inventory levels within Odoo and helps you track and manage inventory across the Amazon marketplace.
  • Amazon Settlement Reports- Imports and analyzes Amazon settlement reports within Odoo with a detailed breakdown of financial transactions and settlements.
  • Order Reports- Logs and tracks order-related activities and events, including order creation, updates, and cancellations.
  • Product Log Report-  Logs and tracks product-related activities and events, such as product updates, changes, and synchronization with Amazon.
  • FBA Reporting-  FBA reporting features help you efficiently manage your FBA inventory, shipments, removal orders, and stock adjustments

Queue management 

Our Odoo Amazon Connector help in managing queues related to Amazon processes. It helps in organizing and prioritizing tasks such as order imports, inventory updates, and pricing changes, and ensures efficient processing of Amazon-related operations within Odoo.

Odoo Amazon Connector

    • Automation and Batch Processing
    • Priority-Based Processing
    • Error Handling and Retry Mechanism
    • Real-Time Monitoring and Alerts

Log Management 

Log Management helps in monitoring and troubleshooting issues by providing detailed information about the execution of various processes. It enables effective debugging, error tracking, and auditing of Amazon-related operations within Odoo.

    • Centralized Log Storage
    • Real-Time Monitoring
    • Auditing and Compliance
    • Log Analysis and Search
    • Log Retention and Archiving
    • Alerting and Notification
    • Log Security and Access Control

Why Choose Bista Solutions?

  • 200+ Successful Custom App developments
  • 250+ Expert Developers at your service
  • 350+ Successful Project Implementations Completed
  • Most Trusted Odoo Gold Partners
  • Global Presence in 10+ Countries
  • 24/7 Support Available


Maximize the Potential of Your E-commerce Business with our Odoo Amazon Connector. Schedule a Call Today to Discuss Your Unique Requirements with Our Experts!

Odoo Authorize.net Module

Key feature of Odoo -Authorize.net. Here is a step-by-step briefing on how this can be achieved

First of all

To Configure Authorize.Net API in Odoo

  1. Go to Settings.

  2. Authorize.Net under General Setting.

  3. Click on Create.

  4. Enter the API Login Id.

  5. Enter the Transaction Key.

  6. Select the Environment as Test or Production.

  7. Enter the Server URL.

  8. Click on Save.

  9. Get Profile IDS:- If we click on this option it will fetch the details of the Customer present in Odoo and Authorize.net through email id and create the Customer Profile and Payment Profile.

1

#1: To Configure Authorize.Net API in Odoo

Next, we will look into 

How To Create a Customer Profile in Odoo.

  1. Click on Sales Module.

  2. Click on Customers and select the Customer for whom you want to create the customer Profile.

  3. Now click on the Customer Profile Tab inside.

  4. Click on Create Customer Profile. (A dialogue box will open, select the Billing contact and click on Create Customer Profile).

  5. Customer Profile Id is created.

  6. Now click on Register Payment Profile and fill in all the necessary details shown on this page & click on Register Payment Profile.

2

#2: To Create a Customer Profile in Odoo

Now let’s see

How To Use Authorize.Net in Sales Orders in Odoo.

Here are the steps

  1. Click on Sales Module.

  2. Click on Sales Order under Sales Option.

  3. Click on Create.

  4. Enter all the necessary details like Customer name, Order Date, add product, &, etc.

3

#3: To Use Authorize.Net in Sales Orders in Odoo

  1. Click on Confirm with Auth.net.

  2. Click on Use Existing Card if you want to use the Card which you added in the Customer Profile, or Click on New Credit Card and enter all the necessary details (it is as same as Register Payment Profile in Customer).

4

#4: To Use Authorize.Net in Sales Orders in Odoo


  1. Select the Card.

  2. Select the Transaction Type, There are 2 options for doing this

i) Authorize and Capture: – This Option will Authorize and capture the payment.

ii) Authorize Only:- This Option will only authorize the Payment we need to capture in the Invoice.

5

#5: To Use Authorize.Net in Sales Orders in Odoo


  1. Now we are using the Authorize and Capture Option, the below images are based on this option.

  2. Click on Charge Customer.

  3. Now Click on Create Invoice. Select the option Invoiceable lines and Click on Create and View Invoices.

6

#6: To Use Authorize.Net in Sales Orders in Odoo

7

#7: To Use Authorize.Net in Sales Orders in Odoo


  1. Click on Validate.

8

#8: To Use Authorize.Net in Sales Orders in Odoo

  1. To use the register the payment scroll down, we can see the Outstanding credits and we need to click on Add payment through Authorize.net.

9

#9: To Use Authorize.Net in Sales Orders in Odoo

  1. The invoice is Paid using Authorize.net and we can view the details in Authorize.net Payment Tab.

Alternately Using Capture Only Option in Odoo.

Here the process remains the same as explained above until point number 7

1. Now in the Transaction Type Select Authorize Only.

10

2. You can now follow the same steps and process as explained in point number 10,11 and 12.

3. Click on Capture Payment.

11

4. The Invoice is paid using Authorize.net.

Echeck.Net

What is eCheck.Net?

eCheck.Net is an Authorize.Net payment service

How to Use eCheck.Net?

  1. Click on Sales Module.

  2.  under Sales Option-Click on Sales Order

  3. Click on Create.

  4. Enter all the necessary details like Customer name, Order Date, add the product, & etc.

  5. Click on Confirm with Auth.net.

  6. Click on Pay with eCheck.Net.

12

  1. Select the Bank and Click on Capture Payment.

13

We Hope this Step by step tutorial on Odoo -Authorize.net User Guide helps you to drive your businesses better. Feel free to get in touch with us for more insights on Odoo and many other ERP solutions through sales@bistasolutions.com also write to us to tell us what you think about this blog at feedback@bistasolutions.com .

Odoo-Canada Post Integration

odoo canada post integration

Integration of Odoo with Canada Post

This article talks about the Integration of Odoo with Canada Post Shipping services.This integration will ease the shipping services involved in the online purchase of products.Odoo-Canada Post Integration allows the users to print the shipping labels just on a button’s click,printing the packing forms, custom forms and also provides a tracking facility. The Odoo-Canada Post Integration will enable all the shipping methods as provided by Canada Post through Odoo.This Odoo-Canada Post Integration will provide the following Canada post web services:

screenshot1

Here is a short tutorial on things you need to configure while using the Odoo-Canada Post Integration

1.Configuration of canada post account

Firstly Go to the Inventory/Shipping Services Management/Canada Post Setting and configure your canada post account.After you have configured this, click on the Get Services button. Once this process is over all Canada Post services are made available as Delivery Methods in odoo. Also this will create a service product with the delivery method name.

configure

#1:Configure your Canada Post Account

2. Address Validation

When you are all set to start the shipping activity enter your destination address and click on “Validate Address” button. If address is validated for Canada post “Is validate address” field will checked true automatically

address

#2:Address Validation for Shipment

3. Get Rates

Now you can Go to sale order select Customer, Delivery Method of Canada post and enter Order Lines. Once you have selected the product in line, it will get all package related information to the Shipping info tab on sales order .Now you can enter the Length, the width and the height and click on set Price button of sales order to get the rates.It will add all one order line part of the service charge of Canada post with selected service of Canada post.

rates

#3: Rates Setting up

4. Get Label

After the product is made ready to ship you can either click on validate the delivery order or click on the “Get Label” button to get the label printed. This will get the tracking number from canada post and this will be attached with the particular delivery order as show below.

shipment

#4: Get Label for Shipment.

We hope this quick walk through the Odoo-Canada Post Integration demonstration for using Canada post Shipping methods in Odoo helps you all work with it as well.We will soon come up with more interesting and informative tutorials on

  • Odoo-ebay connector

  • Odoo-Magento connector and many more

Please feel free to tell us what you think about this blog through feedback@bistasolutions.com. Also for more insights on using this connector, you can get in touch with us through sales@bistasolutions.com .

For more information on the above topic, You can view our video . Odoo-Canada Post Integration

Password Validation in Odoo

Password Validation in Odoo

Password Validation in Odoo

Any system having a user login and password must have some method.

odoo to validate the authentication and accordingly grant access. Alternately it is very important to have a strong password in place to make this authentication secure. The use of strong passwords can many times avoid or even prevent an attack on the system and thus ensure the security of sensitive data. The Password Validation Module helps odoo systems to create strong passwords for all their users. The Module doesn’t accept any user with a weak password, Consequently securing your systems from invaders.

Features of the Password Validation Module:

1. It will not allow a weak password.

2. The module imposes certain common validation rules to ensure the strength of the password.Here is a set of rules that the user has to adhere to :

  • The password must be combinations of minimum of 8 characters.

  • Password must have at least one digit, one Uppercase ,and one Lowercase character.

  • Also, password must have one special character. Supported special characters are: !@#$%&*,.^_`~.

  • Users must avoid using any information which is obvious and associated with the user or the account.

  • Avoid using Default passwords.

3. The module will assist the user in setting their passwords by giving recommendations to handle their passwords.

4. The module may also blacklist a few passwords and mark them as weak passwords.

Methods of changing passwords in Odoo?

There are two ways in which a user can change his/her password namely:

  • From the top right menu User Name > Preference menu, or

  • Using the“Reset Password” link in the Login Form.

Process of changing your password in odoo

Here is the demonstration of how the user can change the password along with screenshots attached.

  1. When the user changes the password from the “Reset Password” link:

Any user can change the password by clicking on the “Reset Password” link. This link appears in the Odoo Login form.

Step1:

odoo1Click on the “Reset Password” link

Step2:

odoo2

Reset your password

Step3:

odoo3

2. When the user changes the password from the “Preference” menu:

There is one more way to change the password. The user will click on the top right USER_NAME > PREFERENCE menu

Step1:

odoo4

Change the password from the “Preference” menu

Step2:

Set your new password

odoo5

Since Password Validation Module is a generic module and is not specifically targeted to any industry. Any Odoo project can make use of this module and implement it.

Feel free to get in touch with us or email us at sales@bistasolutions.com for more insights on the module. 

This module is now available on Odoo Apps to download the module and begin working with it click on this link on the link below.

https://apps.odoo.com/apps/modules/9.0/bista_password_validation/

Odoo Commission Tracker for Field Employees

Commission Tracker for Field Employees

Odoo Commission Tracker | Odoo Sales People Commission Tracker.

Odoo Commission Tracker is an Excellent Feature developed by Bista Solutions for one of our US Clients to track the Daily Sales Performance of the Employees and also their previous Sales Performances as well.

Traditionally, Field Employees didn’t have any source to Track their Performances on a Daily basis as well as where they stand on LeaderBoard Rankings based on their Performances, and this led to confusion and indirectly less Motivation in their Point of View.

Odoo Commission tracker is a Performance Booster to view their Performances ttoDate within fa ew seconds. Tracking becomes a lot easier to them wconcerningtheir Performances instead of time and again checking their Performances at Reporting Level.

screen-shot-1

Given an Example of an Organizational Hierarchy for the Sales Department.

Here’s aaHierarchical Diagram which can pepresent Sales Department in a Telecom Business.

screen-shot2

Below Design represents CT for the Job Position of Retail Sales Associate(RSA) which stands at the bottom of an Organization but does the most Important Job of all.

screen-shot3

This shows the Performance of the RSA on different Parameters based on the Plans offered by the Telecom Giant and how much Commission/Payout he is making out from Month to date.

screen-shot4

Features:-

  • CT provides excellent Advantages over Other Commission Apps when it comes to its Dynamic Nature and automatic adjustment to different Hierarchies within an Organization.

  • CT is tynamic based on the Person who is Logged into Sthe ystem and his Position in the Company accordingly specific design of CT is assigned to him and he can run CCTsof himself and the Employees falling under his Position in the Company.

  • CT Features assembles the Design as well as Calculation Logic as per the Payout structure of an Organization which can suit any Organization from Retail to Telecom Business.

  • The only Configuration from a System Admin point of view one has to do is to set up the Commission Structure for all of its Employees based on either htheirJob Position or his Department or his Role in an Organization and rest leave it up to CT to handle.

  • Commission Structure can be set up Monthly or Quarterly depending upon how an Organization plans its P & L calculation.

  • CT can be run Monthly or Quarterly to check the Performance of an Employee, Store,Market, or Region.

screen-shot5

Different Parameters can be considered in a CT based on the types of Business and its Products or Services which can IIncorporateeasily in a single Form.

The screenshot below shows you an example of Commission Parameters for a Telecom Business and their Payout Structure for a Retail Store Manager(RSM) and how simple it is to set the commission structure for one of the parameters(Revenue Goal Attainment) of RSM Payouts.

screen-shot6 screen-shot7

With a Simple Configuration as designed above  Sales/Commissions Department Head can easily set up targets for different Job Positions within his Department in ma atter of Minutes and ends up setting up the Entire Payout Structure for the Field Employees within half an hour either on Monthly Basis or Quarterly Basis.Setting u p this formula not only sets up the structure but also sets up the Design for this parameter in the Commission Tracker see the screenshots below.

screen-shot8

The result is as see you below for an Insurance Parameter for Phones in commercial terms “JUMP”.

screen-shot9

JUMP Attachment specifies Sales Reps Percentage on Selling insurance on the purchase of Phones. The yellow arrow suggests the performance of a Store as well as The tore Manager on selling insurance Phones and their Payouts.

With a single click of the ba button, whether it’s a Sales Rep or Store Manager or Market Manager or Region Director can see their Payouts for the current Month or months Months with the Live Operational Data as the entries are going on in the store and this is just with a single Button button per the image showcased in the next page.

See the screen below, this is what an employee has to do to view his Commission for the specified month and his total performance appears before him within a matter of seconds as shown in the above screenshots.

screen-shot10

Conclusion:-

Normally we search for apps that look far fancier but end up slowing down the system to a considerable extent with a single process, in current Business world TIME is what matters especially for Sales Department since these guys are mostly on the field and need more time to interact with Possible Opportunities rather than spending time on Software applications.

Hence, Bista’s CT provides an easy and better platform to check Sales Performances at any given point ointime without waiting for Hefty Reports to load and show their Performances.

Pitfalls of using custom code for cloud based system and their solutions

Pitfalls of using custom code for cloud based system and their solutions

Cloud-based software is particularly built to gain interest of a wide range of market. For individuals and small scale companies, utilizing generic cloud-based software is often acceptable, but a larger business will need custom software development to alter the functionality according to their own unique needs and requirements.

pitfull-of-using-custom-code-bista-solutions

While integrating cloud-based software on SaaS platform, everything is provided other than the users and the corresponding data. The vendor provides the application code and the developer has restricted access to modify and write consistent code. This is specifically not an appropriate choice for deploying custom software development, as the vendor provides the complete cloud-based software.

For cloud-based software:

  1. Advantage: The complete cloud-based software is provided by the vendor except the users and the corresponding data.

  2. Disadvantage: You have restricted control over the cloud-based application and it is frequently arduous to incorporate external workflows into the cloud-based system.

In true cloud SaaS software, the vendor does not create custom cloud code for customer requirements. With every customization, they are integrating something known and keeping consistent code on their side to whatever the customer possesses.

If the vendor has custom cloud code, then they are integrating cloud-based software and that is a custom integration which then leads to all sorts of problems and risks.

There are a few guidelines explained below that will help you in optimizing your custom cloud code so that you can avoid the risks:

  1. Prevent excessive Server API calls

  2. Utilizing Static Variable does not make any difference

  3. Closely observe Metering Data

  4. Create consistent code

  5. Create more generic custom cloud functions

bista-solutions-codeing-picture

The classifying line is the cloud code. True cloud-based software is often written on a single line code. Customers can configure the cloud-based software as per their needs, but they can’t customize the cloud code for their enterprises or to install it on their local servers. Consistent code makes monitoring and maintenance trouble-free and lets the enterprise concentrate on innovation. Vendor should design for a highly efficient, secure and scalable cloud functions and cloud code.

If you cannot keep your cloud code consistent and generic, you lose all the productivity, scalability and cost benefit of the single line code. Also, the integration turns out to be considerably more time consuming, arduous and costly.

A scalable custom software development:

The cloud-based software with SaaS model only works when you can sell out the same consistent code to a large number of customers. Cloud-based software service companies are not charging higher amount of fees. They are investing a lot of time and money in research and development. But for the business to be serviceable, they have to sell out the cloud code repeatedly. If you start building code that is only used by a single customer, you will ruin your business and economic model.

This is what makes integrating cloud-based software more time taking, expensive, arduous and prone to risks. But, if you are working with a true cloud solution; integrating cloud-based software should not be a big trouble. So if you are buying cloud based software, you should ascertain if it is true cloud-based software. 

Feel free to get in touch with us through sales@bistasolutions.com for more insights. And Write to tell us what you think about this blog at feedback@bistasolutions.com


Getting The Most From Workflow Management System

Workflow Management System

W – workflows can be a simple sequence of tasks or activities or a complicated collection of one or more processes.

M – Management can be the process of dealing with or controlling things, work, or people.

S – System can be a framework or tool which can help manage workflow.

Together Workflow Management System (WMS) provides infrastructure monitoring and automates a defined sequence of tasks, arranged as a workflow. Workflow Management System helps to reduce repetitive tasks and automates manual work, which improves both performance and efficiency. So it is very important to use best practices to get the most out of the workflow management system.

Following are a few practices that should be followed in the workflow management system:

1. Create a sweet and simple workflow

A great Workflow Management System lets you think in simple linear loops and does all the complex stuff in the background. Your workflow diagram should be neat and simple enough to understand, which will help simplify the work. One can achieve this by understanding and placing tasks one after the other splitting them according to the team who will be working on them. Give proper task name, process or workflow name, labeling whenever and wherever needed.

2. User-friendly form design

When you design a form, you want to make sure all of your hard work pays so that someone instantly knows how to fill it out the moment they see it. WMS provides Custom Form Designers which allows you to customize forms. As we can customize forms according to the business need, but the form should be designed considering the user’s perspective, it should be user-friendly. Put placeholders, give hints, form elements should be well spaced, the form should be compact, avoid more clicks, etc.

3. Pre-filled form fields

Pre-filled forms may not sound like a big deal, but it is one of the most important features workflow management systems offers. Once a form is filled, it shouldn’t go back to doing it again. Once data is entered, it can populate in multiple forms, reducing duplication of effort and helping keep error rates down. Your workflow system should be a Business Intelligence System, consider the HR process of resource allocation, resources are employees of the company, and their details are stored in some application. So while working on resource allocation HR might require employee details, but if the employee’s details are available they should be pre-filled in the form rather than asking HR to fill it.

4. Managing groups, users, departments, and roles

In a workflow or process, users are the key players who will drive the process and will be working on the tasks. WMS gives freedom to create users, groups, departments, and roles, but just creating them does not end the work there. It is very important to manage users, groups, departments, and roles and assign them properly according to tasks.

5. Document management

Most businesses have piles of paperwork involved with day-to-day operations. Many documents move from one department to another or from one user to another. There are many chances of loss of documents in between. WMS facilitates editing, producing, tracking, storing, and managing documents in digital format.

6. Choose the proper routing

Not all steps can be sequential, there can be many other scenarios evaluating conditions to move to the next step or move to multiple steps parallelly. Take Customer Relationship Management (CRM) as an example. It usually needs to follow up with multiple customers, but instead of coming up with different workflows for each customer, you can create one workflow and choose the customer to whom you want to contact or follow up with. Choosing a proper routing helps reduces time and avoid redundant work, and does decision-making on its own once the condition is defined.

7. Send emails and notifications

It’s a human tendency to forget things, people might forget to come to the workflow management systems. So it becomes important to remind them to come back. An effective Workflow Management System provides features for sending emails and notifications. If emails and notifications are sent on time, users will not have to wait for tasks to come to him/her, and the WMS also confirms the completion of tasks or work that has been performed.

8. Role-Based Access

Not everyone should be able to see everything. There are a few workflows that may comprise sensitive information that is not intended to be shared with everyone in the process. Based on the roles each one is assigned to, the Workflow Management System allows you to customize what each user can see and edit.

9. Reporting

In a company that is growing day by day, it is very necessary to know the amount of work completed in a period, user efficiency, and performance. WMS can generate reports on who is doing what, how much time it took to complete the particular task, what workflow participants are still waiting on, and many other reports. Reporting helps to understand and analyze where the bottlenecks are and where to focus your attention.

10. Task Automation

Last but not least one of the greatest benefits of workflow management software is being able to automate repetitive processes. It is also known as a workflow automation system. While developing workflow one should recognize which tasks can be manual and which tasks can be automated. Automation in the workflow can be: most of the decisions are taken by the WMS system without human intervention, sending an email automatically, starting a task, or moving a task from one step to another. This helps reduce labor costs and increase productivity.

We hope the above Best Practices of Workflow Management Systems help to increase the productivity of your business. Feel free to get in touch with us or email us at sales@bistasolutions.comto get an in-person demo.