In today’s fast-paced business world, think of Odoo Apps as your efficiency heroes. They’re here to streamline your operations, making your business run like a well-oiled machine, and, of course, boosting your growth. If you’re on the lookout for a dependable partner to walk you through this journey, we have a ton of experience in tailoring Odoo Apps just for you. Before we dive into explaining Odoo Apps and how they work, let’s first get a clear understanding of Odoo ERP.
Quick Overview of Odoo Apps
Odoo Apps are a set of specialized software tools designed to help businesses manage various aspects of their operations more efficiently. These apps cover a wide range of functions, from customer relationship management and sales to project management and accounting. They provide a streamlined and integrated approach to company management, making it easier to run and grow your business.
Standard Odoo Applications
Odoo provides a versatile suite of standard applications that cater to a diverse range of business needs, making it a valuable resource for nearly every industry.
CRM (Customer Relationship Management) – Manage your customer interactions, track leads, and streamline your sales process.
Point of Sale (POS)- Simplify in-store transactions and inventory management for retail businesses.
Sales – Effectively manage your sales processes, from quotations to invoicing, and keep track of customer orders.
Project Management- Plan, execute, and oversee projects with tools for task management, collaboration, and time tracking.
Inventory Management- Keep tight control over your inventory, from procurement to warehouse management, ensuring efficient stock management.
Human Resources (HR)- Manage employee information, payroll, attendance, and recruitment, all in one place.
Accounting- Handle your financial operations with features like invoicing, expense tracking, and financial reporting.
E-commerce- Build and manage your online store to expand your business to the digital realm.
Website Builder- Create and maintain a professional website with ease, including e-commerce integration.
Manufacturing- Streamline your production processes, bill of materials, and work orders for manufacturing businesses.
Discover the Difference with Odoo Apps and Bista Solutions
🚀 Streamlined Operations- Odoo’s versatile apps optimize every facet of company management, from CRM to project management, ensuring efficiency.
🌐 Seamless Integration- Harness Odoo’s adaptability by integrating with various platforms, enhancing functionality for a connected business ecosystem.
💡 Expert Guidance -Embark on a seamless journey with Bista Solutions as your Odoo Partner. Our adept Odoo implementation ensures the utmost value from Odoo apps.
Ready to elevate your business? Embrace the power of Odoo Apps and unlock limitless possibilities with Bista Solutions by your side. Schedule A Call Today!
With Odoo Sign embrace a speedy way to Sign, Send and Approve Documents. It’s a great add-on to the other Odoo Apps. It assists you to modernize your business and also Saves time and money. With Odoo Sign go paperless and be eco-friendly. With Odoo Sign App you can assign roles for every document and track the document signature process.
Creating an Odoo Signature Document
When you trigger on odoo Sign it will land you on the template page where you can upload a PDF template or send a signature request. Suppose you are on some other page and also want to be redirected to the template page that can be achieved by triggering the Template button from the top menu item. You can upload a PDF template or contracts that require a signature or other customization by triggering UPLOAD A PDF TEMPLATE.
You can configure and also upgrade your own customized field in the menu items. I will get back on how to do that.
In the Odoo Sign field, you can view a small + icon if you trigger it, a small customization box will pop up where you can set the field to be Mandatory field or leave it to the customer to decide and can assign a person who will be Responsible to populate the field. To configure responsible roles just go to the top menu Configuration > Roles
In Configuration > Roles, you can view all the configured roles to create the new role just trigger the CREATE button.
It will open the form view, where you can fill in the Name section and you can enable SMS Authentication if required and also lastly save it by triggering the SAVE button.
Now coming back to the template once everything seems right you can send your signature request to your client or organization by triggering the SEND button on the top left corner in the odoo sign Menu bar.
Now on the top Odoo Sign Menu, you can track the status of the Signature. The signed document status will change from Signature in Progress to Fully Signed. In case of any inducement, the other party refuses to sign and cancel the document. The document transitions to a Canceled state. Odoo sign apps help you to track all the details from approval to cancellation.
On the Customer Portal:
On opening the document by a customer from their email, he can fill in the highlighted fields.
Once the trigger is on the field for Signature it will open the small wizard where they have various Signature choices. There is a Draw option where the customer can sign the doc with a digital pen or something.
Then there is an Auto option where the customer will be provided with various signature styles and they can choose any according to their preference.
Then there is a Load option where they can load their signature life from their system. Lastly, by choosing the preferred option trigger Adopt and Sign.
Post that the customer will have to validate and also send the document back by triggering Validate & Send Completed Document in the bottom.
Post validation and completion of the Odoo signature process
Once the document is signed by all the authorized people, you can view the message You have completed the document and by triggering the Download Document you can download the signed document.
Now again if you trigger top menu Signature, since the document has been signed it has been moved to the Fully Signed stage.
Creating a custom field for the document
For creating a custom field you have to first enable the developer’s mode. With developer mode odoo allows you to understand the technicality of your module more greatly. To enable the developer mode you have to jump to Settings.
It will open the Settings tab where in the bottom right corner you will have an option to Activate or Deactivate the developer’s mode. On activating developer mode you can view the small bug icon on the top menu.
Coming back to the Odoo Sign module, under Configuration you can view the Field Types menu has been updated. By triggering that you can see the list of fields available, to create your own custom field just trigger the CREATE button.
Fill in the basic details such as Field Name, Type, and much more. Lastly, save it by triggering the Save button. The field option will reflect in your document.
Odoo always gives the best add-on features to its customers to reduce the time and communication barrier. Odoo sign is one of the best methods to get the approval and signature of the documents without wasting much time on sending follow-up emails by tracking the documents.
At Bista Solutionswe help our clients by implementing odoo ERP for their businesses. To get a demo contact us.
Are you still entering all your transactions manually on an excel file? It’s time to migrate to odoo, and also understand the importance of odoo invoicing and how it helps to automate Invoices.
When it comes to simplifying your invoicing processes, Odoo ERPis the answer to all your questions. With its user-friendly application. You can create invoices from sales orders, and delivery orders or base them on time and material. Odoo invoicing module is scalable & also customizable.
By directly linking your bank accounts, you can easily track your payments, create professional invoices and manage your bills effortlessly.
Company Configuration in Odoo
In order to set up your company account and commence your invoicing process, go to your Odoo and click on settings.
On clicking on settings, it will redirect you to the basic settings page. Where on the top menu trigger Users & Companies > Companies. Here you can view all the companies which have been set up and you can configure a new company by clicking the CREATE button on the top.
It will open a form view where you can add your Company Name and update the required details under the General Information section. The details added reflect in customer invoice. Lastly, save the record by clicking the SAVE button on the top in Odoo invoicing section.
Odoo Document Template
After setting up your company details. Now you will require a template for your invoice document for that just click General Settings on the top which will redirect you to the Settings page. In which under Business Documents section you have Document Template, just click Change Document Template.
On clicking the Change document Template button. The predefined template image will pop up from which you can choose and open the document template layout for your document and save it by clicking the Save button on the bottom.
Payment Method Setup
Odoo ERP has made the payment process and invoicing easy. To allow your customers to pay online all you have to do is just go to Configuration > Settings and Under Customer Payments enable Invoice Online Payment.
To configure an online payment method for your invoice. Just trigger Configuration > Payment Acquirers, it will display the list of acquirers available and you can configure any of them until now and activate it.
To activate it just trigger the specific payment acquirer which will display the detailed description of that acquirer. On the top, you can view the smart Publish tab, by triggering that you can publish it. Once you do that smart button will be updated to Published now by triggering that Published button. You can unpublish that payment acquirer in Odoo Invoicing.
In the screenshot above you can view the Credentials section under that you can set the password for the selected payment acquirer.
In the Messages section, you can update messages for the customer in each schema.
If some error occurred during the transaction you can add a message to be displayed in the Error Message textbox.
If the transaction has been canceled the message related to that can be displayed in the Cancel Message textbox.
Message after the successful transaction can be displayed in the Done Message textbox.
The status of the order before validation can be displayed in the Pending Message textbox.
You can even add the acknowledgment message for the customer in the Thanks Message textbox.
You can even include your bank details in the message so that if the customer wants to Wire Transfer the capital it will be convenient for them.
Payment Configuration
Then you have Configuration section. Where you can set up a basic configuration for the payment acquirer. Such as you can define the Payment Journal, and enable options as per your preference to Save Cards. You can enable Specific Countries and define those countries if the acquirer is limited to certain countries. Add Supported Payment Icons also select the Payment Flow i.e. if the payment should be redirected to the acquirer’s website or should be processed from Odoo.
Invoicing the Customer
To start invoicing your customer you can go to Customers > Invoices, here you can view the list of invoices which was early generated. To create a new invoice click on the CREATE button on the top of the odoo screen.
Once you trigger CREATE, it will open the form view where you can update your invoice details of the product.
Once that is done you can preview it by clicking the PREVIEW button on the top. It will open the layout of the customer portal for us to review before sending it to the customer. Where customers can either download or print the invoice by triggering the Download and also Print button. Below is the screen for the same.
Now, going back to the database, your invoice in the draft state of odoo invoicing, you can validate it by clicking the Validate button.
Once the Odoo invoice is validated, it will be transitioned from DRAFT to OPEN state allowing customers to go ahead with payment. Now we can again preview it by clicking the PREVIEW button.
Now once you preview it after validating you can view the Pay Now button as been updated providing the customer an option to pay online.
If the customer did not opt for online payment and did the cash payment you can register that payment from the database by triggering the REGISTER PAYMENT method.
Once the payment is validated your invoice will be set to the Paid stage. Odoo Invoicing is best module ever
Post payment you can view the info icon updated in the form view below Total amount, triggering that will provide you the details of the payment done by the customer.
After payment validation, if there is any issue with the transaction or a product. If you want to refund the amount to the customer, you can do that with a credit note. Just trigger the ADD CREDIT NOTE button.
It will open a wizard where you can enable the Credit Method as per your preference, add the refund Reason and click ADD CREDIT NOTE.
After adding Credit Note, you can validate, and lastly, once the amount is refunded to the customer you can register the payment.
In Odoo Invoicing transactions synchronizes every hour followed by accelerating reconciliation. Odoo’s smart reconciliation tool saves your productive time.
You can instantly generate Odoo invoices and also send them via email in just a few clicks. On successful payment, it instantly reflects on your screen.
You can print checks to pay the vendors in batches or can use the payment integration protocol. With interactive dynamic reporting features, from legal statements to execution summaries everything is efficient and well synchronized.
You can navigate all your company’s data with Odoo’s BI feature. Therefore makes Odoo Invoicing easily manageable to all the custom setups.
Odoo ERP is the best ERP in Industry
Odoo ERP is one of the best open source ERP solutions, it has grown tremendously over several years. It is easy to manage with such broad-level customization available within it. Odoo ERP is a Scalable and Robust enterprise application. You can customize every module/app of it as per your requirement and also define the criteria with very less effort. The idea of Odoo ERP is to automate the workflow of every business by giving them the platform with 10000+ apps with each app scalable and robust. Odoo ERP is 100% open source, Flexible and also fully integrated, Cost-effective powerful yet simple, and so much better faster.
At Bista Solutions our Job is to understand your business & provide the best solution. We are the best Odoo implementation partner in North America. We have 350+ Odoo implementations across several industries.
Odoo Subscription app has made recurring billing also subscriber management easy. Not only can your team focus on selling great services, but the app’s features are also simple and the settings are customizable – which allows for automated management (i.e. clear contracts, automated invoices, etc.) – alleviating any stress you may normally experience without this implementation.
The Odoo subscription is easy to use. Odoo subscription app has an easy & also quick sign-up process. The Portal is very user-friendly.
Beyond all its benefits, this app allows your business to save time on routine tasks and instead focus on growing revenue – which translates to a more efficient sales force. Furthermore, the Odoo Subscription app has excellent analysis tools in order to optimize your business (i.e. sales performance, built-in revenue analytics, future business projections, etc.).
Let’s dive deeper into the Odoo Subscription app: what it is also how it works.
Odoo Subscription Template
Upon opening the Odoo Subscription app, the first thing you will notice is the pipeline of your subscriptions.
To access the Subscription template: go to the top menu, click on Configuration, and also select Subscription Template
In Odoo Subscription Template, you are going to define on which basis you are going to charge your customer. You can create a new Subscription Template by triggering the Create button on the top.
On creating a new subscription template a new form view opens (as seen in the screenshot below). Here you will simply have to fill in the basic details asked of you. How you fill out the information will depend on your organization and its details.
We are explaining the meaning behind each term used in Odoo subscription.
Invoice period: Here you can specify the duration for which your invoice should be generated.
Duration: This translates to the length of time. In this instance, it is categorized into two options – Forever and Fixed.
Forever Option: This implies that there won’t be any end date for your subscription.
Fixed Option: This implies that there is an end date for your subscription. On passing the subscription date, it automatically ends.
Payment Mode: Here you can define how you want your invoice to be issued. There are many options provided, such as; Manual, Draft Invoice, Invoice, Invoice & Try to Charge, as well as Invoice Only on Successful Payment.
Customer Portal: Under this you have the following options:
Closable by Customer – this gives your customers the right to close their subscription whenever they want.
Group of Subscription– this allows you tag a specific group (which you can create) pertaining to this template.
Journal– this can help you set-up journal entries for accounting purposes where all the entries of the template will be invoiced in the specified journal.
Deferred Revenue Type: This allows you to set the asset category for your subscription inside Odoo subscription app.
Once all the fields have been filled out, you can save the subscription template by clicking on the Save button on the top.
Now, let’s proceed. Go to the top menu and click on Subscription, and select Subscription Products from the drop-down menu (as seen in the screenshot below).
In the Subscription Product, you will be able to see all the products you are currently selling to your customer on display. You can create your own Subscription Product by triggering the Create button
On creating a Subscription Product, you require to fill out all the basic details requested of you. Then click on the Subscription section under the Sales tab, where you will find Subscription Product – this has to be enabled so that whenever you confirm the sales order with the pertaining product, a subscription is automatically created.
An Odoo subscription Template is where you can select the template according to your organization’s details/preferences. In this instance, we have selected the template which we have created – as seen in the screenshot above.
Again – once you fill out all the details, you can save it by clicking on the Save button at the top.
Now, click on Configuration at the top and select Subscription Stages. This is where you can configure the stages for your subscription so it becomes easy for you to determine the state of your subscription.
Next, click on Configuration at the top and select Alert. Here you will be able to create alerts for your subscriptions. (in case there is churring of accounts or a modification in billing).
Next, click on Configuration at the top and select Close Reasons. In this section, you can keep track of the reason behind your subscription ending. And why you may be losing your customers.
If you click on Configuration and select Revenue Types, you can configure your deferred revenue types. This is required if you are selling your subscription for an annual service or membership – and especially, if you want to follow GAAP compliance.
Deferred Revenue refers to the revenue that has not yet been earned.
By clicking on Configuration and then selecting Activity Types, you can set-up the activities (i.e. Email, Call, Meeting, Reminders, etc.) which you may need in order to further communicate with your customers.
Subscription through Sales Order
To create a subscription through a Sales order, you need to go to the Sales Management app and make a new quotation by clicking on the CREATE button. For more details about Odoo Sales Management, please refer to our step by step guide on Odoo Sales Management App
In the orderline, you can add your subscription products and save your Quotation.
By triggering SEND BY EMAIL, you can send that quotation to your customer via email.
Once the customer has accepted the quotation, you can go ahead and trigger the CONFIRM button and covert the RFQ into the Sales Order.
Once you Confirm the sales order, you can see the smart tab where Subscriptions has been updated in the form view. This is because the Sale Order contains Subscription products and it links the sales order with the subscription.
On clicking the subscription smart tab, it will redirect to the details of your subscription. Since it is a yearly subscription you can see the Start Date and the Date of Next Invoice that has a duration of a year. Then you have the UPSELL and CLOSE option at the top.
Upselling Your Odoo Subscription
If your customer demands an additional feature or product with the subscription, you can upsell your Subscription by clicking on the UPSELL button; which will open a wizard.
In the wizard you can add the upselling products and click CREATE & VIEW QUOTATION which will create another sales order for the upselling product. You can then send it to the client for approval.
If you select ADD IN SUBSCRIPTION, it will add the upselling product in your current subscription and directly generate an invoice for the customer.
Closing Your Subscription
Again going back to the subscription, you have the CLOSE option at the top.
If you wish to close the subscription you can click on the CLOSE button which will open a wizard. Once it’s open, you can view all the ‘closing reasons’ which you have configured. You can even configure a new reason at the same time by clicking on the Create and also Edit option. Submit the reason by clicking on the SUBMIT button inside the Odoo Subscription template.
Renew
In your subscription, there is a To Renew field. Enabling this field will present you with an option to CREATE A RENEWAL QUOTATION. So when the subscription period is over. By clicking on that option, you can create a renewal quotation for your customer.
Now you can generate an invoice for your subscription by clicking on the CREATE INVOICE button.
For more detailed information of Invoice flow in the Sales Order, refer to our guide on the Sales Management App.
Contacts
When you open your customer’s contact information in the Contact module, you will see that your customer’s contact is linked with your subscription.
Reporting
You can analyze the subscription or business process efficiency with reporting.
Salesperson Dashboard
On the top menu click on Reporting and select the Salesperson Dashboard option from the drop-down menu. This is where you can view all the sales you have done at different times.
Revenue KPI
If you click on Reporting and thus select Revenue KPI from the drop-down, you’ll see that this option has the revenue KPI dashboard. Here you can access all the revenue related to your Subscription.
Subscription Reporting
By selecting Reporting and then clicking on Subscription from the drop-down, you can view the on-goings of your subscription. You can also group and filter by different parameters, and also use different Measures, and views.
Retention Analysis
If you click on Reporting and select Retention from the drop you, you will gain access to all the subscriptions that were open in a specified time period.
While there are several benefits to the Odoo Subscription App. There are also some instances when the default Odoo Subscription App or module does not fulfill the requirements of a company. In such situations, an experienced Odoo implementation partner like Bista Solutions can customize the modules as per your business requirement.
Bista Solutions is an Odoo Gold Partneracross North America and has been nominated for Odoo Best Partner in 2017 and 2021 – and has won the award in 2015, 2016 and 2018. Rest assured the team of experienced and skilled developers know what they are doing. And will be able to help you. If you need assistance or customization for your Odoo Apps you can schedule a demo with us using this Contact Form or by emailing us at sales@bistasolutions.com.
Odoo POS ( Odoo Point Of Sale ) is an all-in-one perfect solution when it comes to handling your Shops, Restaurants, Accounting, and Sales. It is a comprehensible, user-friendly interface & is used in iPods, tablets, or laptops. Let’s find out how to use the Odoo Point of Sale (POS) system.
Overview of Inventory for POS
To commence with Odoo Point of Sale (POS) let’s first set up our Inventory. Make sure you have installed the Odoo Inventory module
Once you click on inventory you will be redirected to the Inventory dashboard where you have Receipts (When you purchase, the incoming orders coming to your warehouse will be reflected),Internal Transfers (If you have multi warehouse at multiple locations), Delivery Order (You will see all the orders which have to be delivered. POS delivery is fully automated) and we have PoS Orders (where all the Point of Sale order will be tracked) .
To Configure a product drill up to the top menu items in Inventory, and go to Master Data > Products which will redirect you to the products page where you can create your own product by triggering the Create button on the top.
Now you can fill in the details of the product as per your preferences and under the General Information tab you can fill in the basic details such as the sales price of the product, it’s making cost and much more.
Then if you switch to the Sales tab you have various options under Point Of Sale section which is explained below.
Available in POS: You have to enable it for your product to appear in Point Of Sale.
Category: It is used in Point Of Sale to categorize your product.
To Weigh With Scale: Here you can integrate your POS with the scale it comes in handy if you are pricing your product with a unit of measures such as gram, kilogram etc.
When you trigger the POS module you will be redirected to the POS Dashboard where you can view all the POS session going on in your Odoo system.
You have the Orders menu under that you have Orders, Sessions and Customers. Under Orders, you can access all the POS orders which were placed.
Under Sessions, you can track the active duration of your shop or restaurant.
Under Customers, you have all your customers with their information.
You have the Product menu under that you have Products, Product Variants and Loyalty Programs.
Under Products, you can access all the products which you have configured.
In Product Variants, you can access or add different variants of your products.
In Loyalty programs, you can set different loyalty rules and rewards for your loyal customers.
You can create your own loyalty program by triggering the CREATE button as you can have multiple loyalty programs running at a time. You can grant points to the customer based on Points per currency, Points per order, Points per product, and Points Rounding (here you can round up the points to the nearest range)
Set the rules for specific products or categories. The loyalty for that specific product or category will differ and the defined rules will deflect.
The loyalty points can be redeemed through the Rewards section. Here you can grant your customer discounts or gifts for loyalty points.
There is also an option of Pricelist which needs to be enabled from Settings. Pricelist is something which you can attach to every single contact and can define your own pricing scheme. For more detailed information on pricelist click here.
Each POS session in the dashboard has its own configured settings. Just click on the icon in the corner and trigger Settings option which will redirect you to the settings page.
In the IoT Box section, you can enable IoT box if you have hardware devices to connect such as Printer, Scanner and much more. By enabling Barcode Scanner you can set barcodes to scan products.
In the Pricing section, you can enable Pricelist and set a shop or product specific Pricelist. By enabling the Loyalty Program, you can set the loyalty program which you have configured for your shop.
Configure your payment method in the Payments section.
Inside the Bills & Receipts section, you enable Header & Footer and customize your bill by adding custom messages. With Invoicing you can print an invoice for your customer.
In the Inventory section, you have Stock Location where you can specify the location of stock used for the inventory.
If your store has a franchise, it will have its own inventory. In such cases, multi-warehouse comes into the picture. You can duplicate your enabled options and just update the new inventory for your franchise. The stocks of your franchise shop will be deducted from your updated Stock Location.
You can see the session for your 2nd shop also in the POS dashboard.
We are all set to start our POS session, you can do that by triggering New Session in POS. This will open your POS interface, where you will have different categories which you have specified for your products. You also have the Wifi button on the top. Even if you are offline your POS system won’t stop and when you are back online you will be able to sync all the information. Your internet connection won’t interrupt the POS session and also there won’t be any data loss.
By triggering the Customer button, you can set your Customer. Let’s take an example of Azure Interior who wants to purchase Acoustic Bloc Screens.
20 points granted to him on the basis of the rule you defined in your loyalty program. If he wants to redeem the points, you can click on Rewards below to see if he is eligible for the rewards which you have defined earlier in your loyalty program.
80 points rcieved and redeemed is a reward. See above image.
Once all the above steps are completed, you can go for Payment by triggering the Payment button. You have to add the Tendered amount the customer paid and validate the payment by triggering the Validate button.
Once you Validate the payment, it will generate a receipt and you can see your customized header and footer. You can even print the receipt if you have a printer configuration. Lastly, you can trigger the Next Order optionand continue with your POS processing.
In the orders section, you can view the order we just processed.
The above information is applicable if you want to use the Odoo Point of Sale system for a shop. If you own a restaurant and want a POS configuration for your restaurant, you can do that by configuring a new session by triggering the settings option which will redirect you to the setting page. Here you have to enable Is a Bar/Restaurant option. You can enable many different features such as Table Management, Orderline Notes, Bill Printing, Bill Splitting, Tips and much more.
When you trigger a New Session button, it will open the restaurant interface. The small edit icon on the top right corner by triggering that you can customize the interface i.e. colors, text, and much more as per your preference.
You have to just select the table and place your order. You can see smart buttons such as Notes, Transfer, Guests, Bill, Split and Order.
With Notes, you can add a note such as instructions for kitchen staff.
You have the Transfer option if you want to transfer your order to some other table. See the below image.
Guests option allows you tospecify the number of people accompanying the guest.
You can process the bill by triggering the Bill option
By using the Split option you can split your bill and select the item for which a specific individual has to pay.
If your system is integrated with the printer then by triggering the Order button you can directly send your order to the kitchen printer.
Lastly, you can process the payment also the customer can even give a tip by triggering the Tip button. Once all the steps are completed, you can validate the payment by clicking the Validate button.
This guide helps you to understand the default POS software offered by Odoo. Default Odoo POS is customizable & can be called as per requirement.
for your business, you can contact an experienced Odoo implementation partner like Bista Solutions who can customize the modules as per your business requirement. If you need any assistance or customization for your Odoo Apps you can schedule a demo with us using this Contact Form or email us at sales@bistasolutions.com
Odoo 13 is one of the most anticipated version of Odoo which is expected to be officially unveiled at the Odoo Experience 2019 scheduled in October later this year. The upcoming version is under development and is expected to introduce several new features that will enhance the functionality of the application.
Last year, Odoo released version 12, Odoo v12 which had a slew of new features Some of the biggest changes in Version 12 came to the Accounting module. Other large changes came with a newly introduced Document Management module, an IoT (internet of things) module and multi-website management.
What are the major changes expected in Odoo 13? What modules are added and what modules are moved from enterprise to community and vice versa? Let’s find out from the expected features of Odoo 13 that are made public and some speculation from the Odoo Community.
Prima facie, few modules from the Odoo 12 Enterprise edition will now be available in the Odoo 13 Community version. These include modules such as Sale Coupon and Promotion Program, Website Form Builder. However, HR payroll is moved from Community edition to Enterprise.
Let’s look at the new features expected in Odoo 13 below:
Odoo 13 new Features:
New Apps
New App: Field Service Management
A new module called HR Skills is included for managing employee skills.
MRP
Subcontracting in MRP
This functionality now allows you to directly enter order details of your vendor in the system.
Work Orders
More stretchability with your components’ consumption., You can Define on your BoM if you want to consume more or fewer components than planned (works for Work Orders and Manufacturing Orders).
Display a timer on your work orders.
POS
Login to POS UI as Employee, instead of User
eCommerce
Display product videos in eCommerce
HR, Payroll & Employee
Payroll Planning
HR: Automatically detect employees presence based on activity
Leaves: Set up an Out Of Office message on your leaves
Invoicing
Invoicing a sales order is now smoother; better phrasing, option to deduct down payments only appears if needed.
Warning on the invoice.
Product
Three new fields added i.e.Can be Expensed, Is a Landed Cost and Sell on eBay.
Delivery & Shipping
Print return shipping labels with FedEx.
Generate and print return labels for all carriers as well as additional improvements regarding delivery orders on the portal.
Signature
New signature widget (binary field). Add signatures anywhere with Odoo Studio. Request signed confirmations in any process: on purchase orders, delivery receipts, etc.
Online Survey
Manage online certifications with Odoo Survey. Test deadline, multiple attempts, on-screen timer, passing score, send and print certificates.
New answer type ‘date time’ in Odoo Survey.
After sales services
Manage refunds, returns, coupons, and repairs directly from your helpdesk tickets. Integrate your support teams with sales, accounting, project, and warehouse departments.
View Improvements
Mass editing in the list view, group by enhancement like new button in the group.
New Search Panel is introduced in the Kanban View.
Renames
Leave is renamed to Time Off.
Delivery Method’ is renamed to ‘Shipping Method’.
Features moved from Odoo Enterprise → Community
Website form builder
Sales Coupon and Promotion module
Feature moved from Community →Enterprise
HR Payroll
HTML & Javascript:
Chartjs will be available in Odoo v13. This will open up a wide range of possibilities for building statistics and more advanced portals out of the box.
Odoo 13 will be running on jQuery 3.
HTML editor support now as Checklists.
These are just the initial list of new features expected in Odoo 13. We will come up with a detailed guide on the list of new features in Odoo 13 as soon as it is officially unveiled.
The Odoo Sales Management module is one of the star applications that Odoo provides. With Sales Management in Odoo, you can control your entire Sales department on a single screen. Firstly, you can customize it according to your project requirements. It also allows you to filter Sales Orders for different criteria due to being interlinked with your emails. Invoices can be sent directly from the system which helps you follow up easily. And maintain the traceability of your customer giving rest to the hectic paperwork.
Converting Opportunity into Quotation from CRM pipeline
You can directly send an RFQ(Request for Quotation) to the client from your pipeline itself. For that, you just have to open an opportunity from the CRM pipeline. Once you open it you will see many options in the top left corner such as New Quotation, Mark Won, and Mark Lost.
Odoo Sales Flow
Creation of Quotation
Now when you trigger New Quotation it will take you to the customer quotation form where you can complete filling your quotation. It starts with the Customer field which will be pre-filled since it was attached to an opportunity.
Odoo Quotation Template
Then you have the Quotation template with which you can send a complete quotation in no time. To enable the Quotation template, you will have to go to Menu Items and under the Configuration tab go to Settings which will take you to the Setting page. Then drill down to Quotations & Orders in Sales section under that tick on the Quotation template and save it.
To create your quotation template go to the menu items and under the Configuration tab, trigger the Quotation Template. After triggering that, you will be redirected to the Quotation Template list view where you can create your template by triggering the Create button. A Quotation template form will be displayed, where you can define the number of days that the template is valid also then add items under the Lines section as per your requirement. In the Optional Products, you have an option to suggest related items to the customers by triggering Add a line. In the Confirmation section, you can select the various options like Online signature where you can sign the quotation online and also confirm the order automatically; Online Payment where the customer can make an online payment and confirm the order automatically; Confirmation Mail where you can select the medium as per your preference and the email template will be sent on confirmation. If you leave that section blank nothing will be send. Once you finish the above steps you can save it and your Quotation template is now created.
Coming back to your RFQ, you can select the specific Quotation template as per your preference which will automatically fill in the products in the Orderline that you have specified in that template. If you want to categorize your Orderline by section you can do that by triggering Add a Section option. If you want to add a note after every or specific product in Orderline you can do that by triggering Add a note.
Odoo Terms & Conditions
You can also add your standard terms and conditions in your Sale Orders. To do that, you have to drill up to the Sales menu items and under the Configuration tab go to Settings which will take you to the Setting page. Then drill down to the Quotations & Orders section, under that tick on the Default Terms & Conditions, and just below it you will see the text box where you can fill in the terms and conditions and saveit. Now, whenever you create the RFQ, the terms and conditions which you added will reflect in your Orderline.
Discount Feature in Odoo Sales
You can also enable the Discount feature in your Quotations. For that, go to the Menu items and under the Configuration tab, go to Settings which will redirect you to the Settings page and drill down to the Pricing section, tick Discounts and Save it to allow manual discounts on your order lines.
Also, you can add products manually in the Orderline as per your requirement by triggering Add a product option below the Orderline. Then you have to Configure a product option where you can configure the product on the fly, Validity fieldwhere you can define how long is that Quotation valid, Payment terms where due dates for the payment of invoices are defined and Delivery Method where you can invoice the shipping based on its medium such as Post, DHL, etc.
Pricing Schemes in Odoo Sales
Basic Pricing:
Odoo Sales Module provides various pricing schemes which you can apply to your Sale Orders, such as Basic pricing, and Pricelist. If you are working on a quotation and want to provide a specific price to a particular customer, you can on the fly change the unit price from Orderline in that quotation but it won’t change the original sale price of the product that you have defined during the product creation.
Odoo Sales Module also accepts negative figures as the unit price. Because there is a possibility that you want to provide a discount on total of the products in Orderline. To do that, add a new item in the Orderline and assign a negative unit price. Since it is a negative value it will deduct from the total amount. For similar cases, Odoo Sales Management Module allows you to enter the negative figure.
Pricelist:
You also have the option to use Odoo Pricelist in Odoo Sales. You can easily manage the product pricing according to the company’s needs.
Multiple Pricing:
One instance of a pricelist is Multiple Pricing. That is the least complex pricing feature and comes in handy mostly for Volume Pricing. That means you can sell the products in different quantities and depending upon the quantity, you get a different price. Which you can apply seasonally or to a single customer.
To enable this feature, you have to again go to configuration settings in Sales and under the pricing section tick on Multiple Sales price per product.
For better understanding. Let’s consider a business case where you have a hardware company. That sells a single desktop keyboard for $ 200. The pricing is such that if the client purchases more than 5 quantities they will get it for $150. If they purchase more than 10 quantities they will get it for $100.
Now to implement this pricelist you have to go to the Products setting and select the product which in our case is a keyboard. Once you open it, you can see under General Information, the sales price which is $200.
Now if you switch to the Sales tab, you can see the whole Pricing section where you can do multiple pricelists for the product, you can even apply it seasonally by defining the start date and end date.
The above pricing scheme indicates that on purchasing 5 Keyboards customer will get it at the original sales price. If they purchase more than 5 Keyboards they will get them at $150. If they are purchasing more than 10 Keyboards they will get them at the discountable price of $100.
Now when you create a new Sale Order in Odoo Sales, select the default pricelist. Odoo pricelist named public pricelist. Now, when you add the keyboard and It’s in the Orderline it will reflect the pricelist which was defined.
You can also add the pricelist for your specific customer. Let’s consider if your customer is a retailer and you sell them the Keyboard at the retail price of $70. For configuring this type of pricelist, go back to product configuration. And open the product which in this case is the keyboard. Once you open it, you can see under General Information the sales price is still $200. To define a specific price for a specific customer like a retailer, you need to switch to the sales tab. Under the pricing section, select add an item, create a new pricelist for example Reseller Pricing and set the price to $70, and Save it.
Now you go to Contacts and select the contact of your Retailer. Let’s take the example of Kit Distributor which is a retailer. Now once you open that contact, you will see the Sales & Purchases Tab. If you go there you will see the Sale Pricelist field which contains the default public pricelist, To apply the pricelist we created for a retailer in the above example, change it to the Reseller Pricelist and save it.
Now when you create a new Sale Order in Odoo Sales Module, select the customer which is in our case Kit Distributor, and change its pricelist to the Reseller Pricelist. Now, when you add the product keyboard in the Orderline it will reflect the retail price($70) which was defined. So here we assigned a different unit price for the specific product to the specific customer. And that unit price is only applicable to that customer. For other customers, they will have to pay the original sales price.
Prices Computed from Formulas:
Another way to set up your price list in the Odoo Sales Management module is by computing formulas. Unlike the previous pricelist, it can be applied based on the product, its category, & variants linked to it, etc. To enable this feature you have to go to configuration settings in sales and under the pricing section tick on Multiple Sales price per product and select Prices Computed from Formulas.
Now under the product category, select pricelist which will redirect you to the pages which shows all the pricelist that are configured. When you can create a new pricelist, you will be redirected to the pricelist form view wherein under the Pricelist Items section you can add a pricelist by triggering add a line. This will open a wizard where you can specify how you want your price list to reflect, you can apply on Global i.e. all the Products, Product Category i.e.the product with a specific category, Product i.e some specific product, and Product Variant product based on some variant.
Now under price computation, you can compute a price by Fixed Price, Percentage(how much percent discount you want to give to the user), and Formula (where you can define a formula that you want to implement that also allows you to round off your price.)
On filling all the details in & saving, you can reflect it in your sales order on creating one. You just have to change the pricelist section in the Sale Order with the pricelist you just created. Then it will automatically show on the Orderline product price.
Sending Quotation by Email
Once you’re done filling the quotations with the proper details and pricelists you can send it to your customer by triggering send by email button. An automatic email will be prepared based on your template with content and pdf attachments. You can also add your content if required and can view the attached pdf. The email can be sent by clicking on the SEND button.
If you want to preview the quotation before sending it to the customer you can do it by triggering the print action on the top of the quotation, which will provide you with a printable PDF version of your quotation.
Modifying Quotation Layout:
If you want to change the layout of your quotation, you can do it from the Menu items. Under the Configuration tab, go to Settings →General Settings where you will find the Business Document section; where you have the option Change Document Template which will open many predefined layouts where you can choose according to your preference.
Once the customer has accepted the quotation you can go ahead and trigger the confirm button and convert the RFQ into the Sale Order.
Delivery Validation:
Odoo Sales Management & inventory module is liked together. On confirming, the order in Odoo Sales, a smart tab of Delivery will upgrade in the form view. Now if you click on that Delivery tab, it will redirect you to Inventory. In inventory, all the details will populate based on your Sale Order. In the top right corner, every stage is defined. The stage in which your outgoing order is currently will be highlighted.
To Confirm your outgoing order all you have to do is click on the green Validate button on the top left of the screen. Once you validate and apply it, your outgoing order will be upgraded to the Done stage.
Invoice Validation:
Once the order is delivered, you can return to the Sale order and create the invoice by triggering create invoice button. There are multiple options available to create invoices such as invoiceable lines, invoiceable lines(deduct down payments), Down payment (percentage), and Down payment (fixed amount). Select the invoice option you prefer and trigger the create and view invoices button which will take you to the invoice page. The invoice page has different stages such as DRAFT, OPEN, and PAID.
By default, the Invoice would be in the draft stage. To move it to the Open stage you will have to Validate the invoice by clicking on the Validate button. To move it to the Paid stage, you will have to first trigger the register payment button which will open the register payment wizard where all the details will be pre-populated and all you need to do is define the payment method Ultimately click on the validate button which will move the invoice from the Open stage to the Paid stage which means your order has been delivered and the payment is received.
Tracking the History:
All the interactions done for this quotation can be track in chatter. Messages sent to or received from the customer are trackable below the quotation. All the communication history is preserve and available when the quotation is convert to the sales order.
Manually creating the Sale Order:
You can manually create an RFQ in the Odoo Sales Management module. If you do not want to create the same from the Odoo CRM pipeline. You can trigger the Odoo Sales App wherein you will redirect to the list view of the Quotation page. Here you have the option to create a button on the top left corner. If you trigger that it will again take you to the customer quotation form. Now fill in the details and carry on with the process as discussed earlier.
You can easily add a new customer and new product in the Odoo Sales Management module. Just click on the Customer drop-down menu. click on Create and edit option which will open a new wizard. You can record customer information such as the website, address, contact number, and much more.
You can manually add the products in the Orderline by triggering add a new product under Order Line., To configure the product on the fly click on Configure a product in the dropdown list of the Product field.
With the Odoo Sales Management module, closing opportunities has become effortless & easy. It permits you to select predefined quotations for product line offers. You will find the information about the product in the quotation itself. Which helps you adapt the offer to fit the client’s needs.
If you find an upselling opportunity with the Odoo Sales module you can reorganize the offer by adding more products. When the offer is ready, the customer can sign the deal online. You can have access to or scrutinize your past interaction and transaction with your clients at any moment.
With the Odoo Sales report, you can have insights into your sales activity, revenue by salesperson, and revenue by product category. You can categorize your product by month or week. On completing report & finalizing format. You can add it to your dashboards in just a few clicks.
Integrate Odoo sales Management module with the major shipping services like DHL, FedEx, Ups, and much more
The Odoo Sales module increases sales efficiency with an interactive dashboard, amazing quotations, and even more.
Odoo Sales flow provides a smooth interface. You can also add references and quotes that can help in closing opportunities easily.
There are several instances when the default Odoo Sales Management app or module does not fulfill the requirements of a company. In such situations, an experienced Odoo implementation partner like Bista Solutionscan customize the modules as per your business requirement.
If you need any assistance or customization for your Odoo Apps you can schedule a demo with us using this Contact Form or by emailing us at sales@bistasolutions.com
Odoo CRM is more than a tool that helps with customer relationship management. Beyond organizing your sales activities, Odoo CRM can help organize your sales activities. This includes tracking leads, closing opportunities, and gaining accurate forecasts. You can also keep opportunities organized with the pipeline, and manage your day-to-day activities with meetings and next activities.
Organize The Pipeline
→ Get Organized by Planning Activities
When you plan activities you minimize the risk of uncertainties, as you provide clear directions for the course of your next action. In addition to that, you do not leave space for wasteful activities and reduce the chance of overlapping actions between team members.
Scheduled Activities
Access and manage your activities wherever you are in Odoo by the Activities menu.
Plan Activities
Activities can be planned and managed from the chatter by clicking on Schedule activity, or through Kanban views.
Set Your Activity Types
A number of activity types are available by default in Odoo (call, email, meeting, etc.). However, you can set new ones by going to Settings ‣ Activity types.
Recommend Next Activities
Odoo helps you to plan a flow of activities by allowing you to set Recommended Next Activities.
→ Manage Lost Opportunities
While working with your opportunities, you might lose some of them. You will want to keep track of the reasons you lost them and also which ways Odoo can help you recover them in the future.
Mark A Lead As Lost
When in your pipeline, select any opportunity you want and you will see a Mark Lost button.
You can then select an existing Lost Reason or create a new one right there.
Manage & Create Lost Reasons
You will find your Lost Reasons under Configuration ‣ Lost Reasons.
You can select & rename any of them as well as create a new one from there.
Retrieve Lost Opportunities
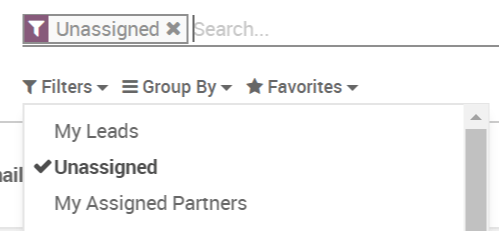
To retrieve lost opportunities and do actions on them (send an email, make a feedback call, etc.), select the Lost filter in the search bar.
You will then see all your lost opportunities.
If you want to refine them further, you can add a filter on the Lost Reason.
For Example, Too Expensive.
Restore Lost Opportunities
From the Kanban view with the filter(s) in place, you can select any opportunity you wish and work on it as usual. You can also restore it by clicking on Archived.
You can also restore items in batch from the Kanban view when they belong to the same stage. Select Restore Records in the column options. You can also archive the same way.
To select specific opportunities, you should switch to the list view.
Then you can select as many or all opportunities and select the actions you want to take.
→ Multiple Sales Teams
Odoo lets you manage several sales teams, departments, or channels, each with its own unique sales processes, using Sales Teams.
Create a New Sales Team
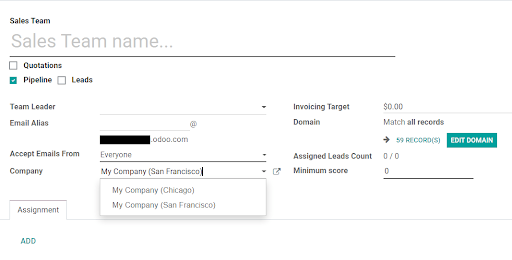
To create a new Sales Team, go to CRM ‣ Sales ‣ Teams then click Create.
On the creation page, set an Email Alias to automatically generate a lead/opportunity for this Sales Team every time a message is sent to that unique email address. You can also choose whether to accept emails from Everyone, Authenticated Partners, or Followers Only.
Set a Domain to assign leads/opportunities to this Sales Team based on specific filters, such as country, language, or campaign. Set an Invoicing Target if this team has specific monthly revenue goals.
Add Members to a Sales Team
To add team members, click Add under the Assignment tab when editing the Sales Team’s configuration page. Select a salesperson from the dropdown menu or create a new salesperson. Set a maximum number of leads that can be assigned to this salesperson in a 30-day period to ensure that they do not overwork.
One person can be added as a team member or Team Leader to multiple Sales Teams, allowing them to access all of the pipelines that they need.
Sales Team Dashboard
To view the Sales Team dashboard, go to CRM ‣ Sales ‣ Teams. Any teams you are a part of will appear as dashboard tiles.
Each tile gives an overview of the Sales Team’s open opportunities, quotations, sales orders, and expected revenue, as well as a bar graph of new opportunities per week and an invoicing progress bar.
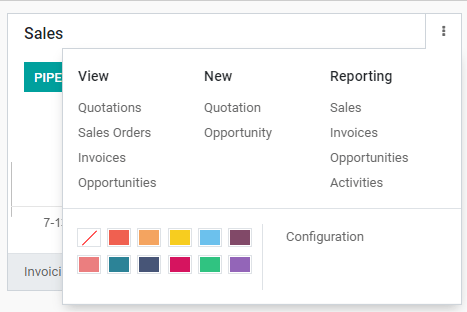
i
Click on the three dots in the corner of a tile to open a navigational menu that lets you quickly view documents or reports, create new quotations or opportunities, pick a color for this team, or access its configuration page.
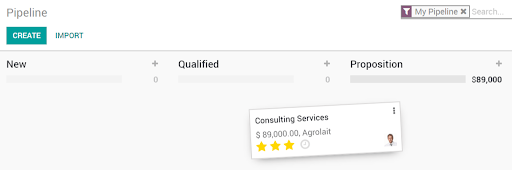
Click on the Pipeline button to go directly to that team’s CRM pipeline.
Acquire Leads
→ Convert Leads into Opportunities
The system can generate leads instead of opportunities, in order to add a qualification step before converting a Lead into an Opportunity and assigning it to the right salespeople.
You can activate this mode from the CRM Settings. It applies to all your sales channels by default. But you can make it specific for specific channels from their configuration form.
Configuration
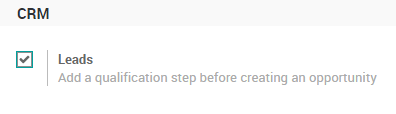
For this feature to work, go to CRM ‣ Configuration ‣ Settings and activate the Leads feature.
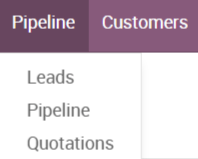
You will now have a new submenu Leads under Leads where they will aggregate.
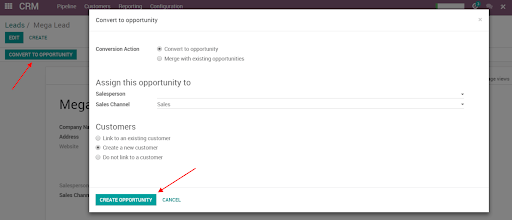
Convert A Lead Into An Opportunity
When you click on a Lead you will have the option to convert it to an opportunity and decide if it should still be assigned to the same channel/person and if you need to create a new customer.
If you already have an opportunity with that customer Odoo will automatically offer you to merge with that opportunity. In the same manner, Odoo will automatically offer you to link to an existing customer if that customer already exists.
Merge Opportunities
Odoo will also automatically propose to merge opportunities if they have the same email address. When merging opportunities, Odoo merges the information into the opportunity which was created first, giving priority to the information present on the first opportunity.
No information is lost: data from the other opportunity is logged in the chatter and the information fields for easy access.
Would you find a duplicate yourself, …you can also merge opportunities or leads even if the system doesn’t propose it.
Here’s how from the list view. Select the opportunities or leads, you want to merge and the action button will appear. Then, you can select merge.
→ Generate Leads / Opportunities
Two key ways to generate new leads or opportunities for your business are through email aliases and website contact forms. Odoo automatically creates leads in your CRM whenever someone sends a message to a Sales Team email alias or fills out a contact form on your website.
Configure Email Aliases
Each Sales Team can use its own unique email alias to generate leads/opportunities. Any email sent to a Sales Team’s email alias will automatically create a lead (if leads are activated in your CRM settings) or an opportunity in the pipeline for that particular team. Configure custom email aliases on the configuration page for each Sales Team by navigating to CRM ‣ Configuration ‣ Sales Teams.
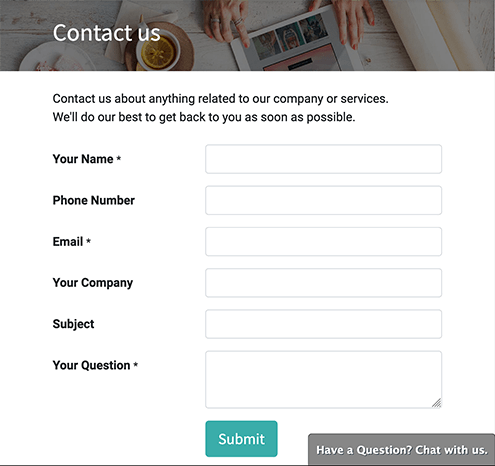
Use Contact Forms on Your Website
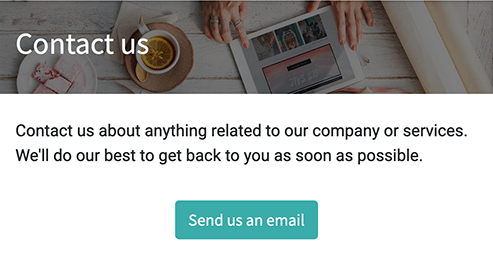
By default, your website’s Contact Us page displays Odoo’s ready-to-use Contact Form. Whenever someone submits this form, a lead or an opportunity is generated in your database.
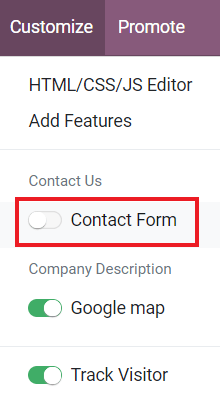
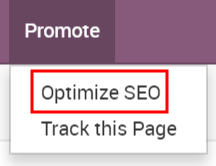
The Contact Form can be activated or deactivated at any time by going to Website ‣ Go to Website ‣ Customize ‣ Contact Form.
When the Form is deactivated, the Contact Us page simply displays a button to email your company directly. Any email sent this way will generate a lead/opportunity.
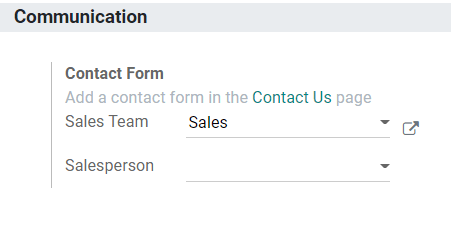
Choose which Sales Team or salesperson is automatically assigned to the leads/opportunities created from the Contact Form by going to Website ‣ Configuration ‣ Settings ‣ Communication.
Customize Contact Forms
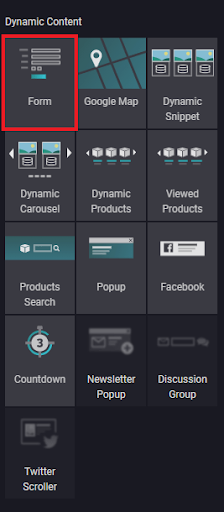
Contact Forms can be customized for the specific information your team needs, using the free Form Builder module. The Form Builder module is installed automatically when a Form element is added to a web page via the Website Builder. It can also be installed manually from the Apps page.
Edit Contact Form Fields
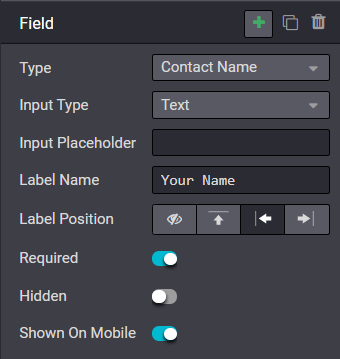
In Edit mode on your website, click on any field to start editing it. The following information can be edited for each field on the Contact Form:
Type: Choose a custom field option or an existing field. Examples include phone, file upload, language, etc.
Input Type: Determine the type of entry customers should input. Available options are text, email, telephone, and URL.
Input Placeholder: Type in an example to guide users on how to input information where formatting is important, such as a phone number or email address.
Label Name: Type in the display name to show users what information is needed from them.
Label Position: Choose the way the label is aligned with the rest of the form. The label can be hidden, above the field, to the far left of the field, or right adjusted and closer to the field.
Required: Toggle this option for information that you absolutely need to be entered.
Hidden: Toggle this option to hide the field without deleting it.
Shown on Mobile: Toggle this option to show the field to users on mobile devices.
By default, when a Form is submitted, it sends you an email with the customer’s inputted information. To have it automatically generate a lead/opportunity instead, edit the Form and select Create an Opportunity as the Action.
→ Send Quotations
When you qualify a lead into an opportunity you will most likely need to send them a quotation. You can directly do this in the CRM App with Odoo.
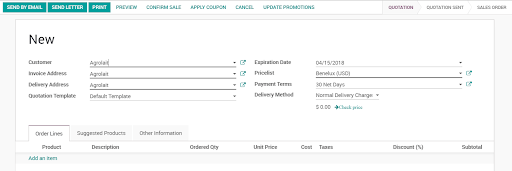
Create A New Quotation
By clicking on any opportunity or lead, you will see a New Quotation button, it will bring you to a new menu where you can manage your quote.
You will find all your quotes for that specific opportunity under the Quotations menu on that page.
Mark Them Won/Lost
Now you will need to mark your opportunity as won or lost to move the process along.
If you mark them as won, they will move to your Won column in your Kanban view. If you however mark them as Lost they will be archived.
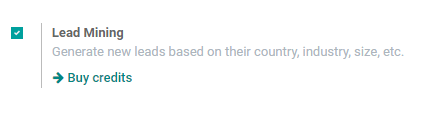
→ Lead Mining
In any business, getting quality leads is essential to keep the business growing. Lead mining allows you to generate leads from scratch directly from your database. Target your leads based on a set of criteria such as the country, the size of the company, the industry your leads are coming from to make them relevant to your business.
Configuration
For this feature to work, go to CRM ‣ Configuration‣ Settings and activate the Lead Mining feature.
Start Generating Leads
You will now have a new button Generate Leads available in your pipeline. You are also able to create lead mining requests from the Configuration ‣ Lead Mining Requests and through Leads ‣ Leads where you have the Generate Leads button.
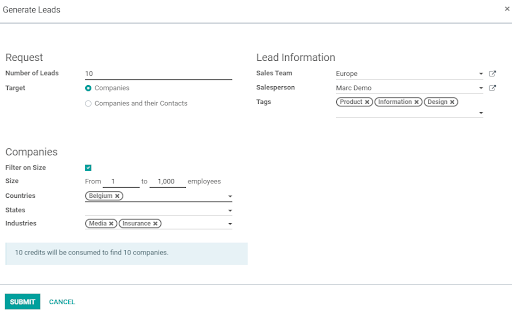
From there, click on the Generate Leads button, a window where you will be able to pick your criteria will pop up.
When choosing to target Companies and their contacts you can choose the contacts you are getting based on Role or Seniority. When getting contact information make sure to be aware of the latest EU regulation, get more information about General Data Protection Regulation on Odoo GDPR.
You can decide to filter the leads you are getting depending on the size (number of employees) of the companies. You can pick the countries your leads are coming from. It is possible to pick multiple countries. You can pick the industries your leads are coming from. It is possible to pick multiple industries.
You can choose the salesperson and the Salesteam the lead will be assigned to. You can also add tags to track your generated leads.
Pricing
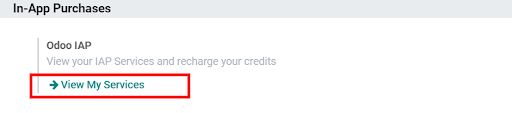
This is an In-App Purchase feature, each generated lead will cost you one credit. If you choose to get contact information each contact will also cost you one additional credit. Here is the pricing for this feature, To buy credits you can either go to CRM ‣ Configuration ‣ Settings ‣ Buy Credits; or go to Settings ‣ Contacts ‣ Odoo IAP ‣ View my Services.
Assign and Track Leads
→ Track Your Prospects Visit
Tracking your website pages will give you much more information about the interests of your website visitors.
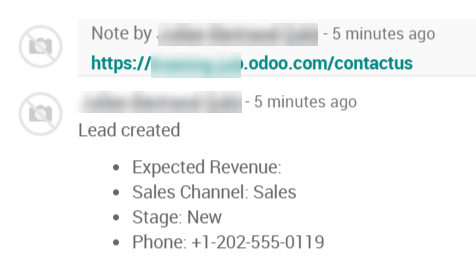
Every tracked page they visit will be recorded on your lead/opportunity if they use the contact form on your website.
Configuration
To use this feature, install the free module Lead Scoring under your Apps page (only available in Odoo Enterprise).
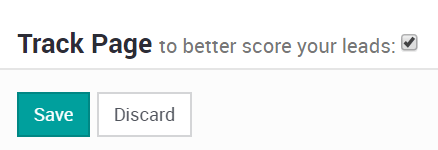
There you will see a Track Page checkbox to track this page.
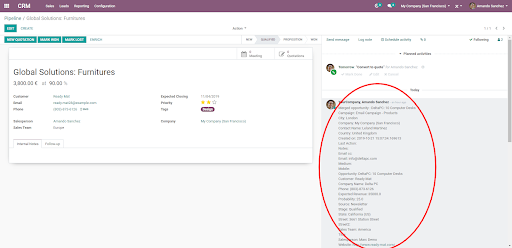
See Visited Pages in Your Leads/Opportunities
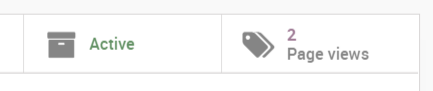
Now each time a lead is created from the contact form it will keep track of the pages visited by that visitor. You have two ways to see those pages, on the top right corner of your lead/opportunity you can see a Page Views button but also further down you will see them in the chatter.
Both will update if the viewer(s) comes back to your website and visits more pages.
The feature will not repeat multiple viewings of the same pages in the chatter.
Your customers will no longer be able to keep any secrets from you!
→ Assign Leads Based on Scoring
Lead Scoring lets you rank and prioritize leads based on selected criteria. A higher score indicates that a lead is more likely to bring value to your company.
For example, if customers from Canada tend to be more likely to purchase your products, you can assign them a higher score than customers from other countries.
Configuration
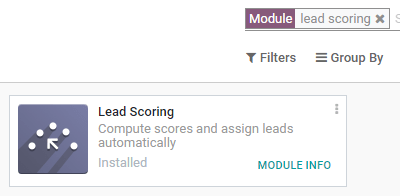
To use scoring, go to Apps, remove the Apps filter, search for Lead Scoring and then install the module.
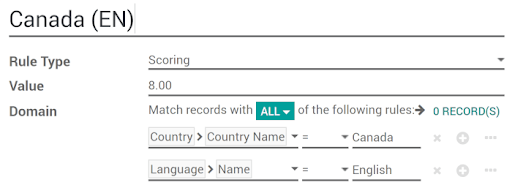
Create Scoring Rules
To manage scoring rules, go to CRM ‣ Leads ‣ Scoring Rules.
Customize your rules to fit the needs of your business, and add as many criteria as you want.
Every hour, Odoo automatically assigns scores to new leads according to your configured rules.
Assign Leads
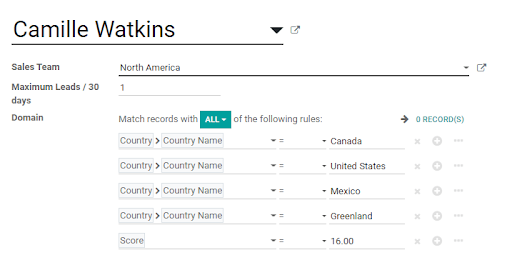
Odoo can also assign leads to specific teams based on configured rules. To configure assignment rules, go to the individual Sales Team’s configuration page via CRM ‣ Leads ‣ Team Assignment or CRM ‣ Configuration ‣ Sales Teams, and apply a specific Domain to each team. The Domain can include lead scores.
Assign leads to specific salespeople using further refined Domains at CRM ‣ Leads ‣ Leads Assignment.
Odoo automatically assigns new leads to teams/salespeople once per day.
Evaluate and Use the Unassigned Leads
Not all leads will fall into your set Domains and get assigned automatically by Odoo.
To view your unassigned leads, go to CRM ‣ Leads ‣ Leads and select the Unassigned filter.
Analyze Performance
→ Check Your Win/Loss Ratio
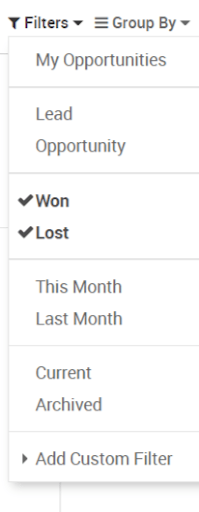
To see how well you are doing with your pipeline, take a look at the Win/Loss ratio.
To access this report, go to your Pipeline view under the Reporting tab.
From there you can filter which opportunities you wish to see, yours, the ones from your sales channel, your whole company, etc. You can then click on the filter and check Won/Lost.
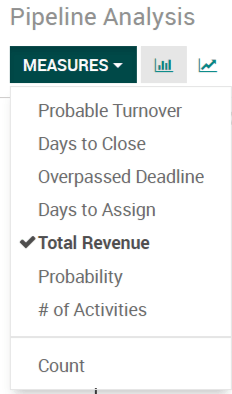
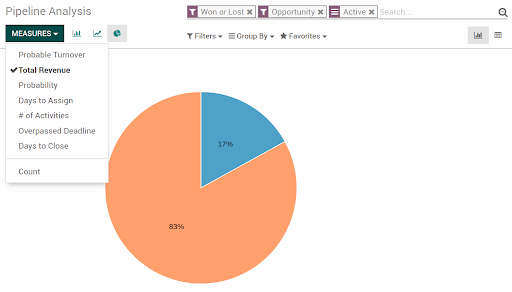
You can also change the Measures to Total Revenue.
You also have the ability to switch to a pie chart view.
→ How to Use Google Spreadsheet in Addition to My Data?
Create custom dashboards in Google Spreadsheet that retrieves data directly from Odoo using spreadsheet formula. You can use it to create sales commission plans, budgets, project forecasts, etc. Formulas are written in Python but programming skills are not required.
Configuration
From the General Settings, activate Google Drive and Google Spreadsheet. The options Authorization Code and Get Authorization Code are now available.
Now, link your Google account with Odoo by following these steps:
Get Authorization Code
Select your Google account
Enter your password
Copy the code
Paste it into the Authorization Code field
Create a New Spreadsheet
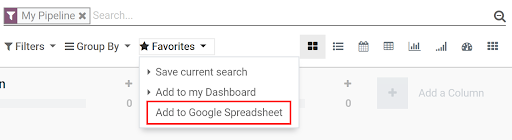
From the CRM app, for example, go to Favorites and click on Add to Google Spreadsheet.
A new spreadsheet will be automatically created in your Google Drive.
Link a Spreadsheet with Odoo
From this new file, configure your database.
Go to Odoo ‣ Server Settings ‣ Database Name ‣ Username ‣ Password.
Applications
You have two different formulas available when using Google Spreadsheet in Odoo: retrieve data and retrieve grouped sums.
Retrieve Data
The theoretical formula is = oe_browse (table; columns; filters; order: limit). Used it if you want to display the information without grouping it (e.g.: each sales order in the database).
Find some of the arguments in the table below.
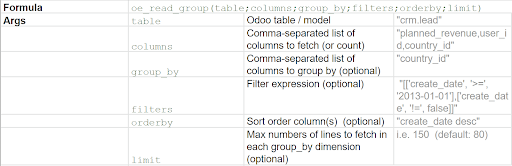
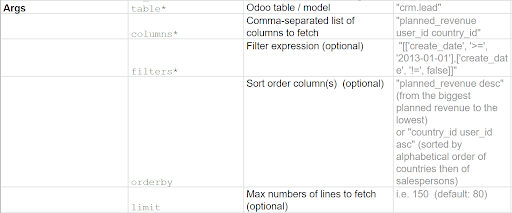
Retrieve Grouped Data
The theoretical formula is = oe_read_group (table; columns;group_by; filters; order by: limit). Use it when you want to display a sum of data (e.g.: total invoiced).
Find some arguments in the table below.
Other Uses
Mix Odoo data with spreadsheet data, add traditional formulas and create Dynamic Tabled and Graphs.
Optimize Your Day-to-Day Work
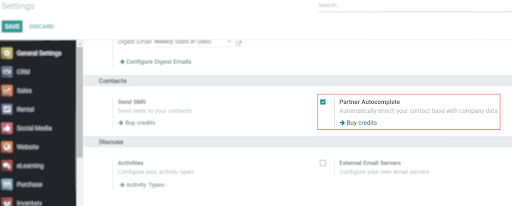
→ Enrich Your Contract Base with Partner Auto-Complete
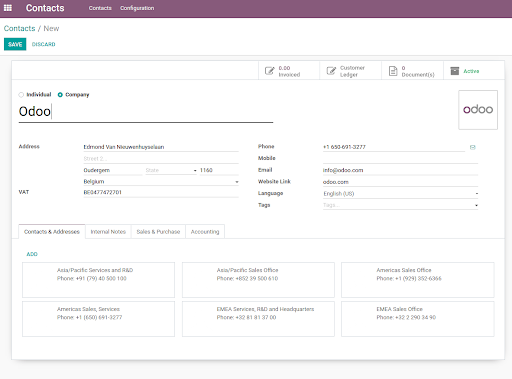
Partner Autocomplete helps you to enrich your contacts database with corporate data. Select one of the companies suggested in the dropdown, and quickly get all the information you need.
Configuration
Go to Settings ‣ Contacts and activate the Partner Autocomplete feature.
Enrich Your Contacts with Corporate Data
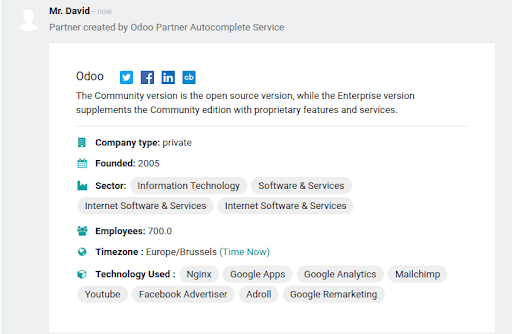
From any module, once you start to create a new contact by typing its name of it, the system will suggest a potential match. If you select it, the contact will be populated with corporate data.
For example, after typing Odoo, you will get the following information:
Enrich Your Contacts with Corporate Data
From any module, once you start to create a new contact by typing its name of it, the system will suggest a potential match. If you select it, the contact will be populated with corporate data.
For example, after typing Odoo, you will get the following information:
Pricing
Partner Autocomplete is an In-App Purchase (IAP) service, which requires prepaid credits to be used. Each request will consume one credit.
To buy credits, go to Settings ‣ Contacts ‣ Partner Autocomplete or Odoo IAP ‣ View My Services and select a package.
→ How to Motivate and Reward My SalesPeople?
Challenging your employees to reach specific targets with goals and rewards is an excellent way to reinforce good habits and improve your salespeople’s productivity. The Gamification module gives you simple and creative ways to motivate and evaluate your employees with real-time recognition and badges inspired by game mechanics.
Configuration
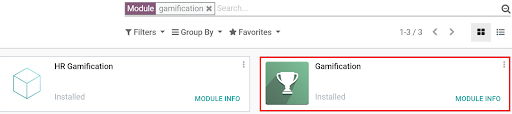
Install the Gamification module, or the CRM gamification one, which adds some useful data (goals and challenges) that can be used on CRM/Sale.
Create a Challenge
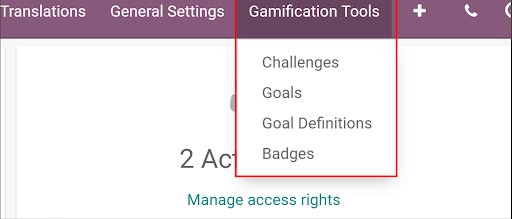
Now, create your first challenge by going to Settings ‣ Gamification Tools ‣ Challenges.
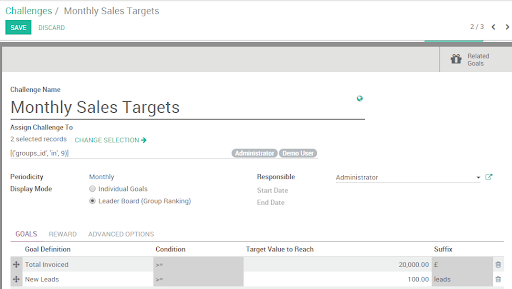
A challenge is a mission that you send to your sales team. It can include one or several goals, set for a specific period of time. Configure your challenge as follows:
Assign the salespeople to be challenged;
Assign a responsible;
Set up the periodicity along with the start and the end date;
Select your goals;
Set up your rewards (badges).
In the example below, 2 employees are being challenged with a Monthly Sales Target. The challenge is based on 2 goals: the total amount invoiced and the number of new leads generated. At the end of the month, the winner will be granted a badge.
Set Up Goals
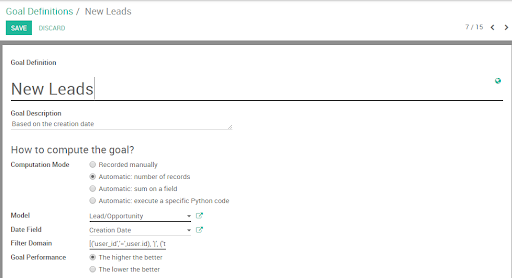
The users can be evaluated using goals and numerical objectives to reach.
Goals are assigned through challenges that evaluate (see image above) and compare members of a team throughout time.
You can create a new goal on the fly from a Challenge by clicking on Add new item, under Goals. Select the business object according to your company’s needs. Examples: number of new leads, time to qualify a lead, the total amount invoiced in a specific week, month, or any other time frame based on your management preferences, etc.
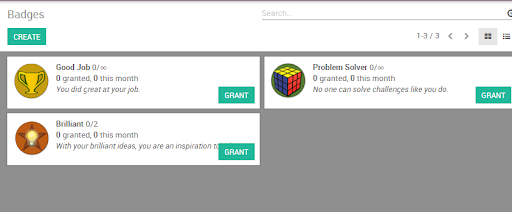
Set Up Rewards
For non-numerical achievements, Badges can be granted to users. From a simple thank you to exceptional achievement, a badge is an easy way to express gratitude to a user for their good work. To create and grant badges to your employees based on their performance, go to Settings ‣ Gamification Tools ‣ Badges.
The Odoo CRM module is fully integrated with other Odoo Apps like Sales, Mass Mailing, and much more. The features of the Odoo CRM APP are very vast.
There are several instances when the default Odoo CRM app or module does not fulfill the requirements of a company. In such situations, an experienced Odoo implementation partner like Bista Solutions can customize the modules as per your business requirement.
Big data brings big benefits. In fact, it’s one of the biggest assets any company could have today. It’s not just about collecting customer info or knowing how to use numbers to your advantage. It’s about anticipating trends, customer needs, and changes before they occur. Essentially, it puts you at the forefront of the latest and greatest things.
However, despite just how influential big data can be, many businesses are failing to use it at all. Or, if they are using it, they’re not using it to its full advantage. There’s a misperception that big data is only for big businesses. This is far from the truth. Big data is just a term that describes any large volume of data that’s used in a business every day. The important part here is that this data can be analyzed to make smarter decisions.
All businesses both big and small can benefit from big data. This data isn’t limited to any industry either, though we commonly hear how it’s used in tech. Frankly, if you’re trying to make your business work in this competitive age, you need big data.
A Brief History of Big Data
First, let’s take a closer look at how big data got started. The term itself is new, but big data has been around for a long while. In fact, big data has been used in the United States for over a century. It all started during the U.S. Census of 1880 which required so much time to process that it would supposedly take over 10 years to wade through all the data.
Luckily, they didn’t have to spend another decade figuring out the census data thanks to a young inventor named Herman Hollerith. He created a machine based on punch cards which makes it easier to record information. From here, big data only continued to grow. With the introduction of computers and modern technology, we find ourselves facing larger volumes of data than ever before.
How Businesses Use Data
Now that you understand where big data comes from, let’s talk about how companies actually use this information. Also, let’s learn Big Data Features. When there’s so much data to sift through, it’s hard to know what data is the most valuable. It all comes down to your audience.
You want data that helps you meet your customers’ needs. This data needs to be accurate, relevant, and consensual. Some you will collect yourself, and others will come from your software and industry sources.
While big data is by no means a new concept, effectively using this data is something we’ve seen only in the past decades. As competition increases, businesses are using this data in new ways.
Big Data Features & Benefits
Customer Trends – How do your customers behave? What do they look for when choosing where to spend their money? Big data helps answer these questions by allowing businesses to take a closer look at customer insights.
Targeted Marketing – With so many marketing avenues to consider today, how do you know which ones are most effective for your business? With big data, you know which avenues work for you and which to avoid
Website Performance – No article on big data would be complete without some tech. One powerful way to use big data is in increasing your own website performance. For more information on analytics and web performance, review this Python Logging Basics article by Loggly.
Final Thoughts
Big data features drive change. It’s how businesses continue to innovate and push forward. Without the right numbers and analytics, we’d all just be taking shots in the dark. If you want your business to be the next big thing, you need to have an idea of what that thing will be.
Knowing your audience has never been more valuable or easier thanks to big data. Are you ready to embrace this power for your own business? There’s no time to waste.
Want to learn more about big data solutions that can help your business? Click here.
Odoo Accounting App is an all-in-one accounting software that allows businesses to easily manage their finances. This web-based application offers a range of accounting features including double-entry bookkeeping, bank synchronization, invoicing, and more. With the ability to manage expenses, track time, and generate detailed reports, Odoo Accounting is designed to streamline financial management for businesses of all sizes.
The app is packed with features that help you save time and stay on top of your finances. For instance, the Bank Synchronization feature allows users to link their bank accounts to their Odoo account, automating the reconciliation process and helping businesses stay up-to-date with their financial data. Additionally, the app supports multi-currency accounting and allows for easy management of multiple companies or branches, making it ideal for businesses with a global reach.
With its user-friendly interface and customizable features, Odoo Accounting is a comprehensive solution for businesses looking to simplify their accounting processes.
Odoo Accounting Key Features
Save Time
Beautiful User Interface: Enjoy a fast and modern user interface design based on the Google Material Design trend that your users will love.
Reduce Data Entry: Save time by eliminating the need to manually create invoices, print and send them, register bank statements, and follow up on payments. Automate more and reduce data entry.
Collaboration & Alerts: Collaborate on documents easily and follow what interests you with automatic alerts.
Pay Multiple Invoices: Reconcile a payment with several invoices using a button on the payment form for added convenience.
Easy Set-Up: Simplify the initial setup process with a configuration progress bar, which allows you to set your initial balances from one screen.
Mobile: Access all accounting features on tablets or smartphones and enjoy instant access to your financial data, no matter where you are.
Bank Interfaces: Automate your bank statement syncing process and save time with automated reconciliation by syncing your bank statements with your bank.
Accounts Receivable
Clean, Feature-Rich Customer Invoices: Odoo provides easy-to-create invoices that are visually pleasing and offer multiple features like payment terms, discounts, price lists, and taxes.
Advanced Payment Options: Odoo supports multiple payment options for a single invoice, including cash discounts, advance invoices, and partial reconciliations.
Automated Draft Invoices: Odoo creates draft invoices automatically based on sales orders, timesheets, or delivery orders.
Instant Payment Reconciliation: When creating an invoice, Odoo suggests outstanding payments automatically to eliminate the need for reconciliation later on.
Get Paid Easily
Accept Credit Card Payments: Quickly receive payments with our online credit card payment integration. Our software supports popular payment gateways like Authorize.net, Ingenico, Paypal, Adyen, and more.
Automated Credit Collection: Odoo simplifies the credit collection process by automatically proposing emails, follow-up letters, and tasks to streamline the process.
Aged Receivables Overview: The receivable report provides a clear overview of outstanding payments and helps you forecast your cash flow.
Customer Portal Access: Your customers can easily track their order status, invoices, and payments through their personal portal.
Advanced Customer Statements: Our software provides clear and detailed reports on customer statements, allowing you to easily navigate through the documents to understand each customer’s use case.
QR Code Payment: Your customers can pay through a QR code by scanning it with their banking app. The QR code appears on PDF invoices and on the payment screen for quotations and invoices.
Account Payables
Ensure Accurate Supplier Payments: Verify and reconcile the Purchase Order, Vendor Bill, and Receipt to ensure correct and timely payments.
Manage Employee Expenses: Track and manage employee expenses from recording to reimbursement with ease.
Future Bill Forecast: Accurately forecast future expenses to manage cash flow and plan budgets effectively.
Digitize Bills: Simplify bill management by uploading scanned PDF or image files, which can be automatically processed by Odoo’s AI to create vendor bills.
Pay Bills
Print Supplier Bills: Generate a list of supplier bills to pay and print them in batches with just a few clicks.
Manage Deposit Tickets: Keep track of deposit tickets quickly and easily to streamline the bank reconciliation process.
Automated Wire Transfers: Let Odoo automate payments to suppliers using SEPA and pay on the scheduled date.
Flexible Payment Workflows: Customize payment orders with optional validation steps to fit your unique payment processes.
Bank & Cash
Automate Bank Feeds: Your bank feeds are automatically synced with Odoo, with support for over 15,000 banks, mostly in the US, Canada, and New Zealand.
Manage Cash Registers: Keep track of every cash transaction, from opening to closing, with ease.
Import Statements: Easily import statements from OFX, QIF, CSV, or Coda files if your bank is not supported by Odoo.
Easy Reconciliation
The Smart Reconciliation Tool: With Odoo’s smart matching tool, 95% of your invoices and payments are automatically matched, and for the remaining 5%, you can match them super fast using the interface for manual reconciliations. Get reconciliation propositions automatically, register extra journal items on the fly, and search efficiently. Plus, with the learning of account numbers based on the first manual reconciliation, you can speed up the process even more.
Convenient Outstanding Payments: Easily reconcile partial and full payments by getting propositions directly from the invoice or bank statement.
Online Payment Support: Confirmed online transactions are automatically created as payments for easy reconciliation. They also show up as notifications in the document’s chatter, making it easier to follow up.
Reconciliation Report: The reconciliation report allows you to audit the differences between your accounts and your bank statement balance, simplifying the reconciliation process.
Advanced Access Rights
Access Control Lists: Default configurations for accountants and advisers are already set up, but access rights are highly flexible.
Multis
Automatic Currency Rate Updates: Currency rates are updated daily, keeping your records current.
Integrated Subsidiaries: Integrate all of your subsidiaries into a single system with real-time consolidation reports. Streamline business flows with intercompany rules.
Flexible User Management: Define as many users as you need with customized access rights.
Multiple Journals: Organize your documents into separate journals based on departments or types of activities, allowing you to divide roles across various users.
Performance Reports
Pivot Table for Business Intelligence Reports: With Odoo Pivot Table, you can easily navigate through information, such as consolidations, drill-up/down, group data, and filters. There are multiple standard reports available, including Profit & Loss, cash flow statements, cash reports, executive summary, aged payable/receivables, and more. You can also get standard reports and charts of accounts for 80+ countries, and export reports to Excel and PDF.
Customizable Dashboards: Assemble custom reports to create your own dashboard. Generate reports for any time period, compare time periods, and get a dynamic calculation of certain fields (e.g., YTD earnings). Share filters and dashboards across teams.
Annotate Any Report: All reports are fully dynamic, so you can easily navigate them. Create multiple annotations and add your notes for managers inline.
Customizable KPIs: Define your own KPIs based on formulas, such as gross margin, customer acquisition costs, and growth rate by-products.
Perpetual Fiscal Year Closing: You don’t need to report balance sheet accounts from one year to another, and there’s an automatic calculation of P&L based on chosen dates. You only need to write the handling of earnings for closure, and you can choose lock entry dates for non-advisers and all users.
Legal Statements
Profit & Loss: Easily navigate through the flow of information in the Profit & Loss report to gain insights into your company’s financial performance.
Real-time Cash Flow Statement: Access a comprehensive cash flow statement in real-time, with a range of filter options to help you gain insights into your company’s cash flow.
Effortless General Ledger Management: Filter and search the general ledger with ease, and dive deeper into specific documents with just one click.
Robust Tax Management: Take advantage of Odoo’s tax engine, which supports a wide range of tax computations, including price included/excluded, percentage, grid, tax on taxes, partial exemptions, and more.
Organized Consolidated Journal: The consolidated journal is presented in an organized, month-by-month format for easy readability, providing a clear picture of each journal.
Automated Balance Sheet: Have your current year earnings automatically reported on your balance sheet, enabling you to report your financial status at any time without having to open or close fiscal years.
Country-specific Financial Statements: Generate country-specific financial statements, including VAT statements, P&L/BS, a listing of VAT subject customers, and more.
Detailed Tax Audit Report: Use the tax audit report to check how the tax report is computed for audit purposes. Select a line in the tax report, and click on the “audit” button to audit the journal items (base and tax in the same report).
Customizable KPIs: Define your own KPIs based on formulas, such as gross margin, customer acquisition costs, and growth rate by-products.
Flexible Consolidation: Combine financial information from multiple companies to generate a consolidated set of statements. Use closing, historic, or average exchange rates and add multiple adjustment columns with no GL impact. Incorporate data from other financial systems, and adjust for partial control or ownership of one or more companies.
Analytic Accounting
Hierarchies of Cost Accounts: Structure your analytic accounts based on departments, projects, contracts, etc., all done automatically.
Seamless Integration: Generate analytic entries automatically by using supplier bills, work orders, timesheets, and other sources that fully integrate with Odoo.
Analytic Distribution: Use analytic tags and flexible distribution to distribute one accounting entry into several analytic accounts.
Multiple Plans: Manage several analytic plans, with default values and assignment ratios between cost accounts or projects.
Analytic Reporting: Access clear and concise reports on your analytic accounts, including hierarchy and subtotals.
Subscriptions
Automatic Invoicing: Use contracts to handle subscription and recurring revenues. Automate the process of recurring invoices, payments, and renewal alerts.
Automated Renewal Alerts: Salespersons receive alerts automatically when it’s time to renew contracts.
Convenient Customer Portal: Customers have access to a portal where they can make changes to their plans, upgrade or downgrade, and unsubscribe, based on your configuration.
Manage Multiple Subscription Plans: Keep track of different subscription plans, templates, and extra fees.
Assets & Revenues
Assets Management: Easily track your assets and generate amortization entries automatically. Manage all your asset events in just a few clicks.
Revenue Recognition: Automate deferred revenue entries for multi-year contracts and get clear dashboards on your recurring revenues. Manage your SaaS metrics in one place.
Budgeting: Track your budget and compare actual performance with different budgets. Manage budgets for financial accounting or analytic accounts.
SaaS Metrics Dashboard: Get a clear and concise dashboard of all your SaaS metrics, including MRR, Churn, CAC, CAC ratio, Growth forecasts, ARR, CLT, and CLTV.
Connect
Web-Service API: Integrate Odoo with third-party applications through the Odoo web service API, which supports various programming languages, including Python, PHP, Java, C#, and Ruby.
Google Spreadsheet Integration: Link Google Sheets to Odoo Saas and create custom dashboards in your preferred spreadsheet software. This allows you to automatically pull data from Odoo and use it for various purposes, such as budgeting and commission planning.
Flexible Import-Export: Use Odoo’s built-in import-export tool to import or export data in bulk. You can also make mass updates by exporting data to an Excel spreadsheet and then importing it back into Odoo.
Taxcloud Integration: Automatically apply the correct tax rates based on U.S. zip codes and product categories by integrating Odoo with TaxCloud. This service calculates real-time sales tax for every state, city, and special jurisdiction in the United States.
With Odoo Accounting, you can easily integrate with other apps like Sales, Inventory, Purchase, and E-commerce. Plus, your customers get their own personalized portal where they can easily access and manage their invoices, track their order status, and keep tabs on their payments. It’s all designed to make your accounting experience as seamless and user-friendly as possible.
Odoo Accounting App & Bista Solutions
Simply put, Odoo Accounting is a comprehensive solution for businesses looking to simplify their accounting processes. This web-based application offers a range of accounting features, including double-entry bookkeeping, bank synchronization, invoicing, and more. With the ability to manage expenses, track time, and generate detailed reports, Odoo Accounting is designed to streamline financial management for businesses of all sizes. The app is packed with features that help save time and stay on top of finances. With its user-friendly interface and customizable features, Odoo Accounting is ideal for businesses that strive to manage their finances with ease.
If you’re interested in learning more about this application or want a free consultation/demo, don’t hesitate to reach out to the Bista Solutions team: here. We have accounting experts at Bista Solutions who can tailor solutions that best fit your business needs. As an Odoo Gold Partner with decades of experience, global presence, and 5 wins for Odoo Best Partner North America, you can rest assured that you’re in capable hands.
Cookie Consent
To provide the best experiences, we use technologies like cookies to store and/or access device information. Consenting to these technologies will allow us to process data such as browsing behavior or unique IDs on this site. Not consenting or withdrawing consent, may adversely affect certain features and functions.
Functional
Always active
To provide the best experiences, we use technologies like cookies to store and/or access device information. Consenting to these technologies will allow us to process data such as browsing behavior or unique IDs on this site. Not consenting or withdrawing consent, may adversely affect certain features and functions.
Preferences
The technical storage or access is necessary for the legitimate purpose of storing preferences that are not requested by the subscriber or user.
Statistics
The technical storage or access that is used exclusively for statistical purposes.The technical storage or access that is used exclusively for anonymous statistical purposes. Without a subpoena, voluntary compliance on the part of your Internet Service Provider, or additional records from a third party, information stored or retrieved for this purpose alone cannot usually be used to identify you.
Marketing
The technical storage or access is required to create user profiles to send advertising, or to track the user on a website or across several websites for similar marketing purposes.
“The level of consistency and dedication Bista has shown towards our project is the driving force behind the project and all that is to come! We, at Reliance, are so thankful to have you as our partners in this endeavor. We’ve grown together and learned a lot from each other over the last few months. I am sure that will only continue as we progress on our journey of innovation together.”
– Sahej Singh – Business Intelligence & Strategy Manager
SilencerCo
“I wanted to let you know how much I appreciate your team for all the help and custom work that they have done on our behalf. Priyesh and Pratik, and the entire offshore team have been really responsive to our operational needs. Thank you again for the hard work.”
– Camille Thompson – Data Manager
Reinhausen Middle East FZE
“Since [we’ve started] working with the team of Mr. Pradeep […] we’re receiving quality replies on time and we’re really enjoying working with him and his team. As the collaboration is going so well, we have started to use Odoo for more […] things in our company and we’re continuing with change requests to adapt the system to our needs. I want to thank Mr. Pradeep and his team for [their] ongoing support.”
– Ralf Klinger – Technical Field Service Manager
Selkirk Signs
“Also want to make a quick mention of the support team. We have been working with them for a while now and Pradeep and his team members […] have done a commendable job in making sure our tickets are handled in [a] timely manner and they are very easy to work with and very approachable.”
– Subhrajeet Sabhapandit IT Manager
FGD Glass Solutions
“Just wanted to drop a quick line to say thank you for all your efforts in supporting us in our needs for Odoo v12 Enterprise. You have been prompt in responding to our many support requests. Pradeep and Mansy are always eager to help and informative with instruction when needed. As a business owner, I’m happy we selected your firm to be our Odoo ERP support provider. Looking forward to growing over the coming years with your support.”
– Derek Lindeborg – Owner
Control System Labs
“Now that we have completed the launch of our new Odoo website, I wanted to take a moment to thank you and [the Bista] team for all the hard work it has taken to get us here. After many months of planning and development, we are now using Odoo for many of our critical business processes: Accounting, Recruitment, Expenses, RMAs, Customer Portal, Credit Card Processing, as well as storing our Product and Partner Master Data. This would not have been possible without your team’s dedication and expertise. Our team is very excited to tackle the last and most important Repair Operations module in the upcoming weeks. We are confident that you will continue to provide excellent service, and we look forward to achieving this major milestone together! Thank you!”
– Gary Fredricks – President
Atlas Arms Manufacturing LLC.
“One of the biggest things for us is lot tracking through our entire manufacturing process from sourcing raw materials, to subcontractors, to in-house manufacturing, and sales to end users and commercial loaders. Because some of our products are restricted in certain locales, we needed to be able to block purchase in those cases. We are also big fans of open source software. [We found Bista] through originally a duckduckgo search, but after speaking with them, and another one of their customers who is well known in our industry, we felt confident they could deliver what we needed for a fair price in a reasonable time (which they have done). [Bista] feels more like a partner than a regular vendor, very responsive to questions and concerns even though the project has been put in production. Their bid was reasonable to start, but still came in under budget and under hours, which can be difficult to do. [Overall experience working with Bista was] excellent and comfortable. I can’t count the hours of misery that Bista has saved me from.”
– Michael Riettini – (Managing Member and COO) Kerrville, TX
“Bista was one of Odoo’s largest implementation partners, so we were introduced through Odoo. They had a good reputation and we had talked extensively with other people that had worked with Bista, so we felt comfortable starting out with them. And we’ve now been working with them for over two years, so we’re quite happy with our decision. We work directly with all the development team. We considered them part of our teams; all of our daily meetings, all of our discussions, [they] were an integral part of that. Even though we had to change quite a few things midway through the project, because we work so closely, because they understood our poor business process and what we were trying to do, we were able to adapt and still deliver on-time, at the same budget. […] I think [Bista] has been a great partner. It’s one of the reasons we’ve been working with them for multiple years now, even after the initial project finished. I think they have a great talent pool to work with and they’ve been very accommodating. So wherever we have to change things, or get additional resources, or find additional expertise, they’ve always been on point to help with that.
“We chose Bista because they had some expertise in manufacturing and they also had some expertise in the accounting side and making sure that our financials were spot on at the end of every quarter. We were right on budget, we were within the 9-month period from ERP planning to go-live, and so I really couldn’t ask for more.”
“Bista has helped us implement Odoo and make changes to it where generic options did not work. So [they are] an excellent partner that’s available 24 hours a day as we need them to make changes, [and] to help us work with our people and train them. So, Odoo is a very generic system that’s like a shell and you put together the pieces of a puzzle to make a new system that meets the needs for manufacturing, for finance, for inventory, etc. Bista helped us manage all of the changes that are needed for that, do the training and they also support us when we have problems. We have four primary people from Bista, but they get us more when we need them. But the four people have been with me for eight months now and we meet every day; and we talk about issues, we talk about things we don’t understand, they explain to us more about the system every day. […] They’re very good about working the hours that we need them to be. Bista accommodates the difference in time. Bista has been very good about being available whenever we need them and doing the support after the implementation. We recommend them highly and we [are] still working with them. And honestly, I would not be working with them at all if I did not like them or if they weren’t providing a service that’s effective for me. They have been doing both very well so that’s just not an issue at all.”
– Bob James – (Head of Enterprise Applications) Fairfield, California
“In terms of what stood out about Bista was definitely the responsiveness from the point that we made first contact. So, they were very quick to respond to my query […] because I was on a very tight deadline. I wanted it up and running within a month. I wanted to go live and then fix problems as we go. […] it was a lot of trial and error which was very helpful from Bista’s side that [they were] really quick and responsive. They had a team dedicated that okay we’re gonna take care of what’s happening and let me have people working around the clock even. I think the biggest change has been inventory accuracy. I got everything that I wanted out of it. Bin locations, traceability, lot tracking, automation, certain degrees route optimization… everything that I wanted to be a part of for the warehouse management side has been part of the warehouse management side. So, with that core being intact, rest of it just follows where your profit and loss and everything else is in place. [With Bista’s help] inventory accuracy [is] above 90 [when it] was probably around 60 to 70 before.”
“After deciding that Bista was the right partner for us, we actually had a member of their team come down to our warehouse and work side-by-side with us to perform a gap analysis and make sure that it was a good fit for us. We found that after bringing Priyesh down to our warehouse to work with us, we were blown away by his focus and understanding of all of our business needs. We got a lot of confidence in both what he could provide as well as other members of his team. They were able to get things done in an extremely timely manner and have a very thorough understanding. We started the project out with some trials of smaller project and were extremely satisfied with the results. They were unparalleled to any other technology partner we have used in the past. Whether it was from Dynamics, or Odoo directly, or other 3rd party partners as well. [Bista] showed that they could comprehend the project needs, as well as go above expectations. And as well as make any kind of adjustments along the way to make sure we were happy with the end results. Their understanding of core business processes and developments and needs is unmatched and unparalleled in their industry. Through working with Bista, we’ve gotten both quantifiable results as well as qualitative results.We’ve been able to increase our sales double, while lowering our back-order fulfillment rate. Bista has allowed us to have more accurate purchasing information, better inventory control, more efficient sales, as well as provided better tracking of all of our CRM Sales tracking. At the end of the day, Bista has a great understanding of our business, and they were able to deliver projects timely, cost-effectively, and accurately. And that is support that we were unable to find anywhere else. They have surpassed our expectations and delivered better results than any other technology company we have ever worked with.”
– Michael Sturury – General Manager, Maqabim Distributors
““Odoo recommended Bista as the potential implementation partner. The implementation was interesting because it forced us to take a step back and really understand our current flow of information, and how we could actually improve that flow and eliminate some of duplicate entries and actually improve efficiency. Bista came on-site and spent the week with us and went through in detail every one of our business processes, generated a flow chart of our current state, and then worked with us to develop the flow chart of our future state which would be the ideal state. I was a little hesitant on the zoom meetings for an implementation but working with Rajiv and his team really, really has been a great experience. They’re so detail-oriented and they are so set on making sure that our requirements are met in every way.” .”
“Our experience with the Bista implementation team was really nothing but positive. These guys were available on the weekends, they were available after hours, you know it wasn’t just go live and walk away, right? They were they were there for us, they’re still there for us and I think we’ll sign a support contract with them. You know, I had pretty high expectations and they met and exceeded, in some instances, all those all my expectations [and] overall did a great job. I would certainly recommend them to anybody who’s looking for an Odoo implementation – look at Bista they’re professional, they’re fast, they’re responsive, they know what they’re doing. So, you know, 10 out of 10, highly recommend.”
“We decided to work with Bista because they demonstrated understanding of cannabis business and they demonstrated client-oriented approach. Some implementation results like sales and pos modules exceeded our expectations. The implementation of Odoo with the help of Bista helped us to get very useful and detailed information regarding our operations. The most important result which I think cannot be quantified is that we have complete information about at least our sales […] which manager [is at which] of our offline shops, how much product he sold, I can check the price…to take some managerial decisions according to this information. Regarding accounting, I think [the] Odoo [implementation] is saving us up to 10 hours per month on preparation of reports. I would, hundred percent, recommend the Bista team to other cannabis companies as a reliable partner in IT system development and support.”
“We selected Bista, originally, because we were really looking for a partner that we felt comfortable, [and] knew what they were doing. TIE is a, you know, by far, in a way, not experts in Odoo. We are not experts in ERP implementations. We are not experts in pretty much everything that Bista is. So, what we were looking for is an expert in those areas that could help lead our project in a way that we would end up being very successful in the platform itself but also getting there. Bista was really presented as a partner not just a vendor to us, and really their advisory in the way that they say ‘hey, here’s your problem… here’s what a good solution would be…or this is what we’ve seen in the past… or here’s a module that you might not be aware of’. When we selected Bista it was really those, you know, key pieces. Then after working with Bista those areas definitely shined big time, especially the technical expertise area, but also the team itself was very high performing. I don’t think there was a single member of any team that I did not enjoy working with as well as be very impressed with their capabilities – whether it be technical or non-technical. The quality of the project and the quality of the system itself has been enhanced greatly since Bista’s involvement in our project.”
“My experience with Bista has been great. Each time I’ve called and talked to Priyesh, who is our rep, [he’s] been very quick to return calls, get back in line, and figure out what’s going on and responding to our issues […]. He’s got a good team of people behind him both here in the U.S. and in India who can do big programming jobs if we need a whole new structure or an only report or a module needs to be adjusted for us. From a financial perspective, I had no issues. [Our implementation was] within budget and on plan. We’ve been very satisfied especially with the response and the timeliness of the response. I couldn’t recommend the company more with Bista and how they took Odoo and got it to work for us. It’s been a tremendous improvement in our business. It’s been a very positive experience. I would highly recommend the software, and I would highly recommend Bista.”
– Dennis McCarthy – CFO (Detroit, USA)
Book A Free 30 Min ERP Consultation
Book A Free 30 Min ERP Consultation load
About Shahid Bandarkar
Mr. Bandarkar has 10+ years of quota carrying technology sales and account management experience
Mr. Bandarkar holds a Master’s Degree in Project Management.
About Faisal Basar
Mr. Basar Successful entrepreneur in the technology domain.
Mr. Basar having Proven track record of building a company from ground-up to multi-million dollars in revenue.
Mr. Basar had 20+ Years in the technology industry & Expertise in identifying new technologies and building teams to deliver those solutions.
About Andre Temnorod
Andre Temnorod has been a leader in the internet technology and telecommunications space for 20 years. Present and previous roles have included:
Founder and CEO, CloudRoute
Founder, Broadvox
CEO, Nexbell Communications
CTO, Unicent Technologies
Mr. Temnorod is also one of the foremost experts in VoIP technology and has been featured on many panels and professional forums.
About Thomas Sparkvik
Thomas Sparrvik is a successful entrepreneur and global business executive. Present and previous roles have included:
CEO, Parpro Corporation
CEO & Vice-Chairman, Kontron
Additionally, Mr. Sparrvik is a Board member in five companies. He holds an MBA from the Warwick Business School and an MSC in Electrical Engineering from Lund University.


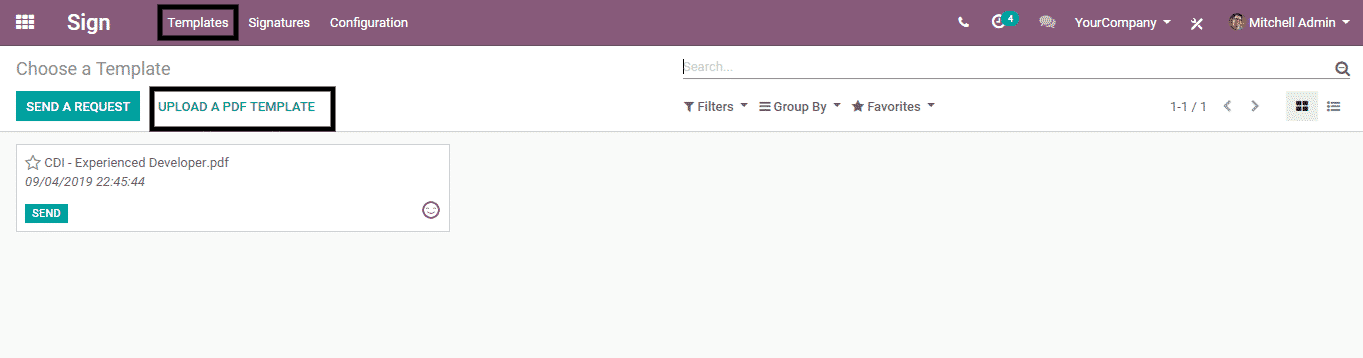
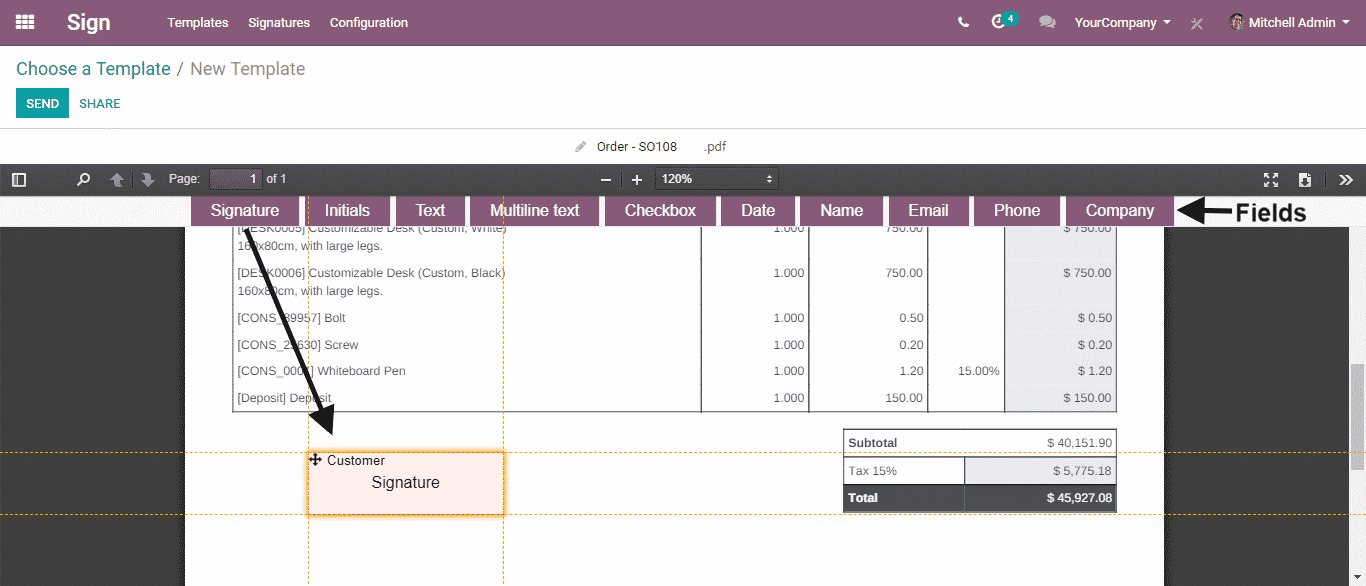
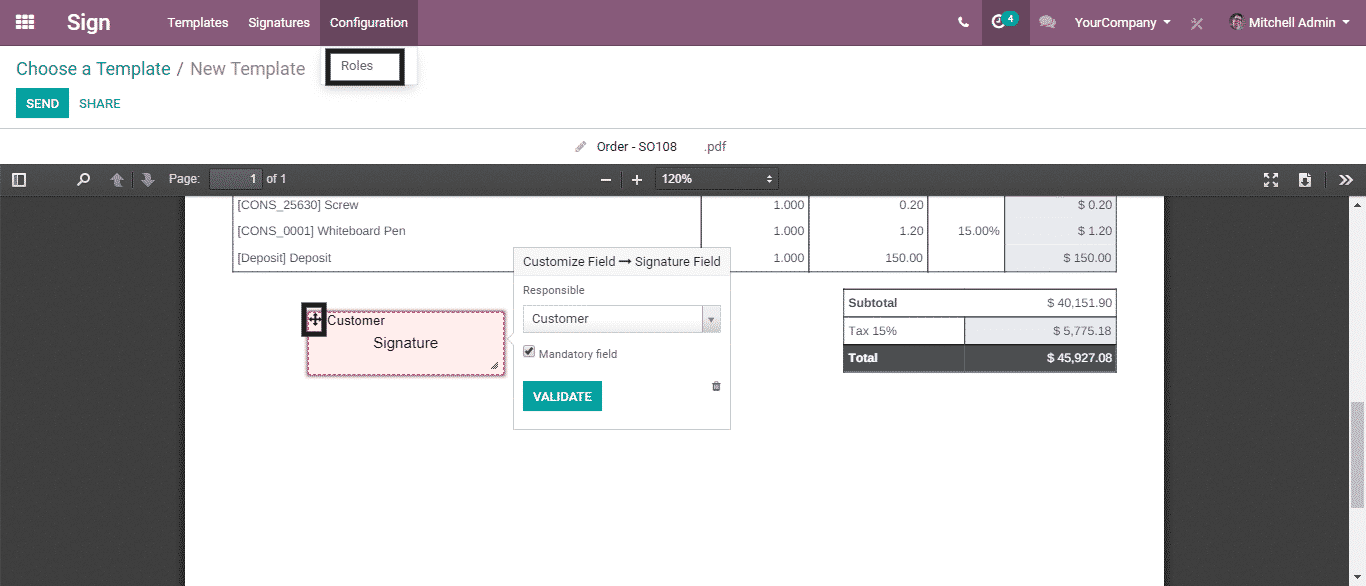
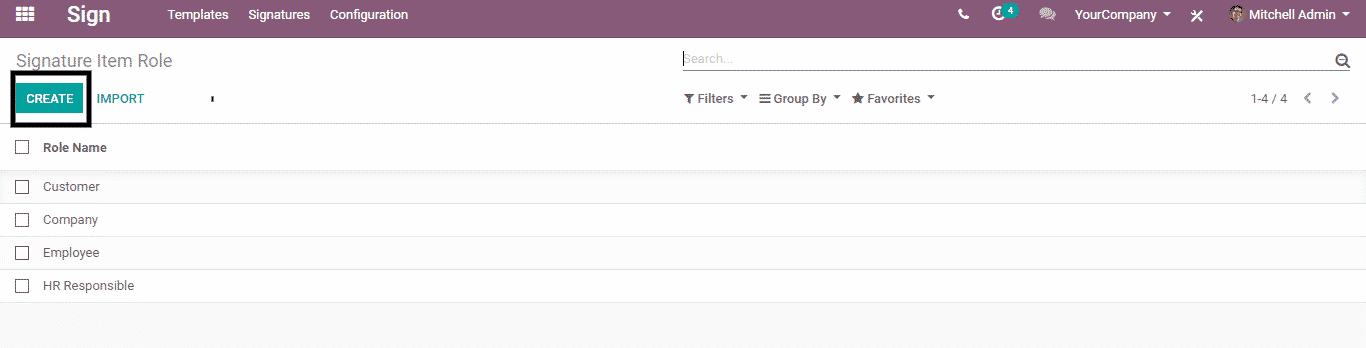
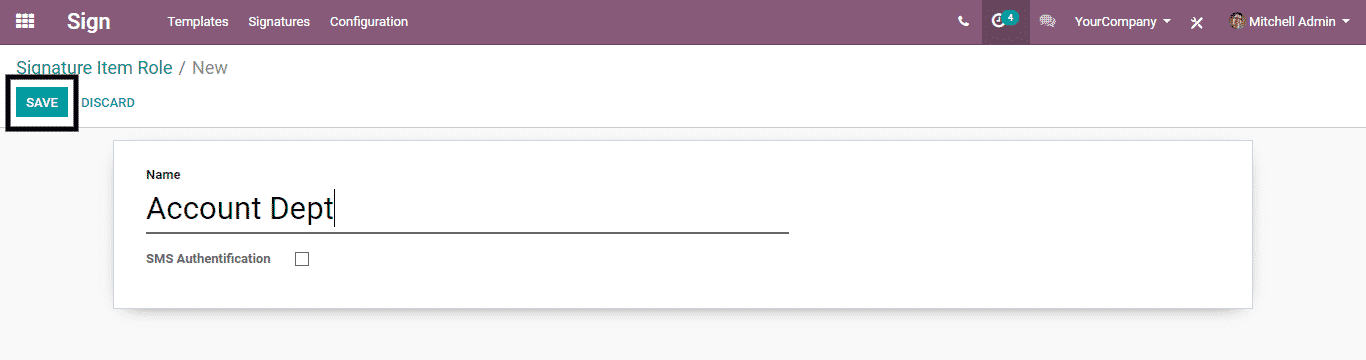

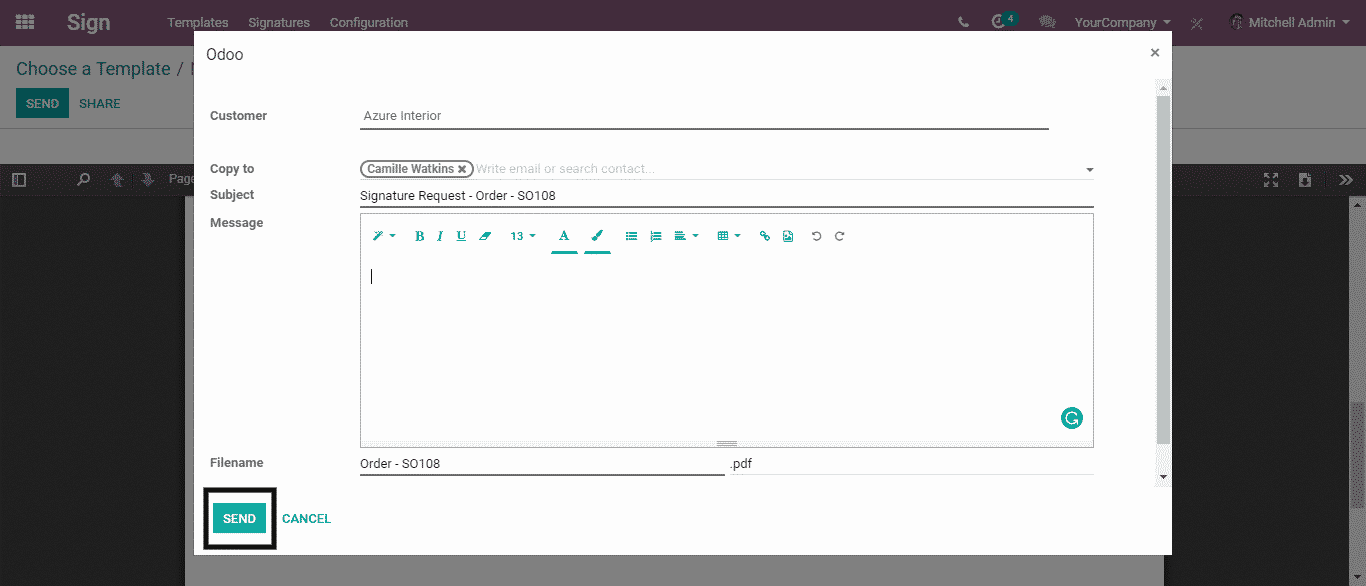


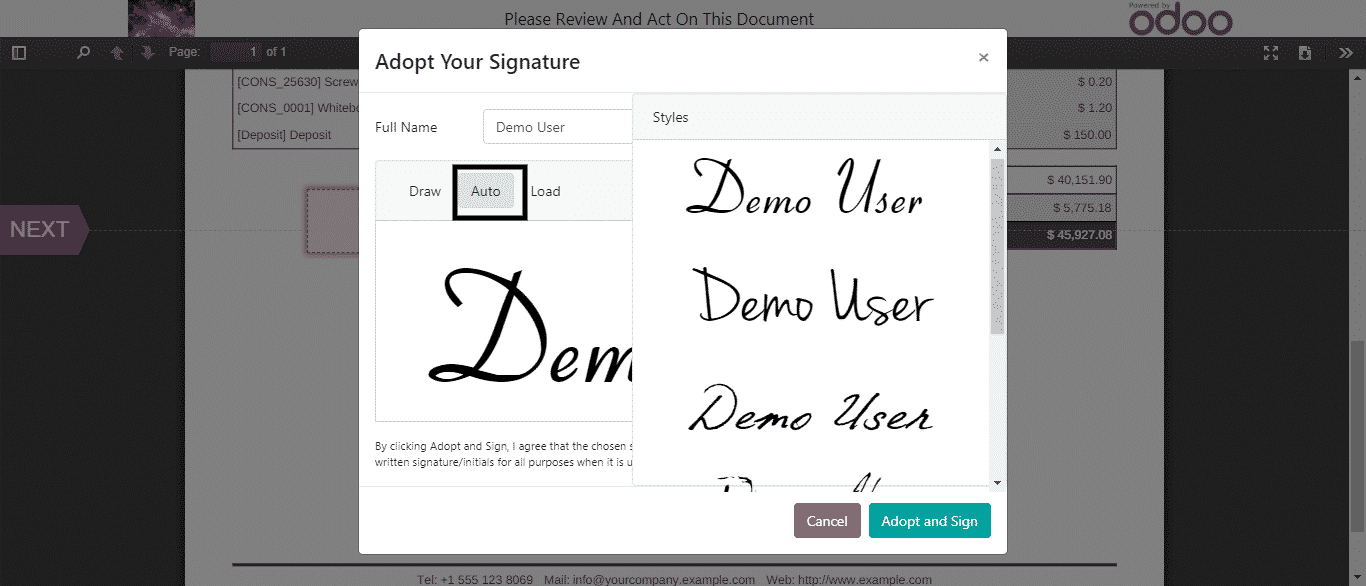
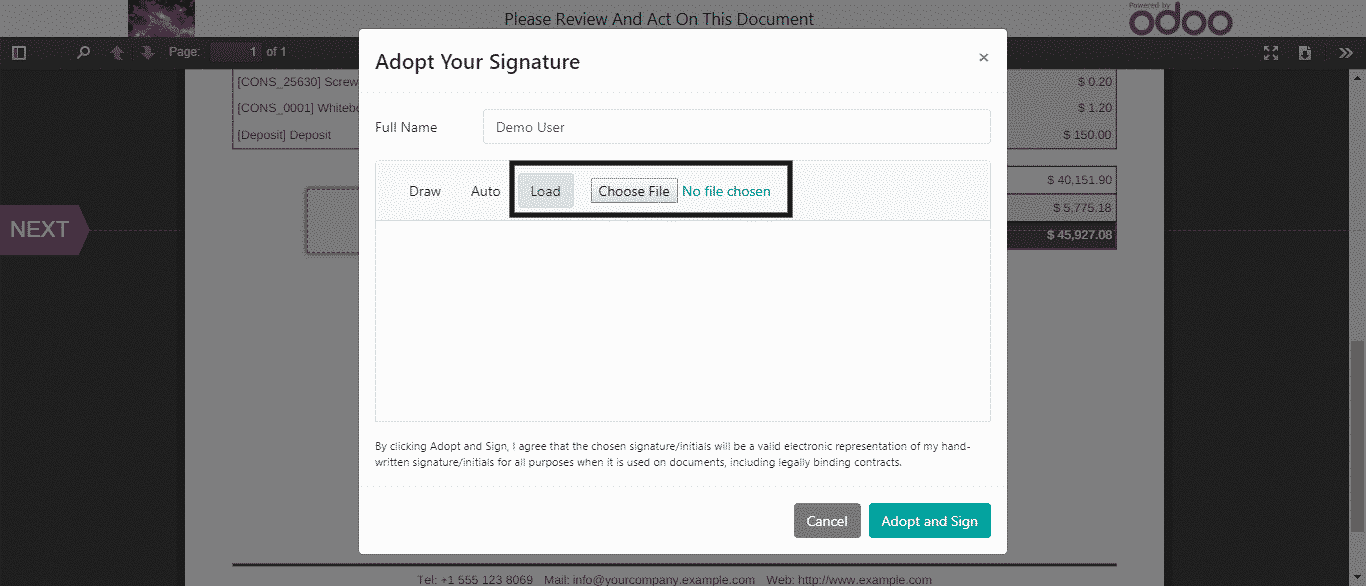
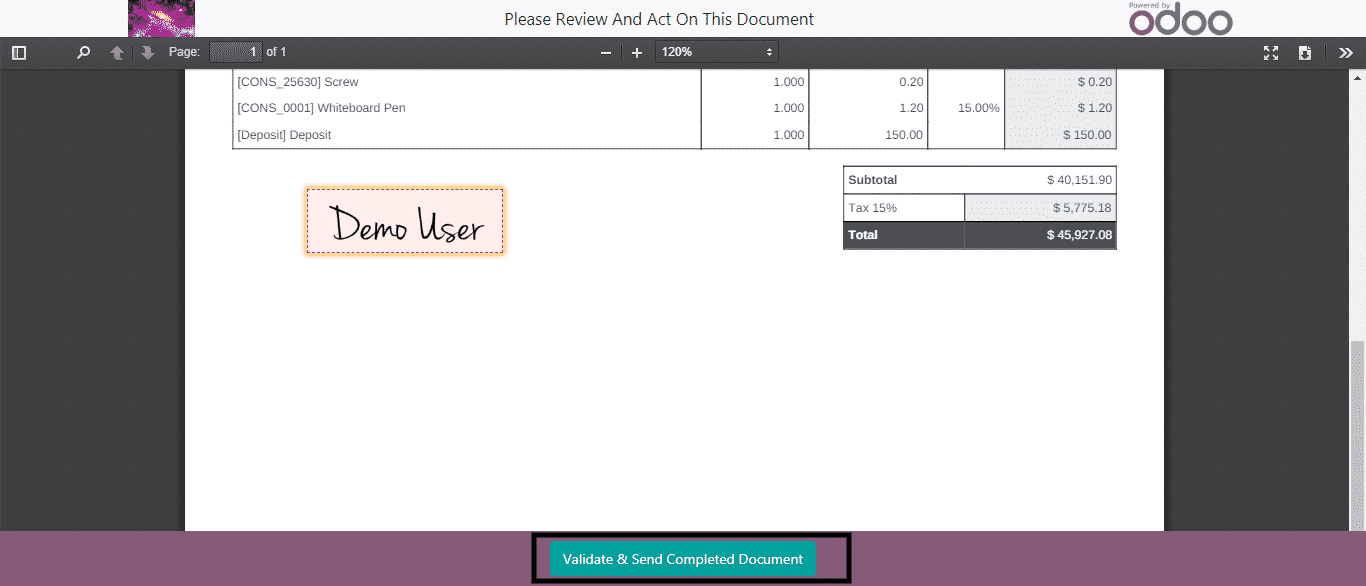
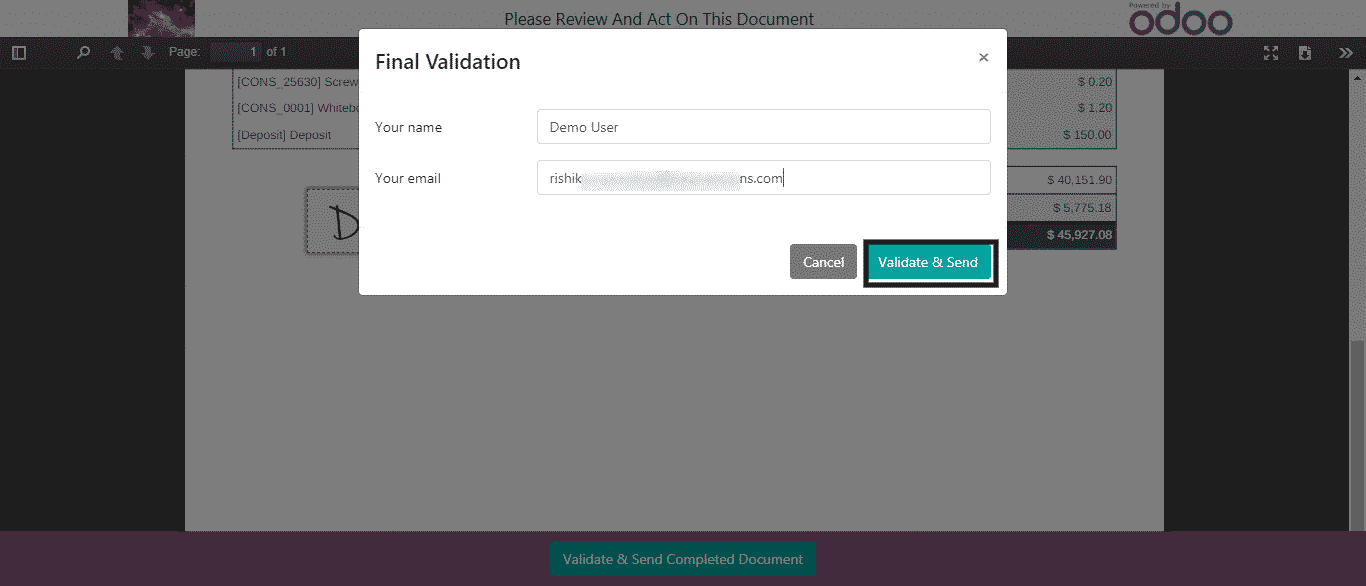
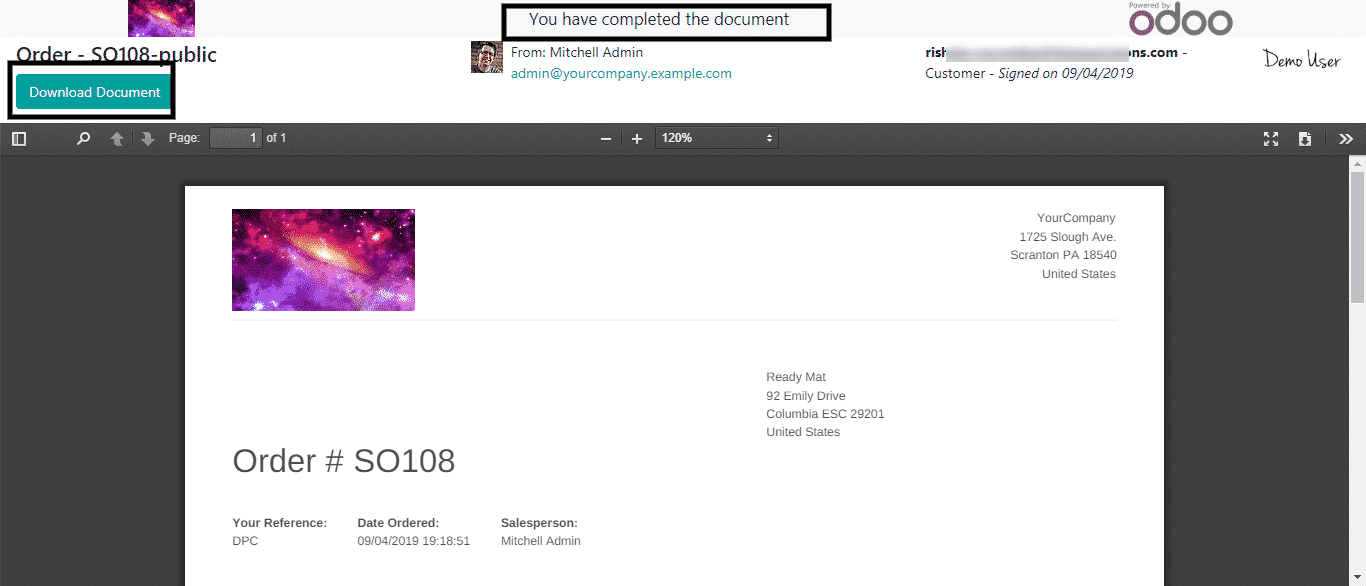
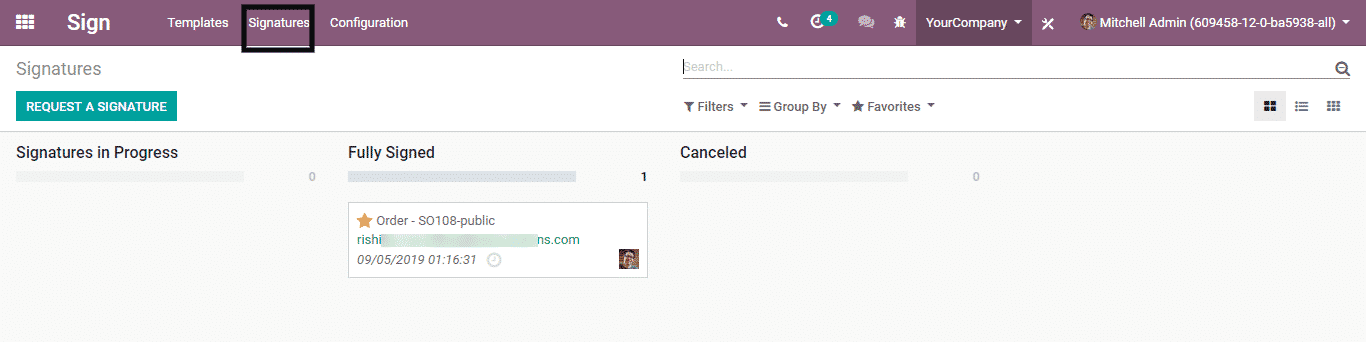
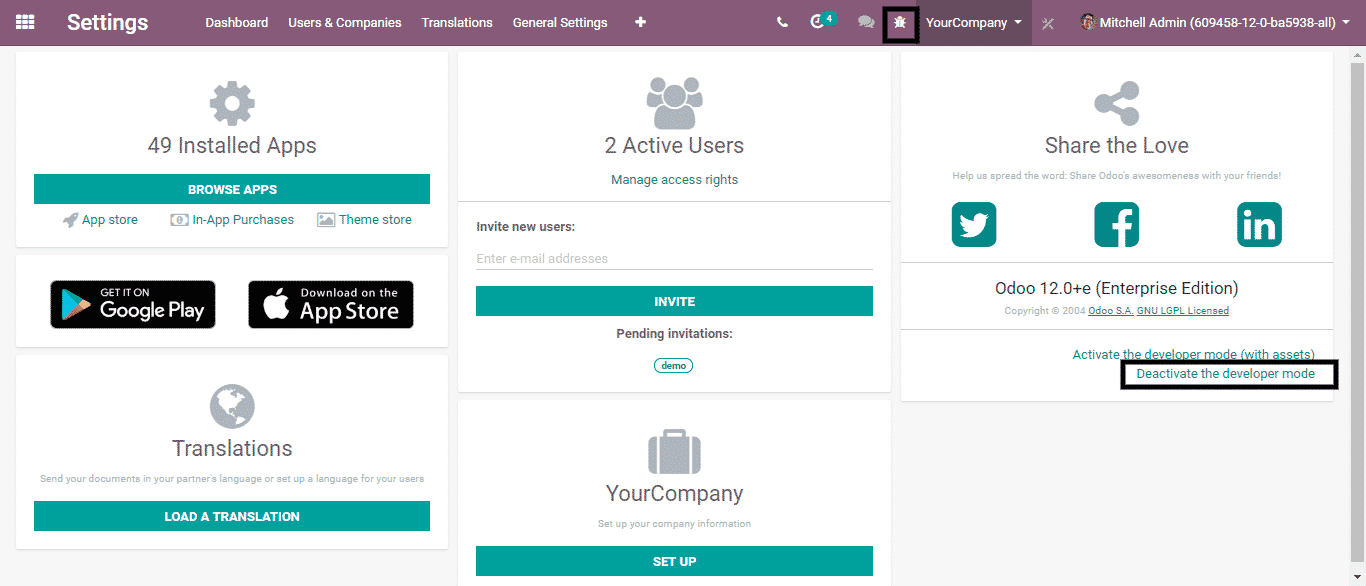
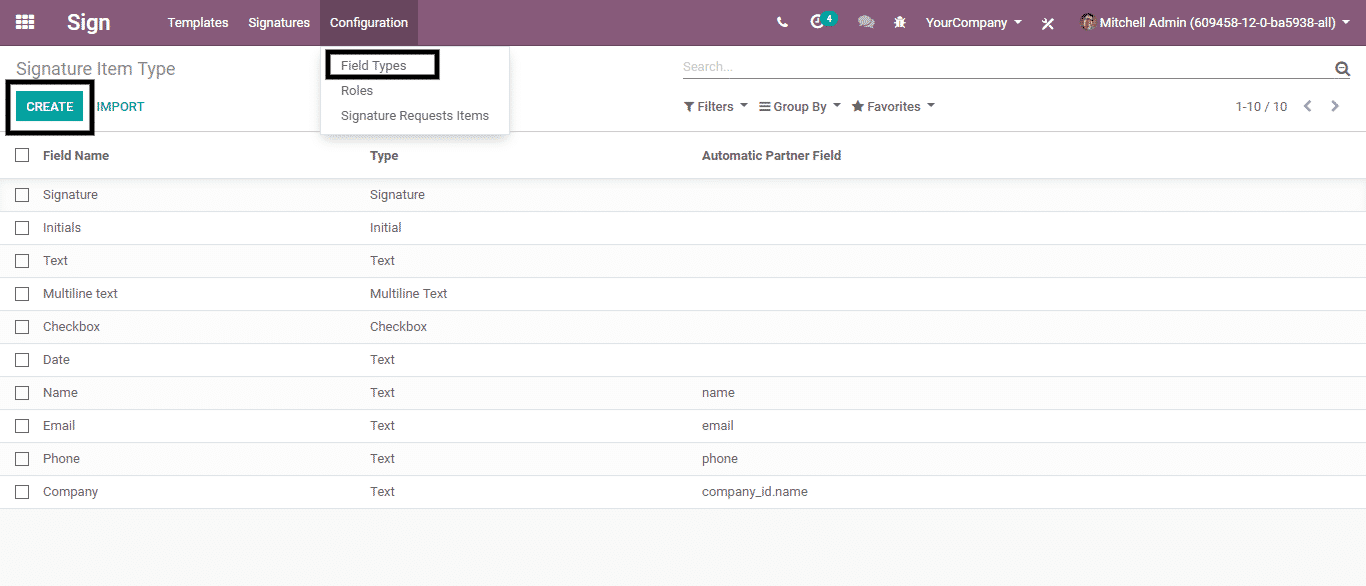


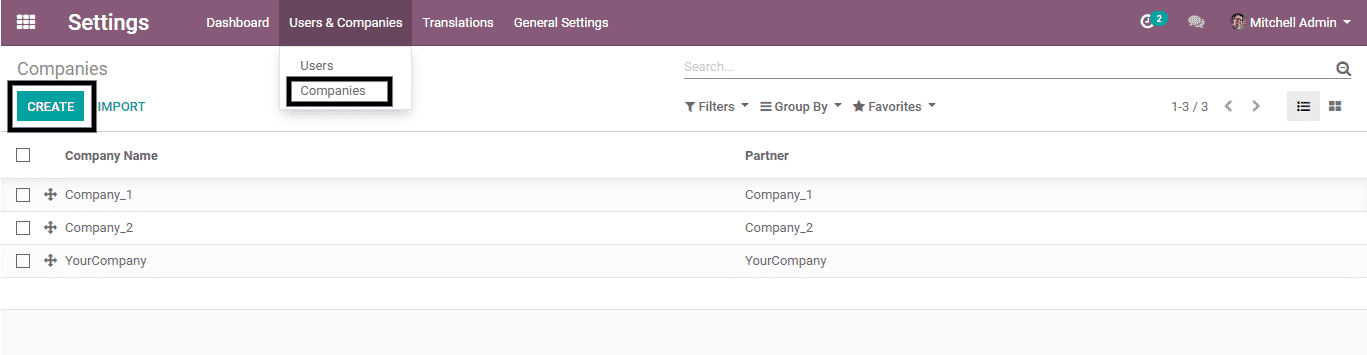

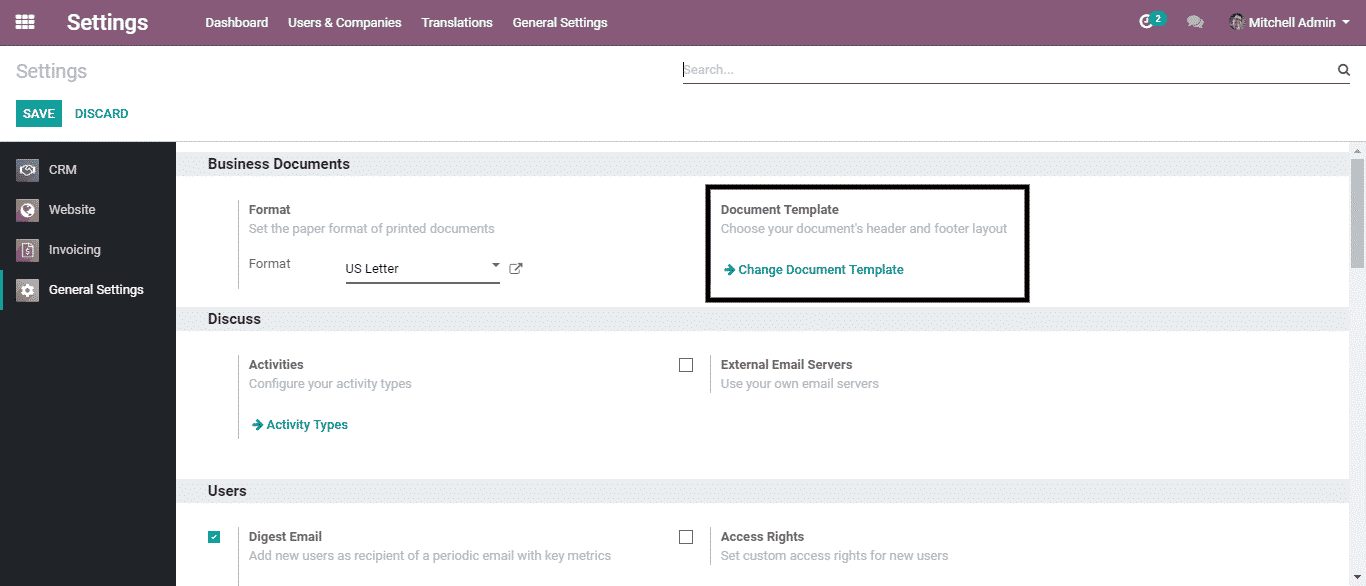
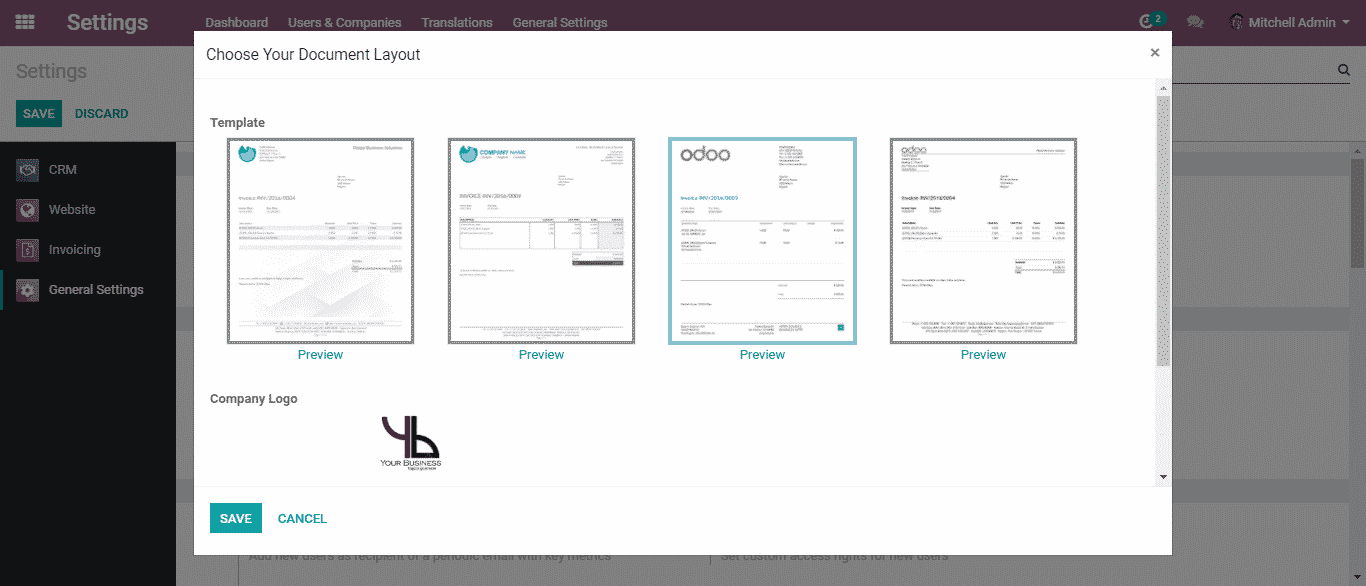
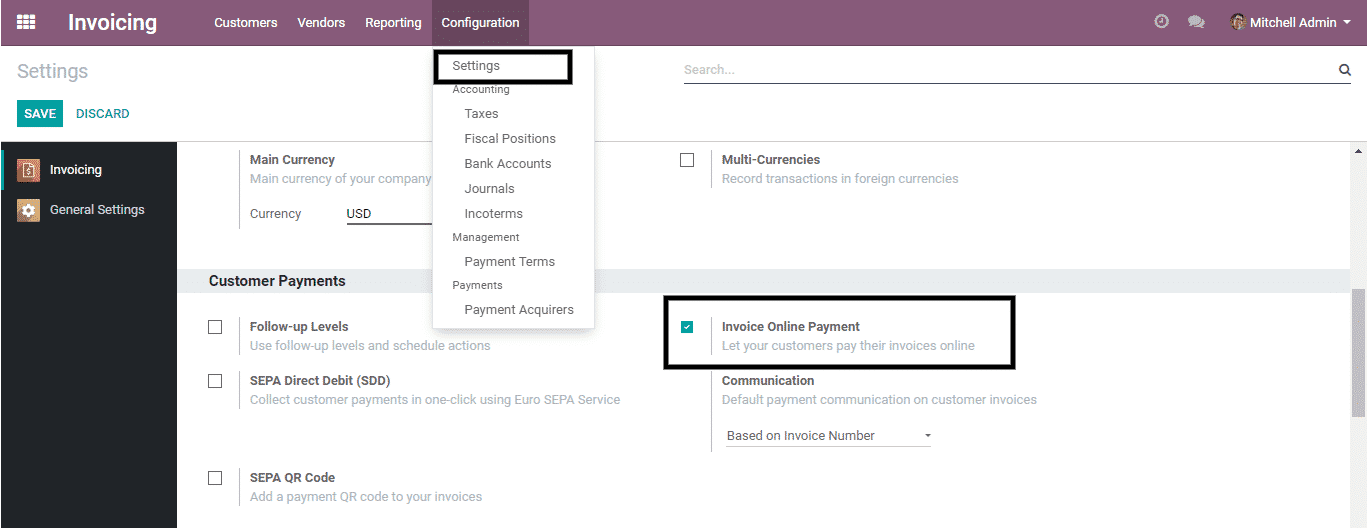
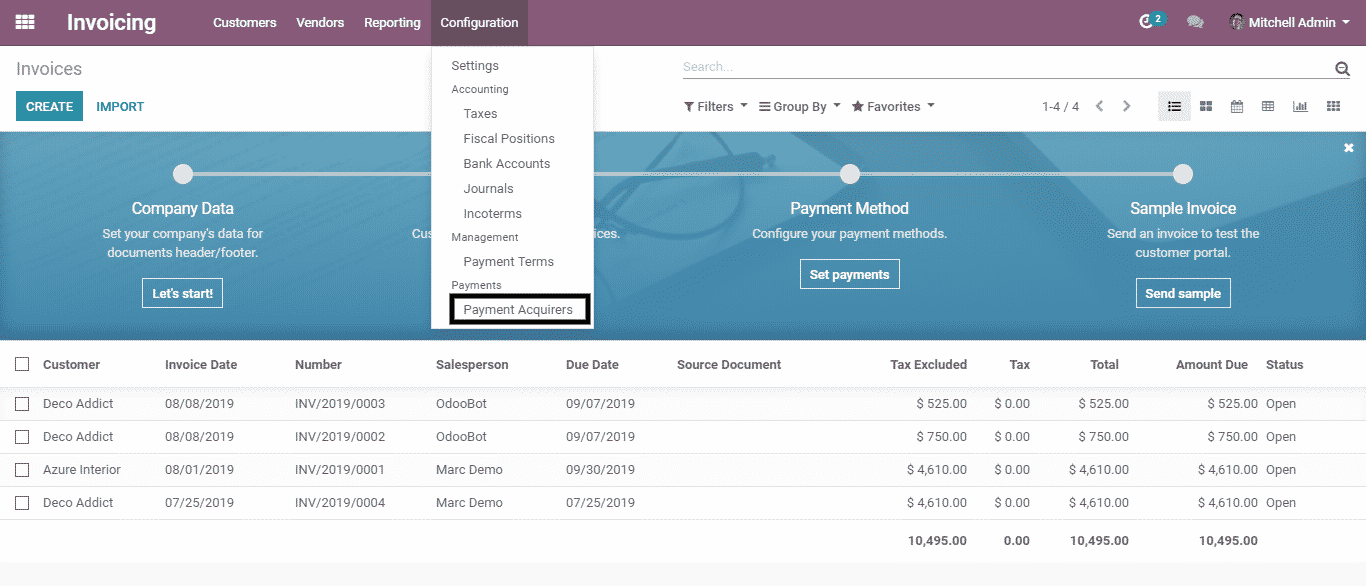
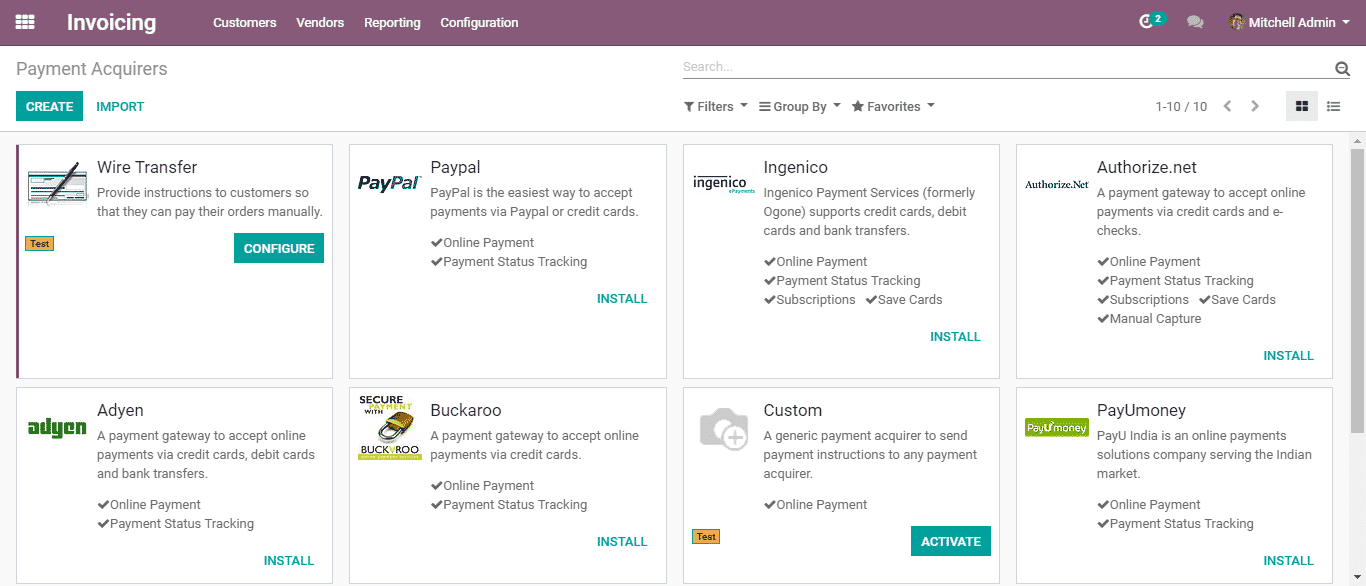

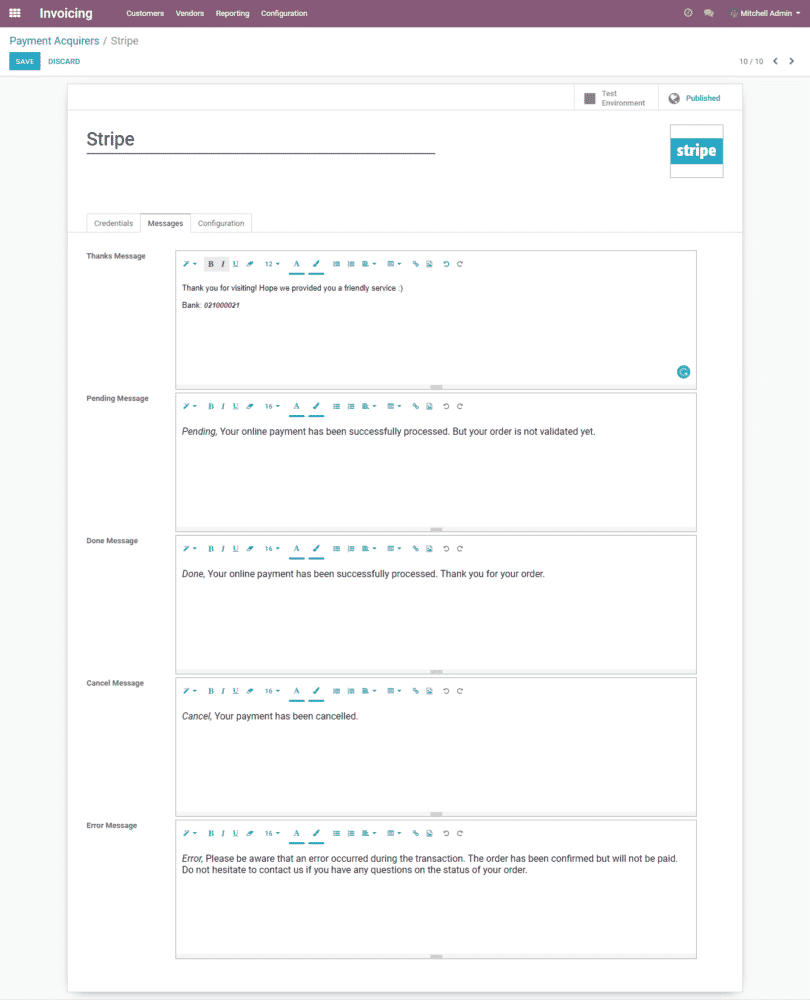
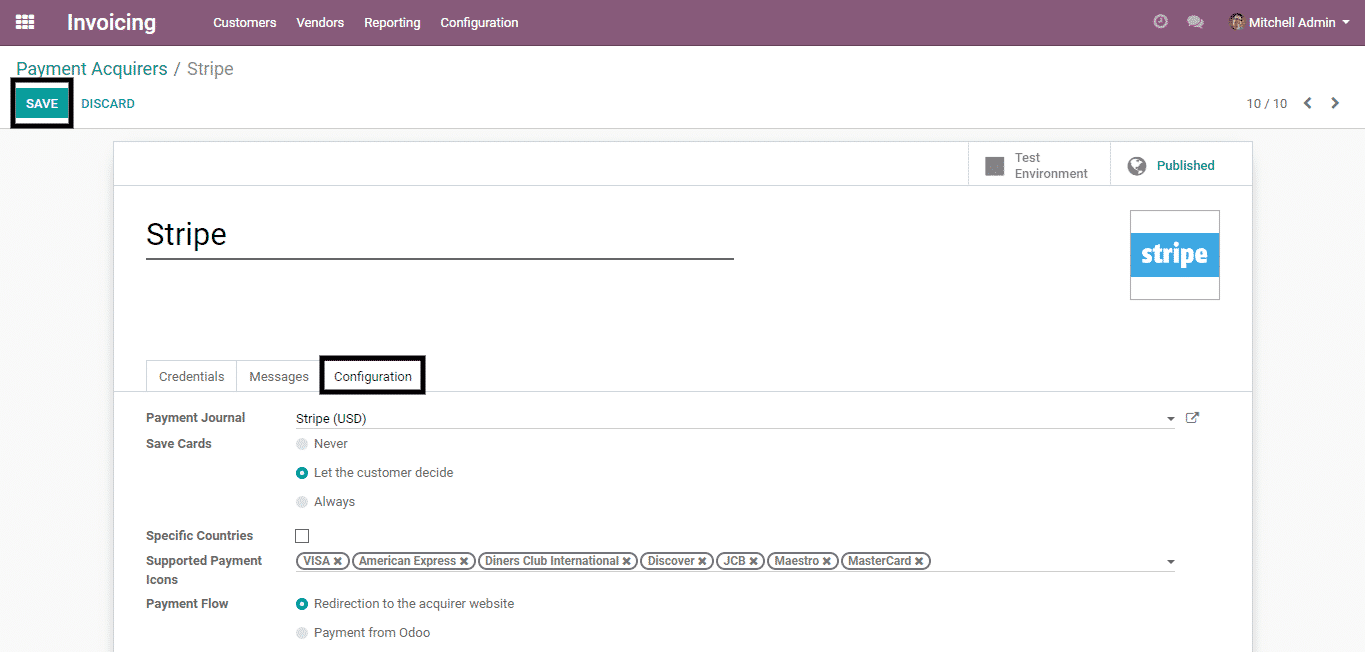
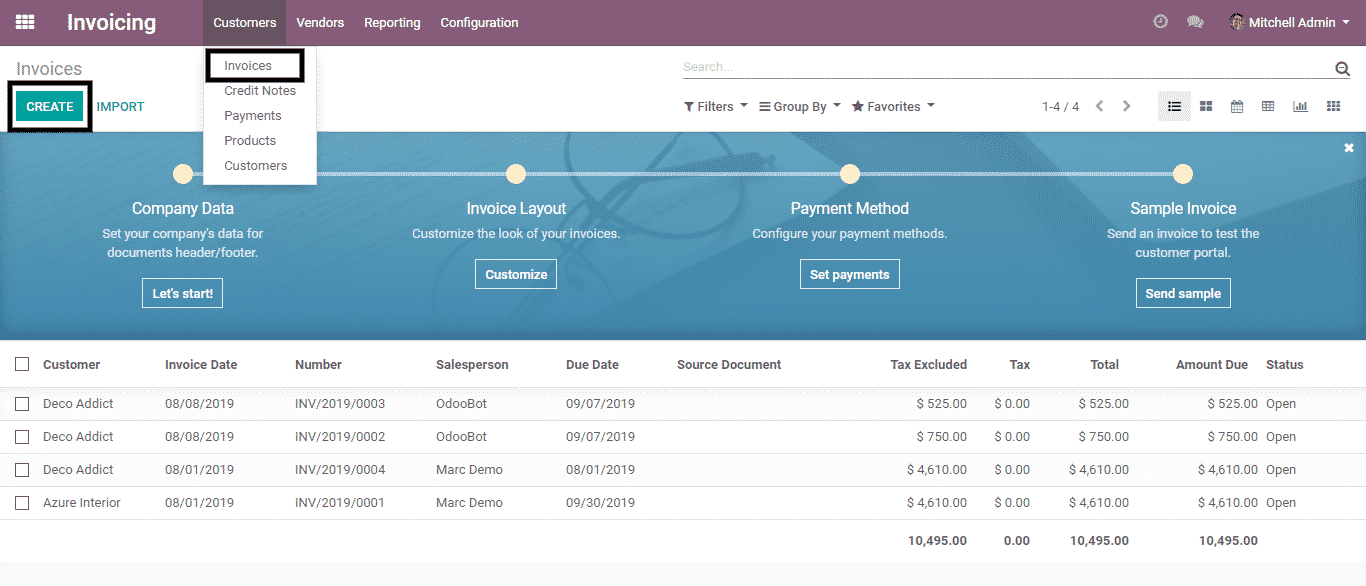
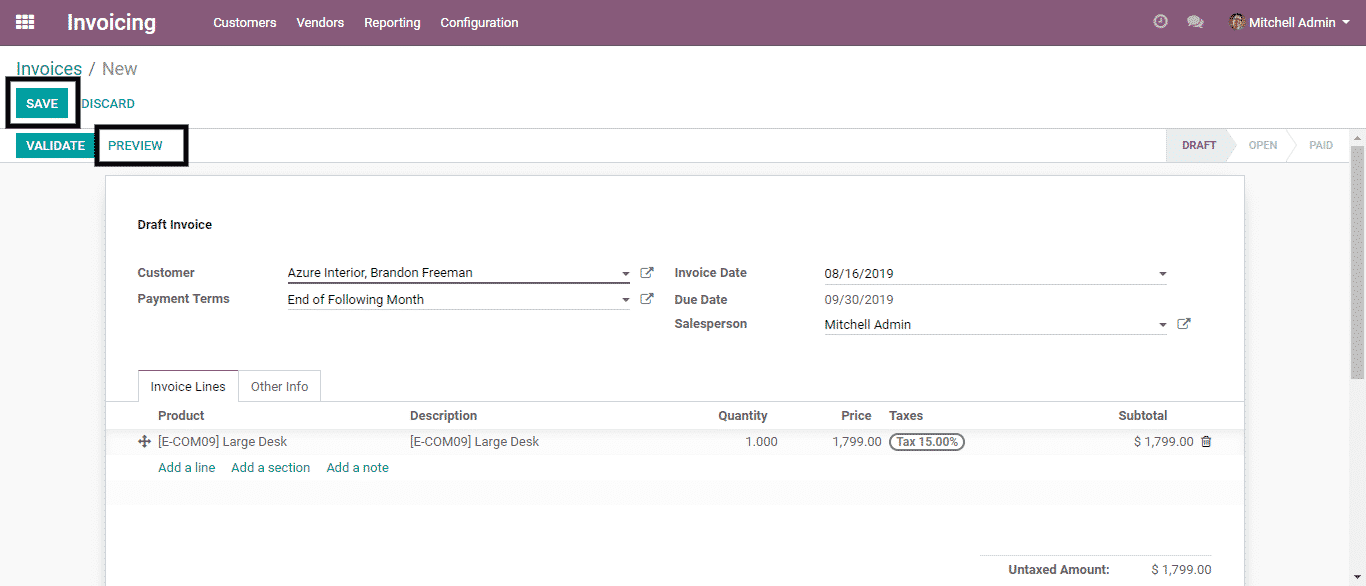
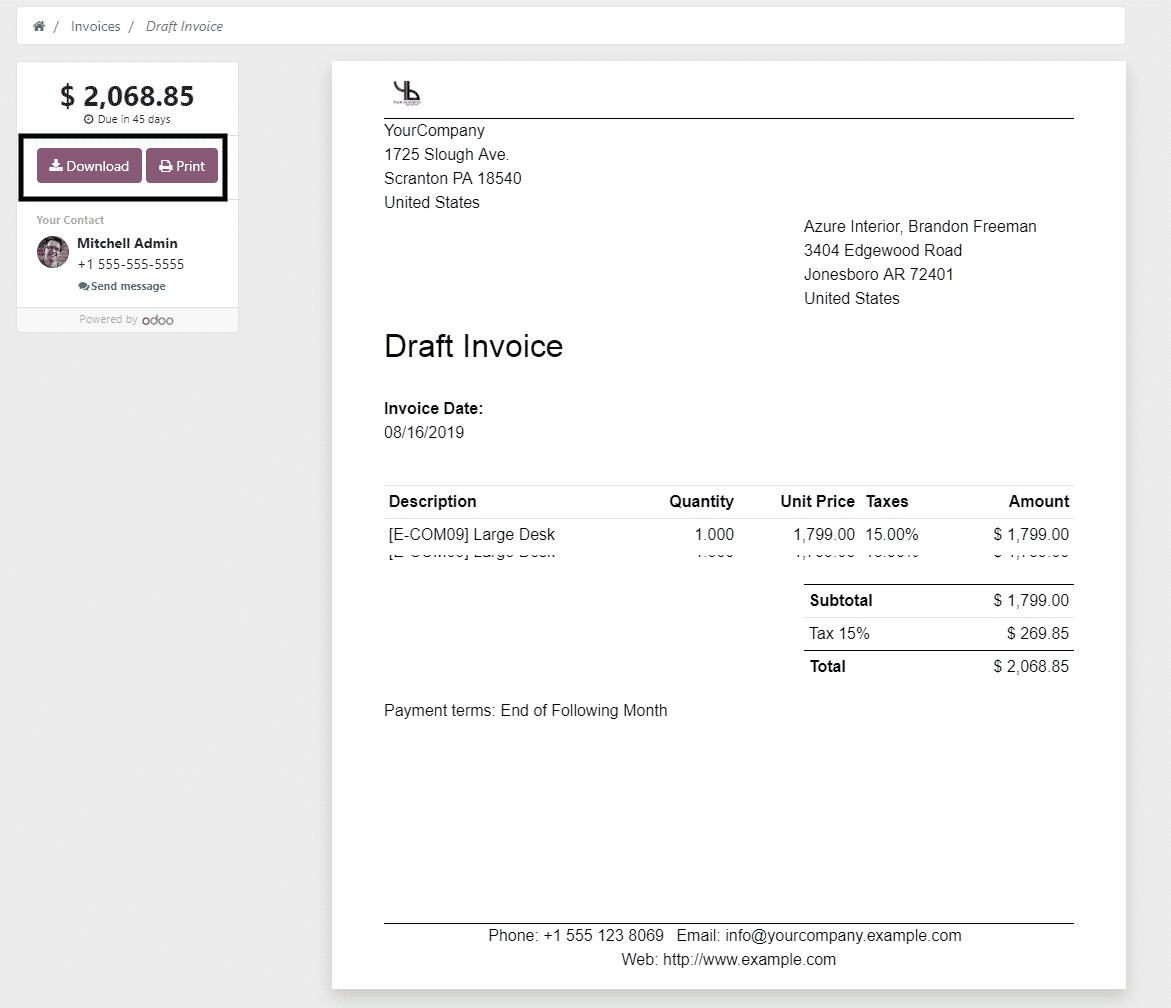
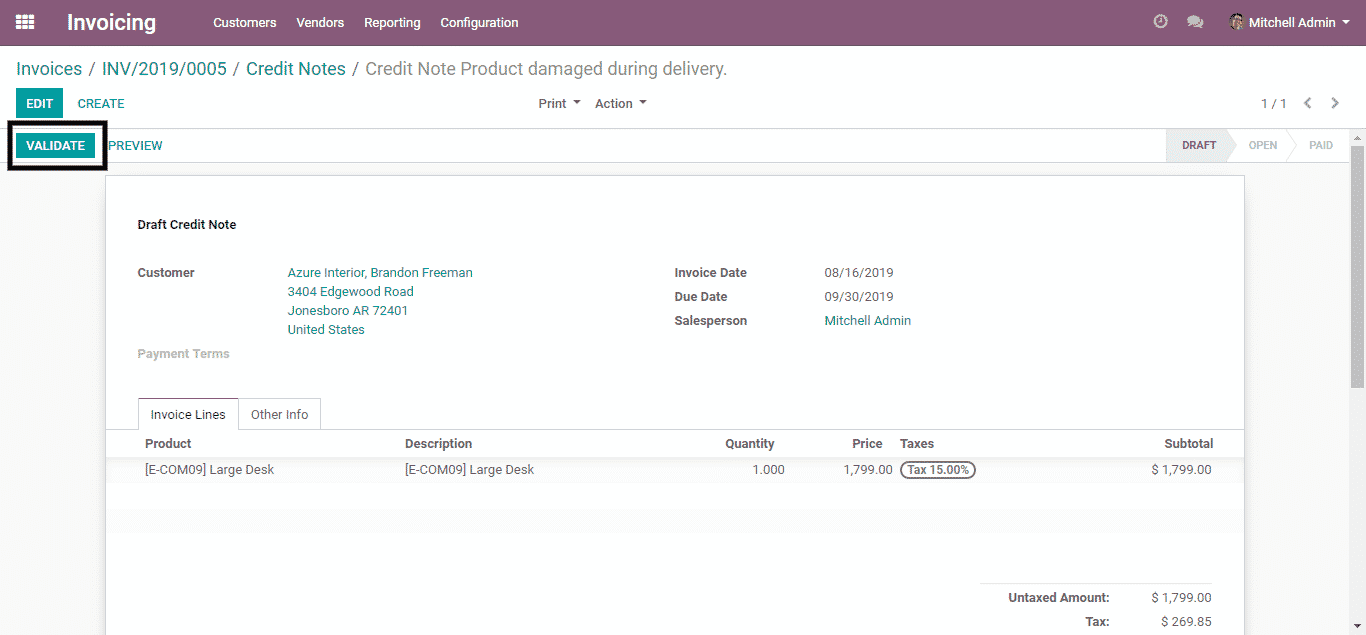
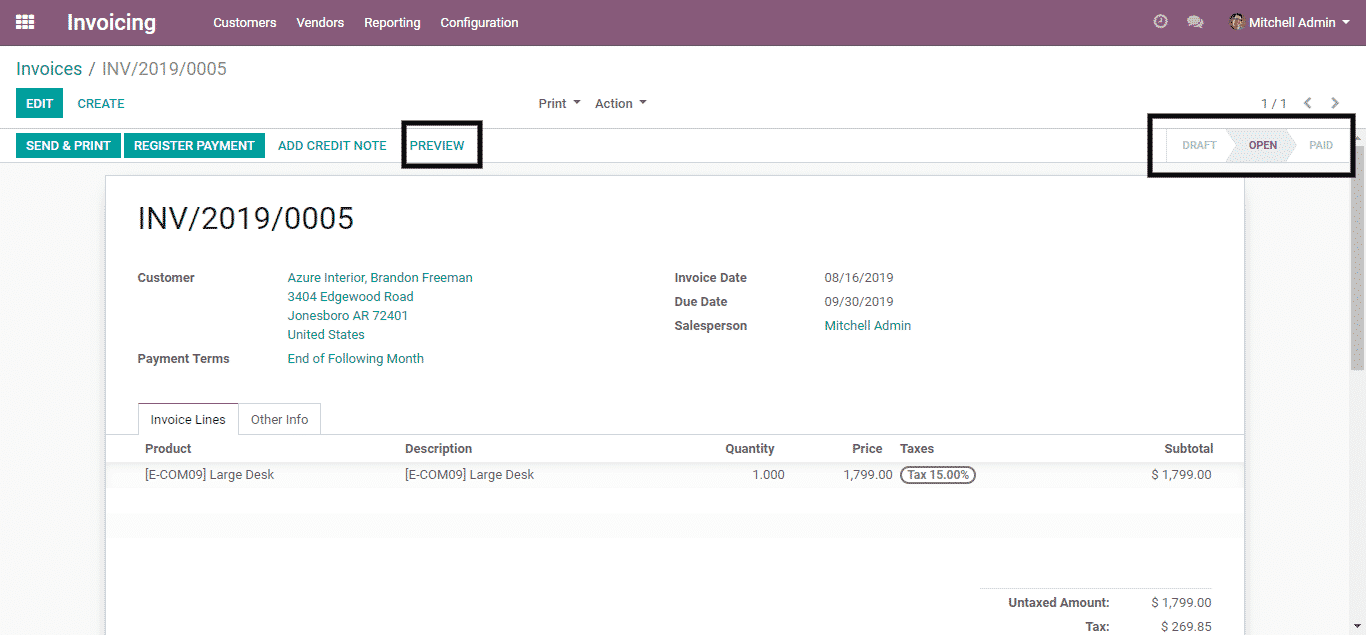
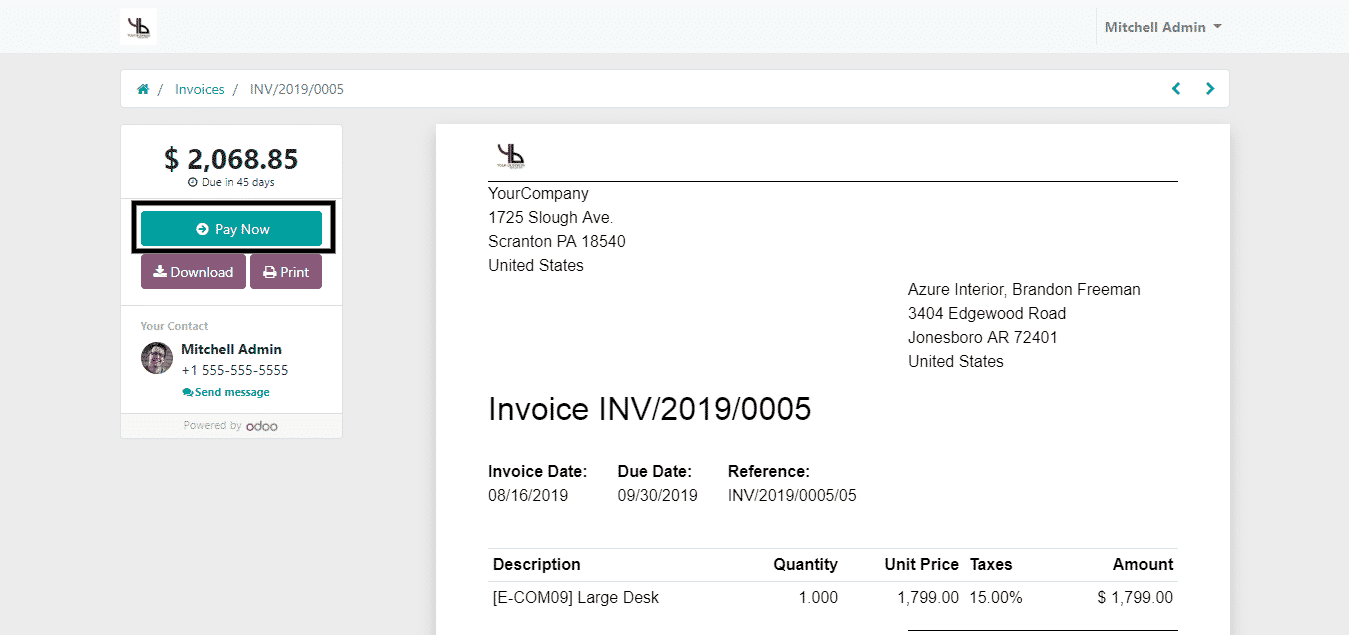
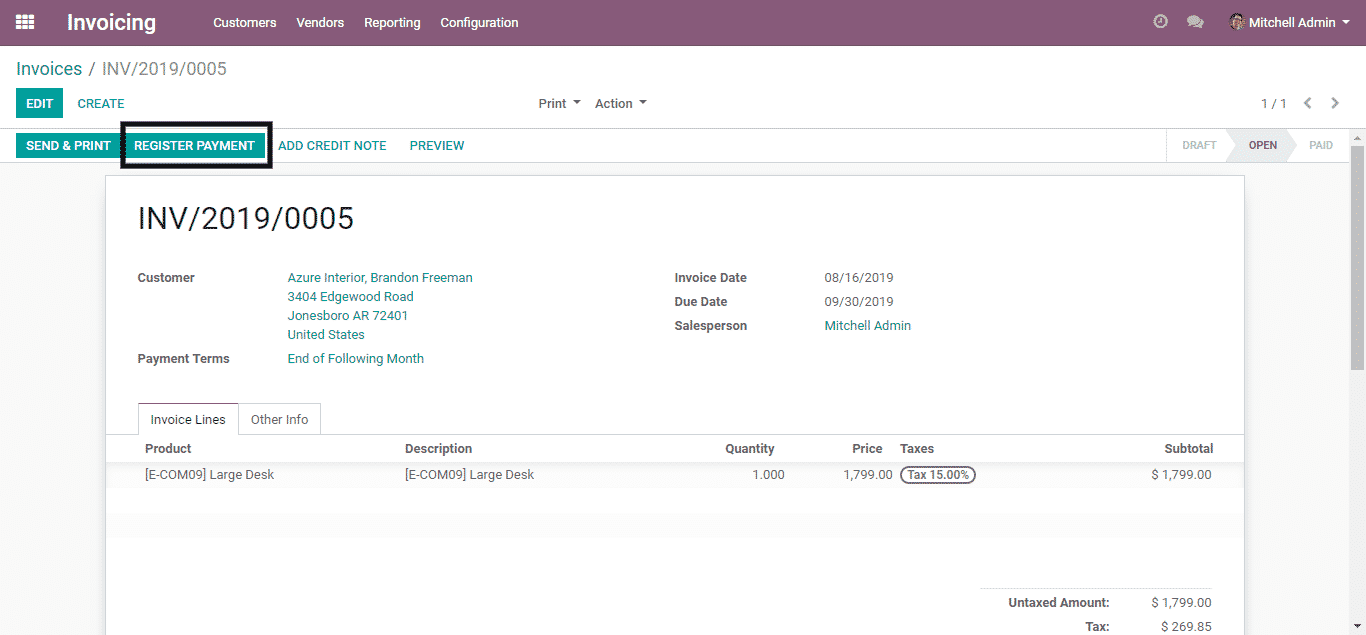

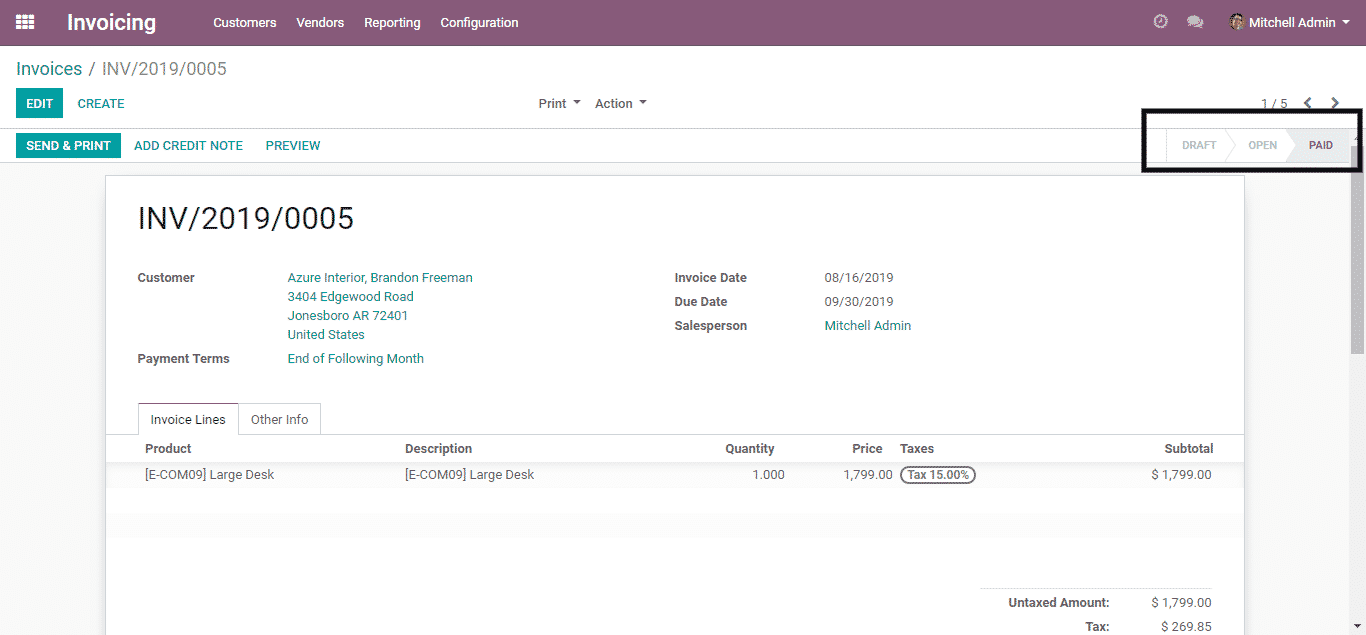
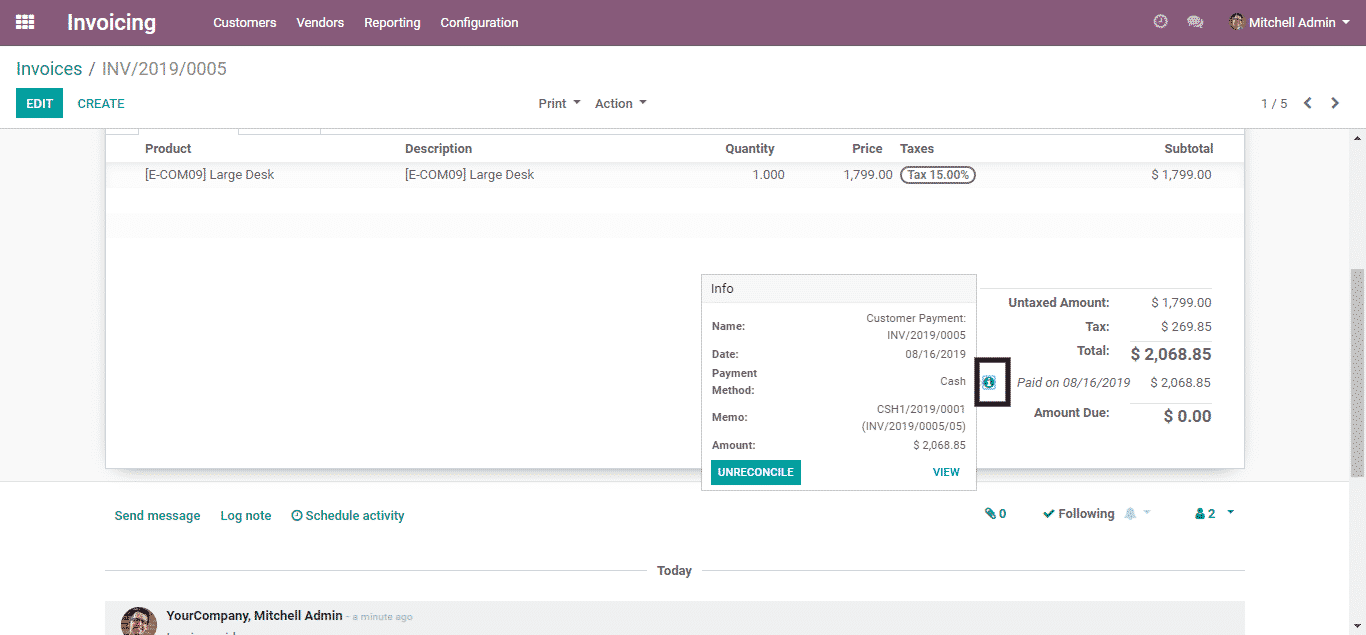
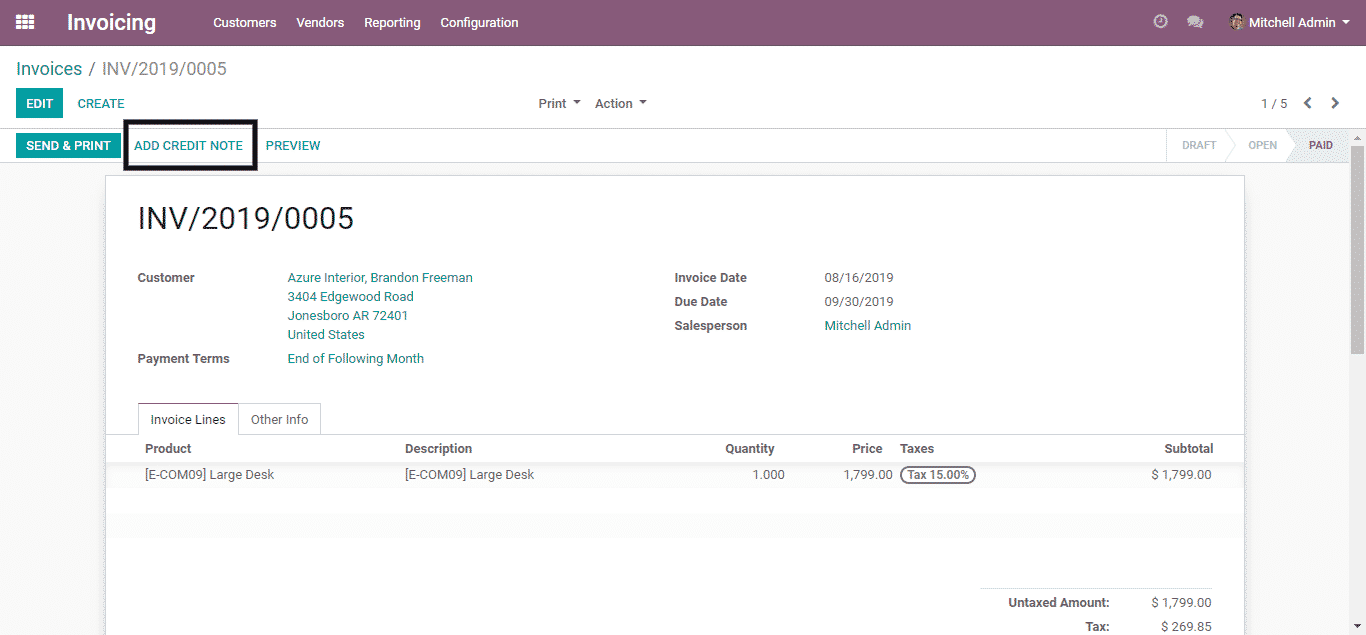
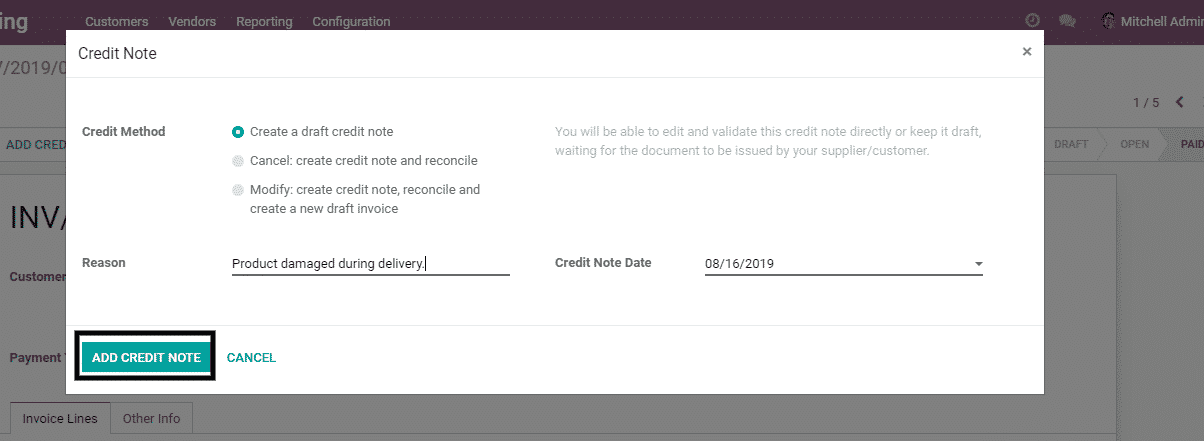

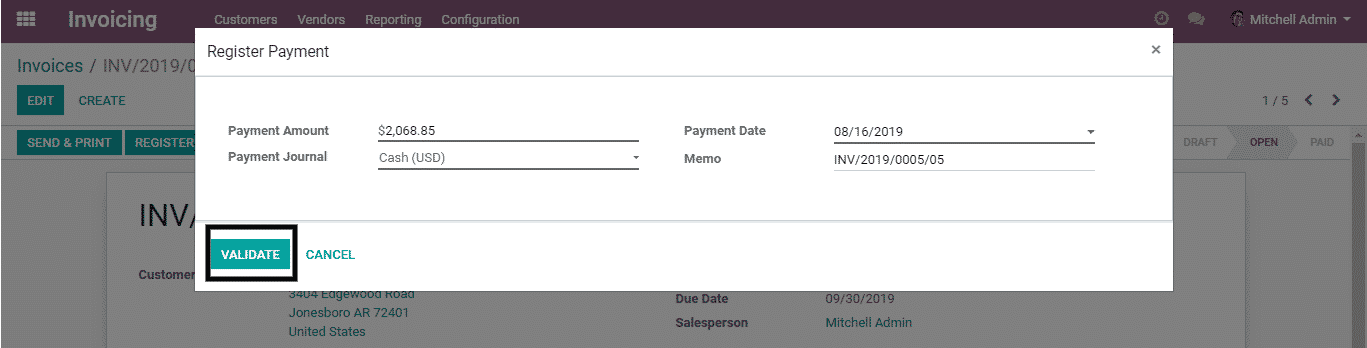

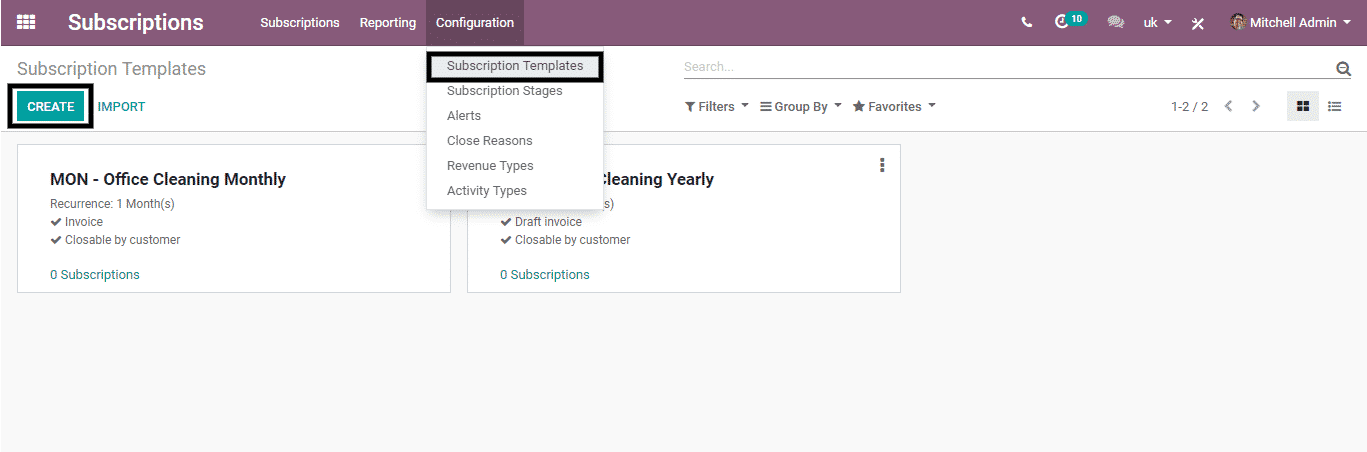
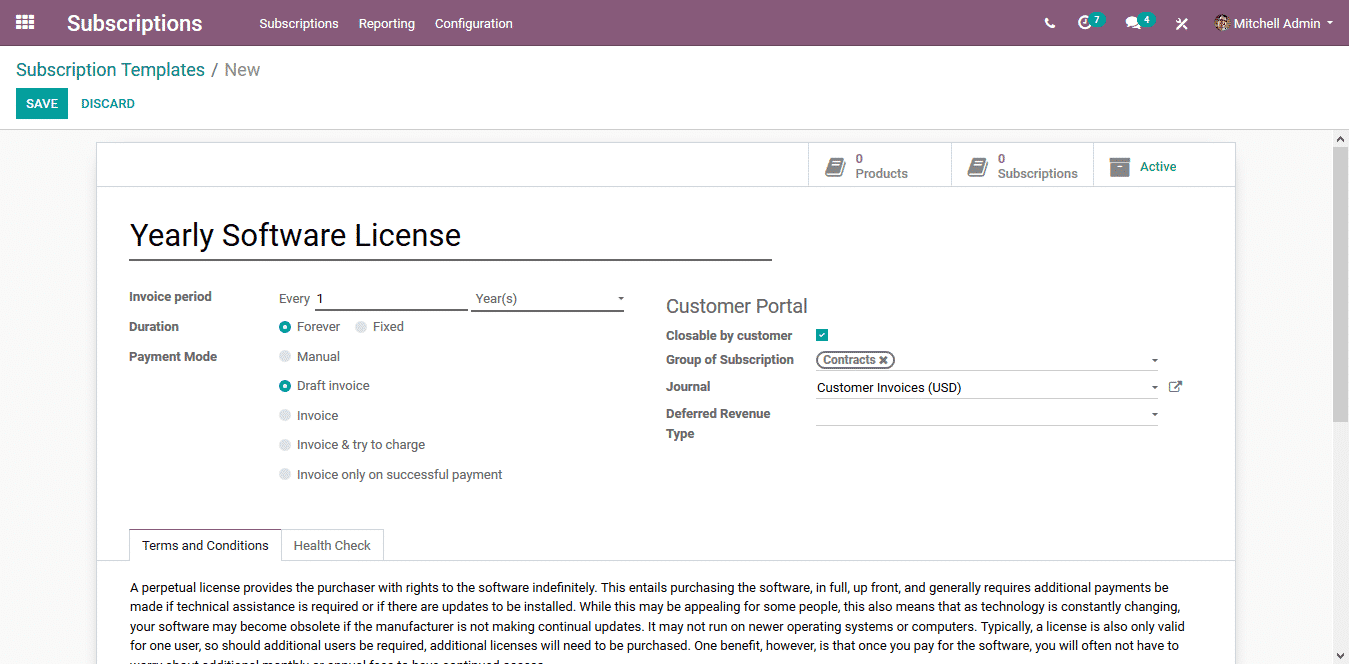
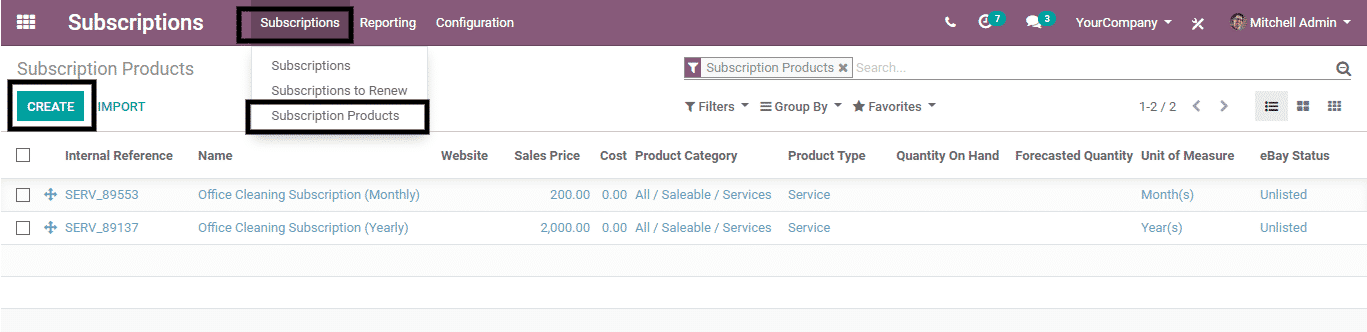
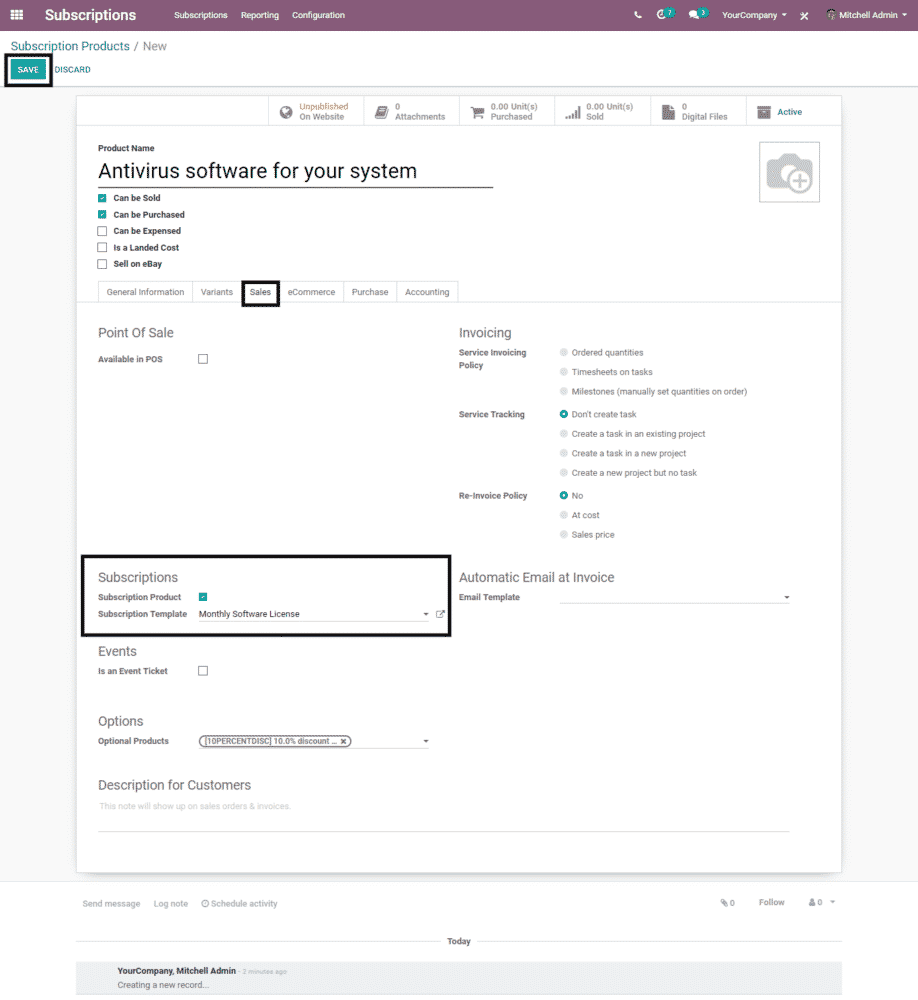
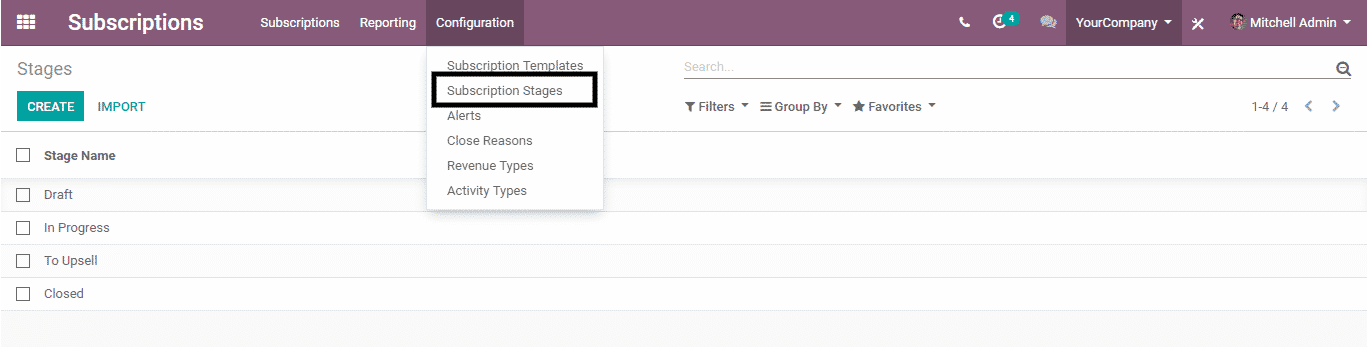
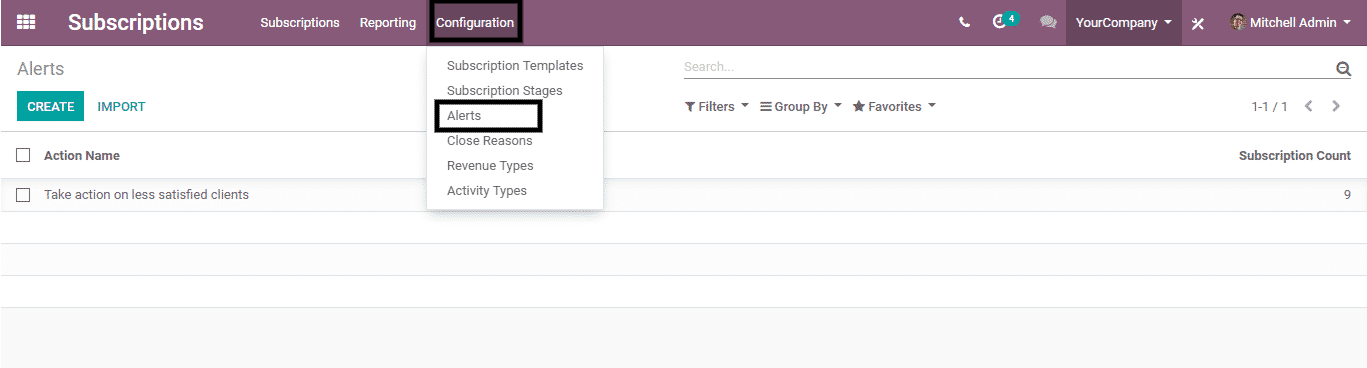

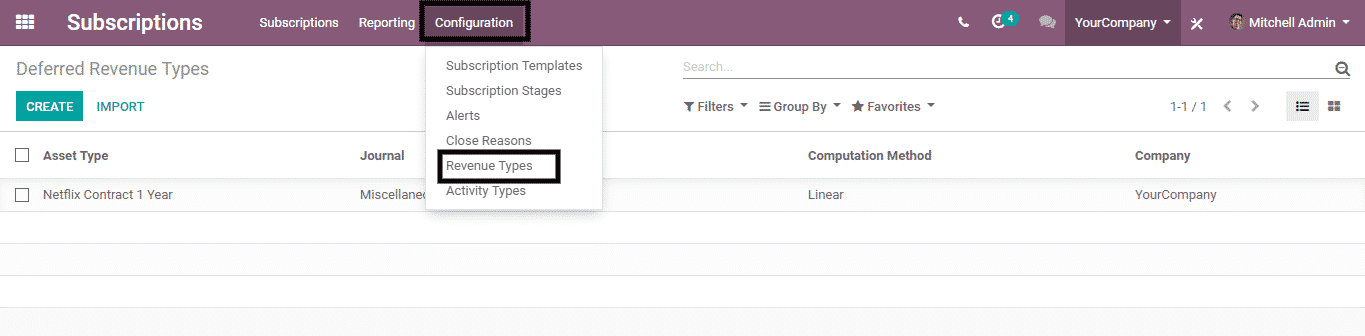
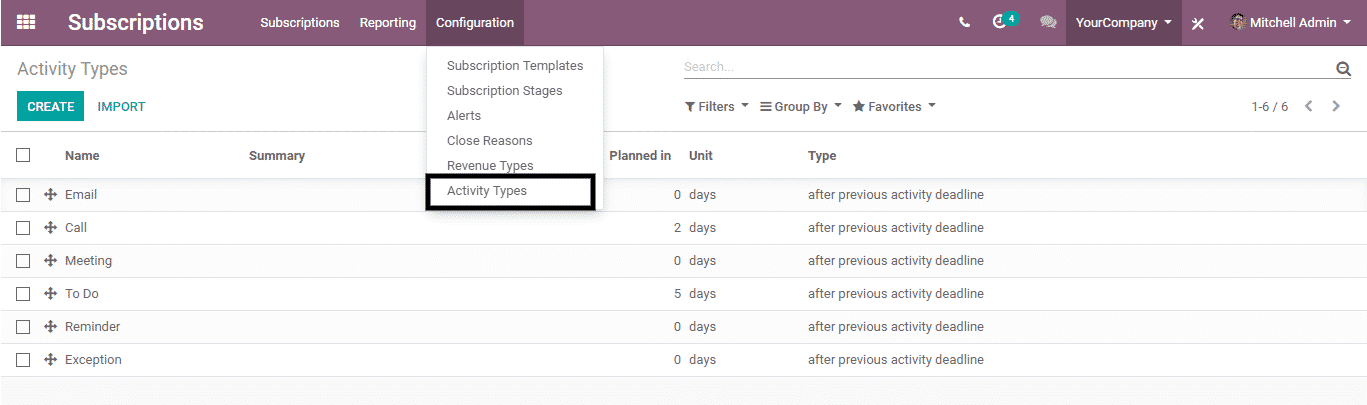
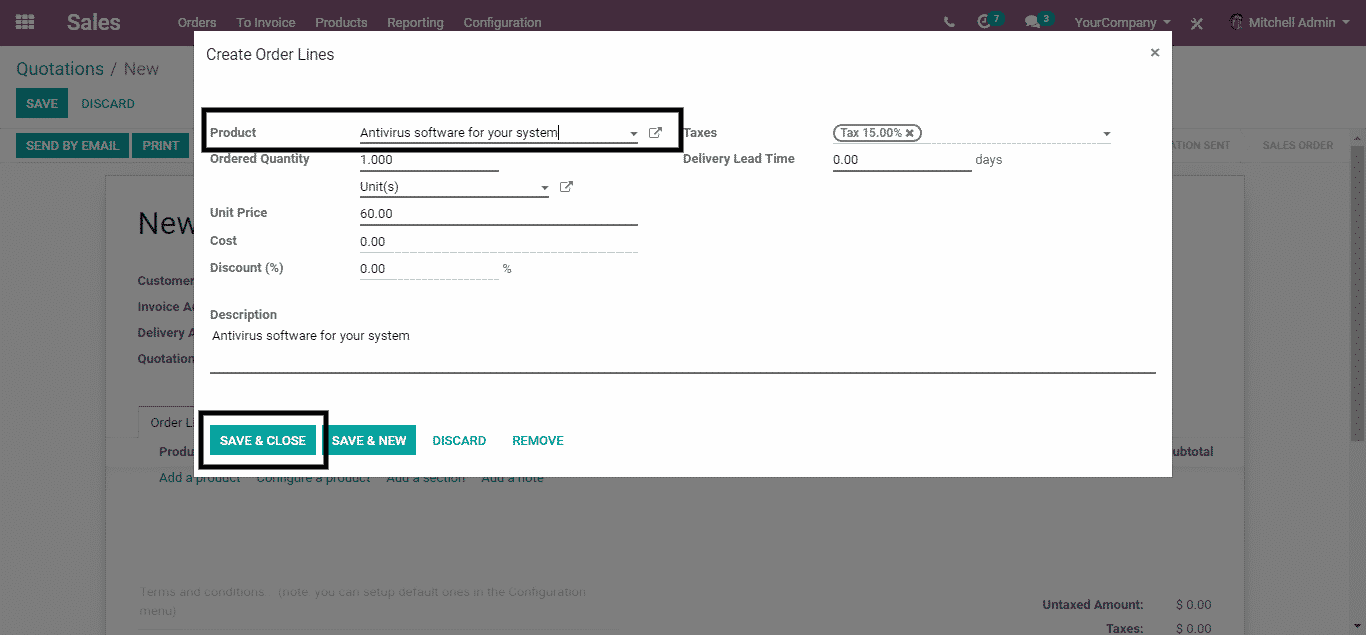
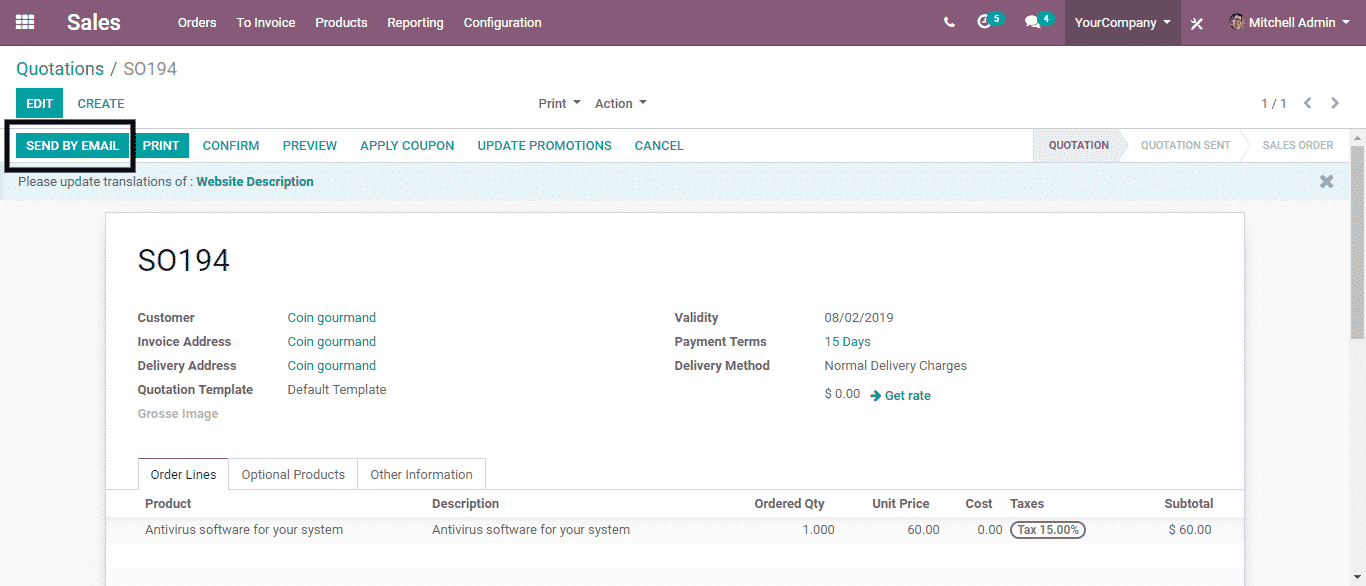
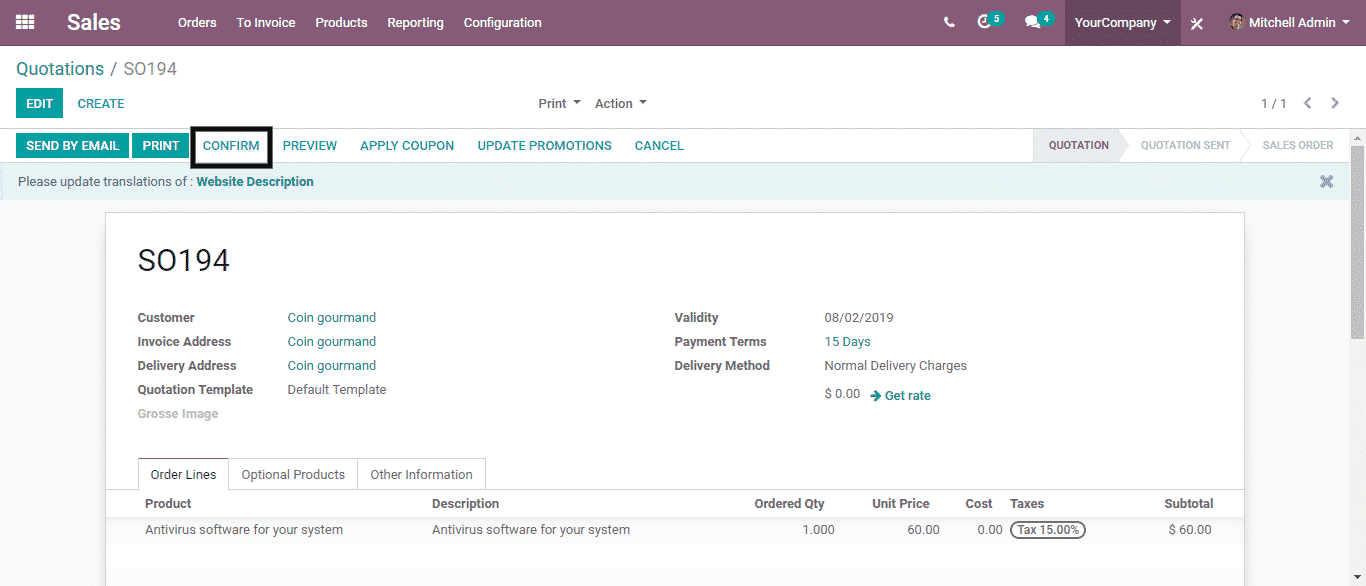
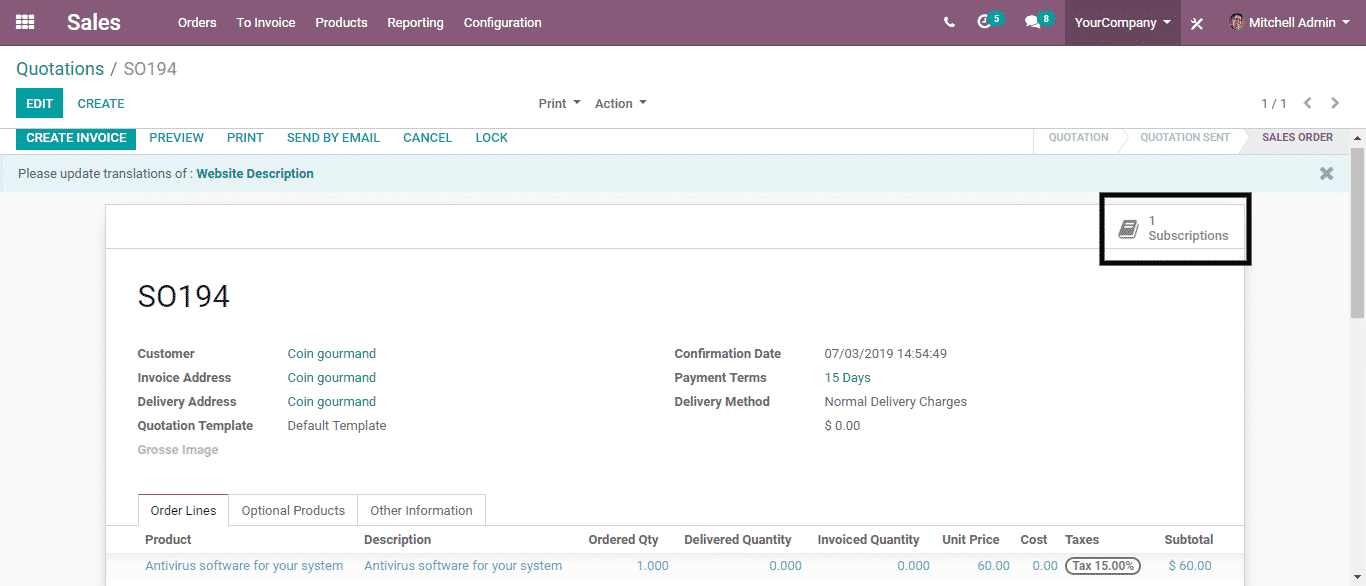
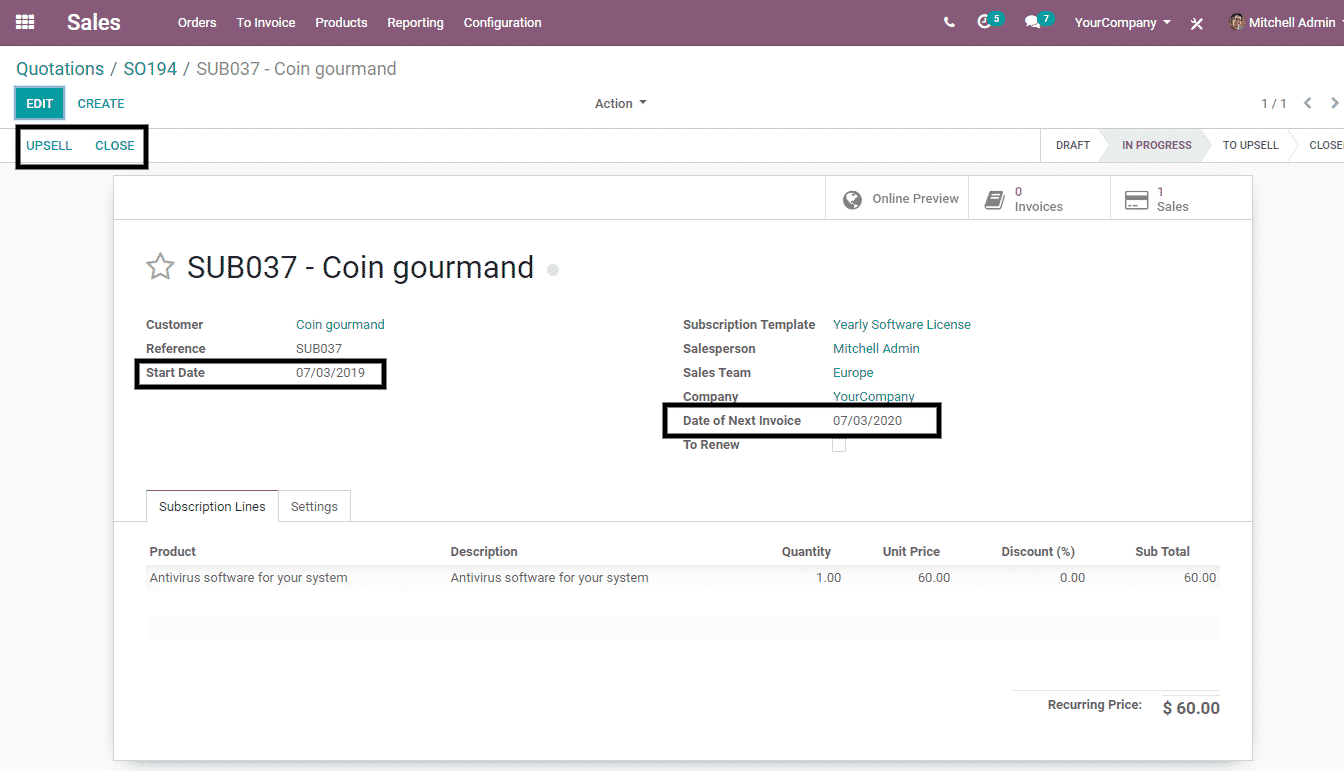
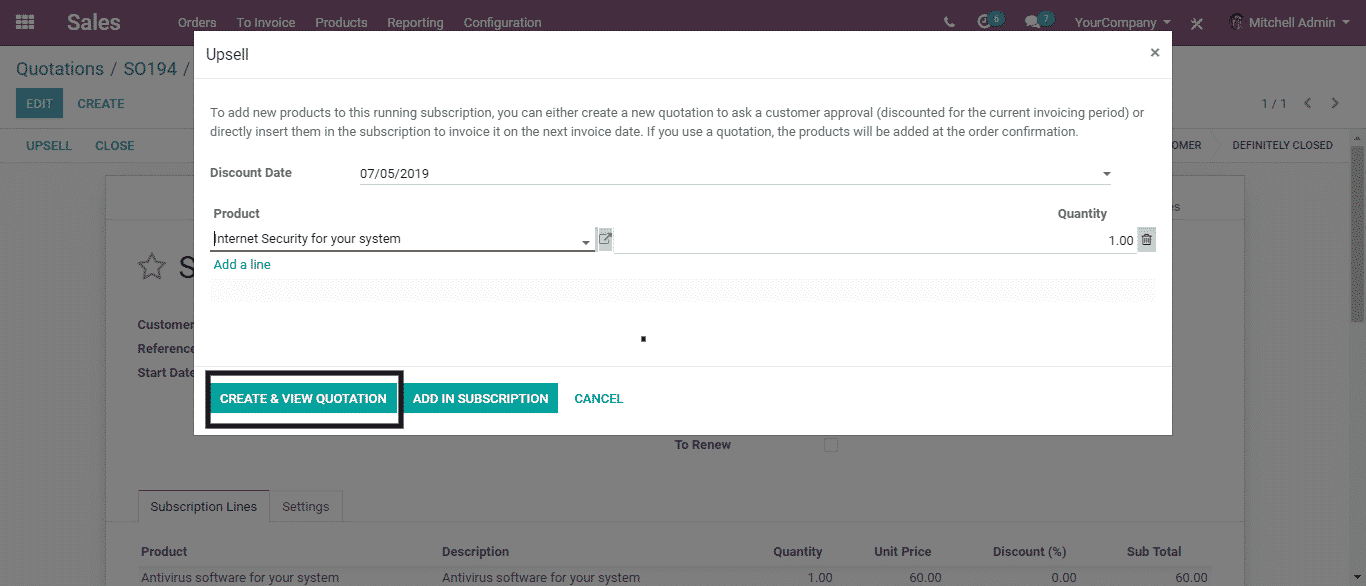
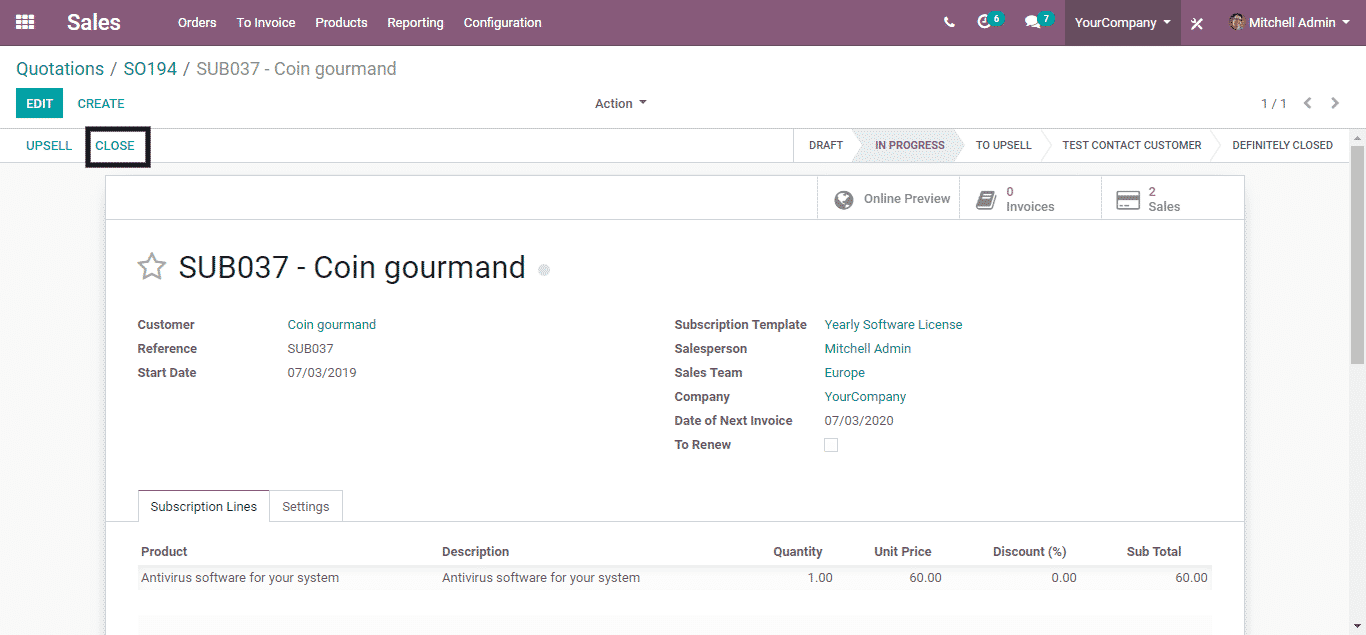
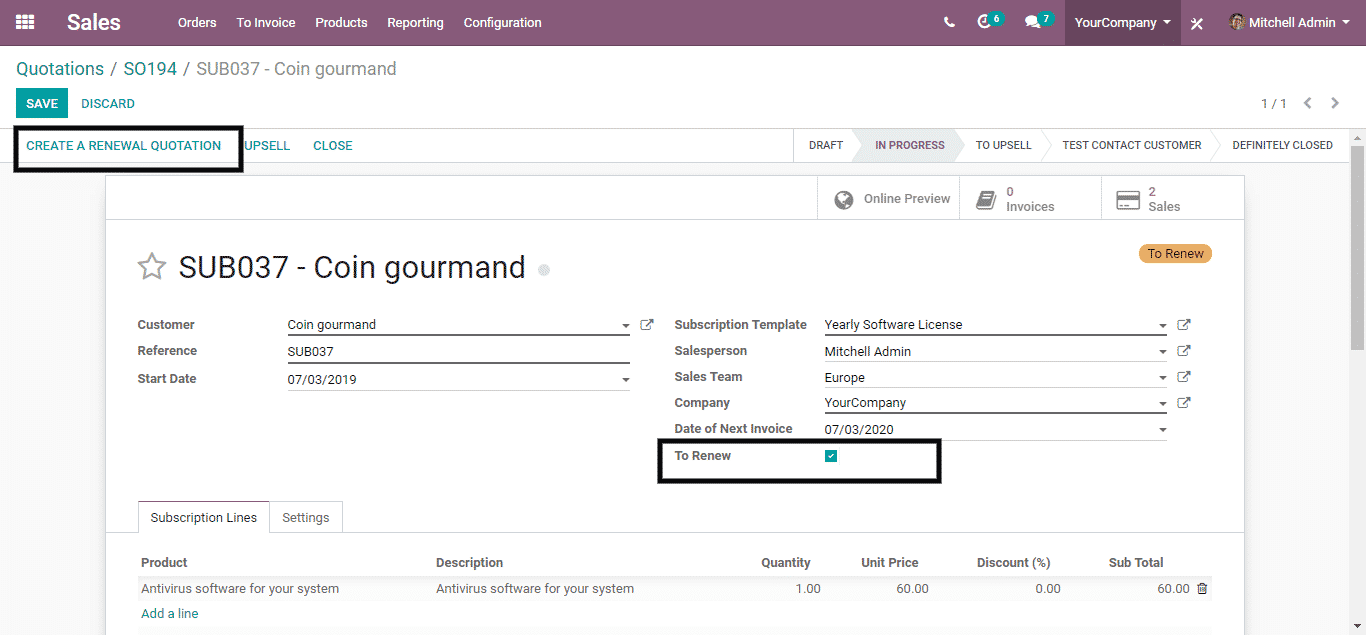
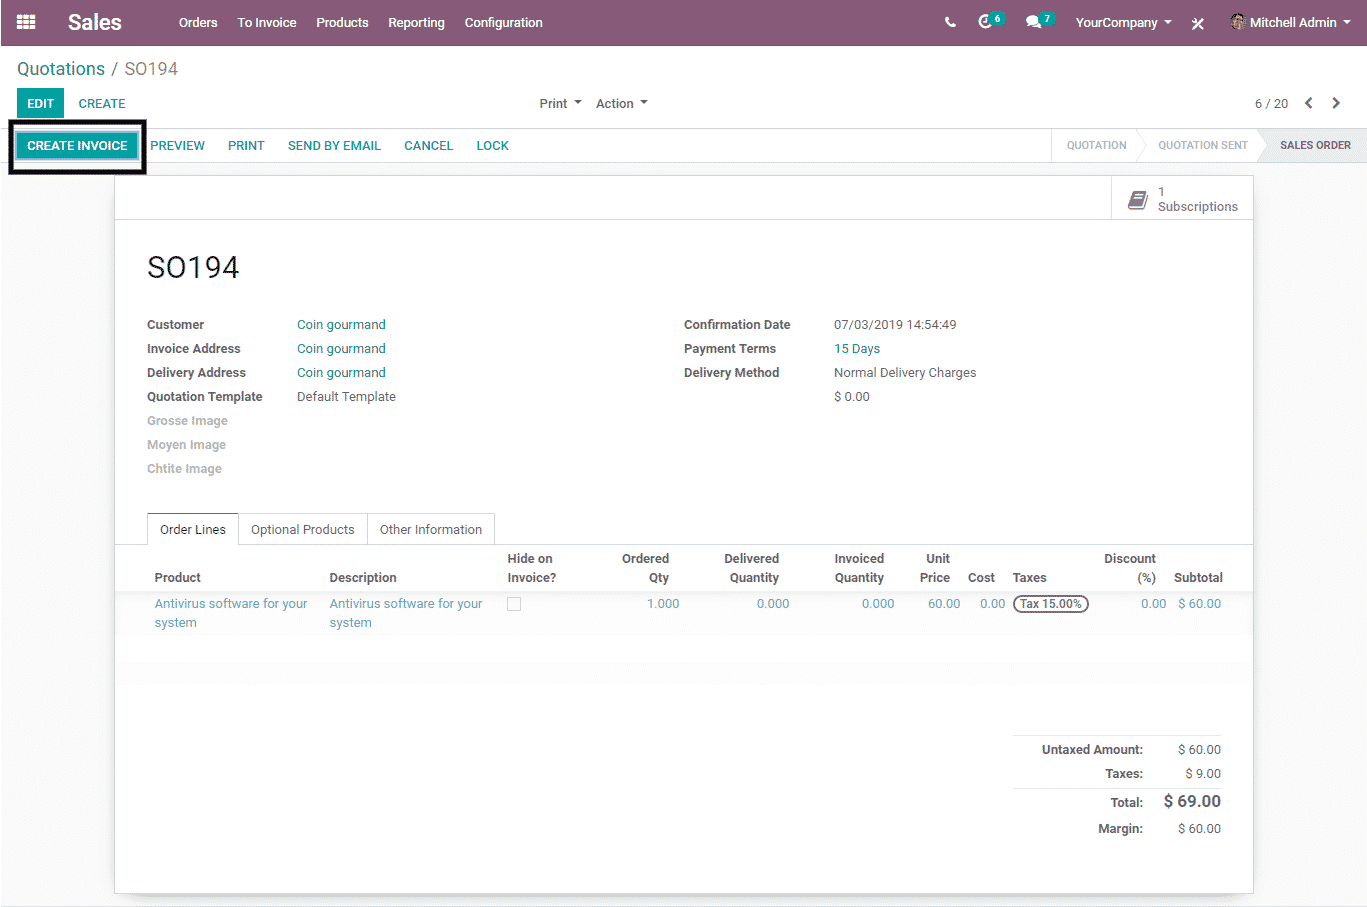
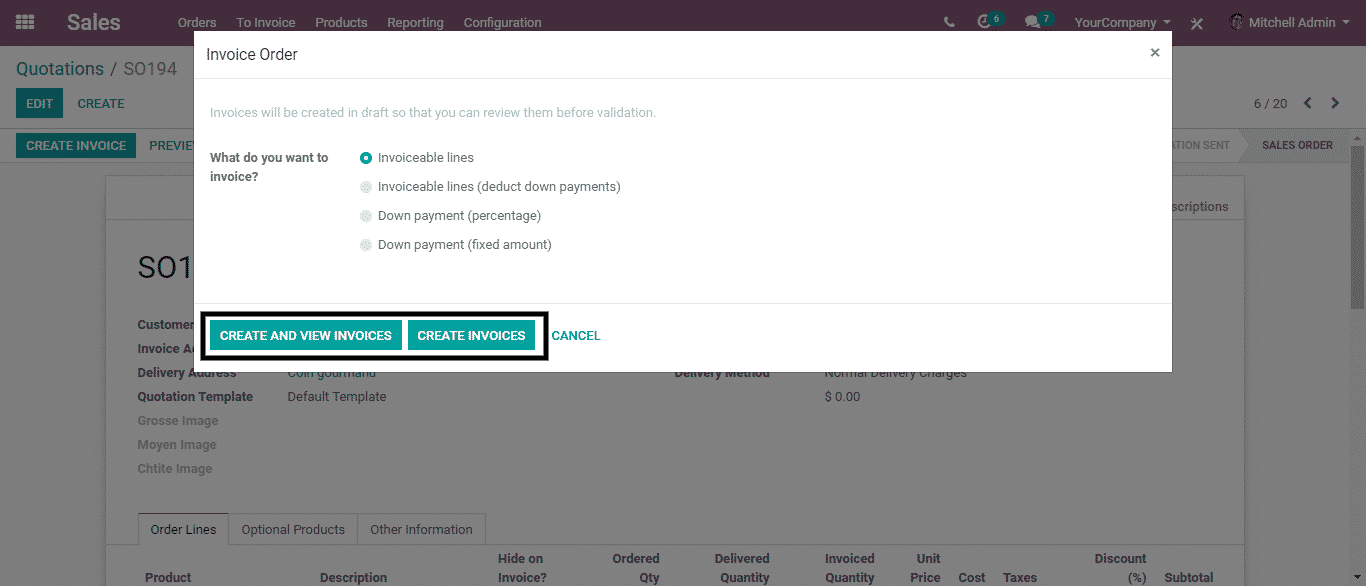
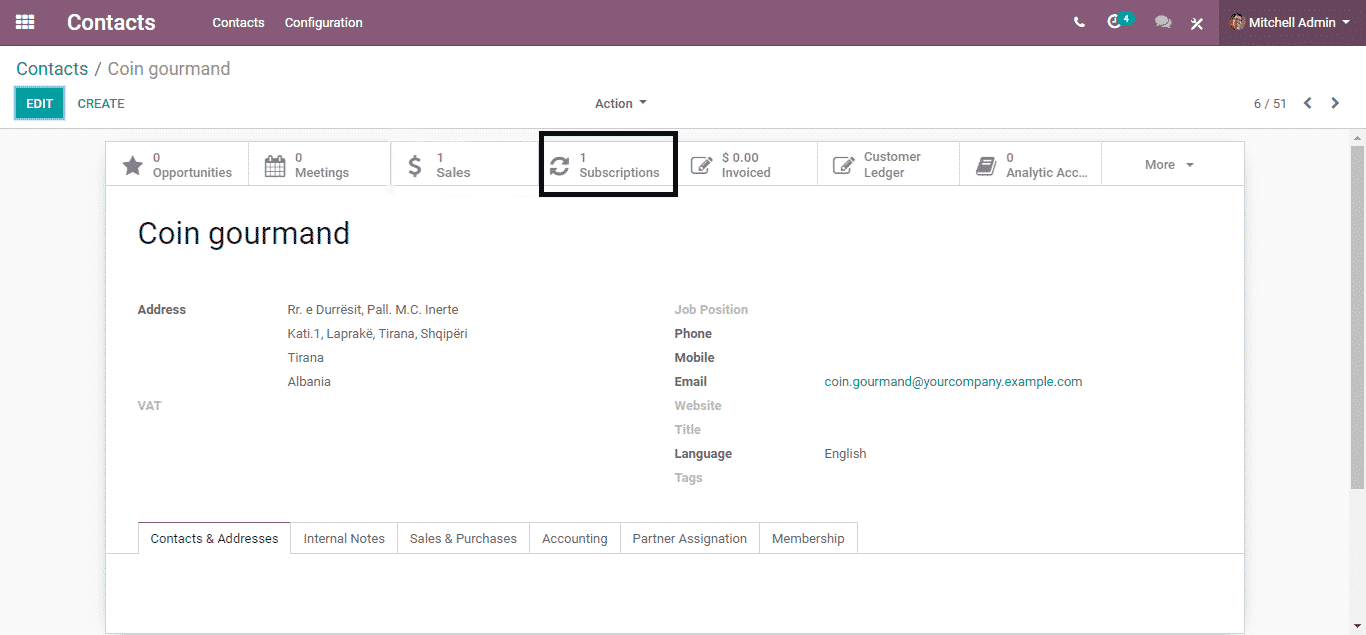
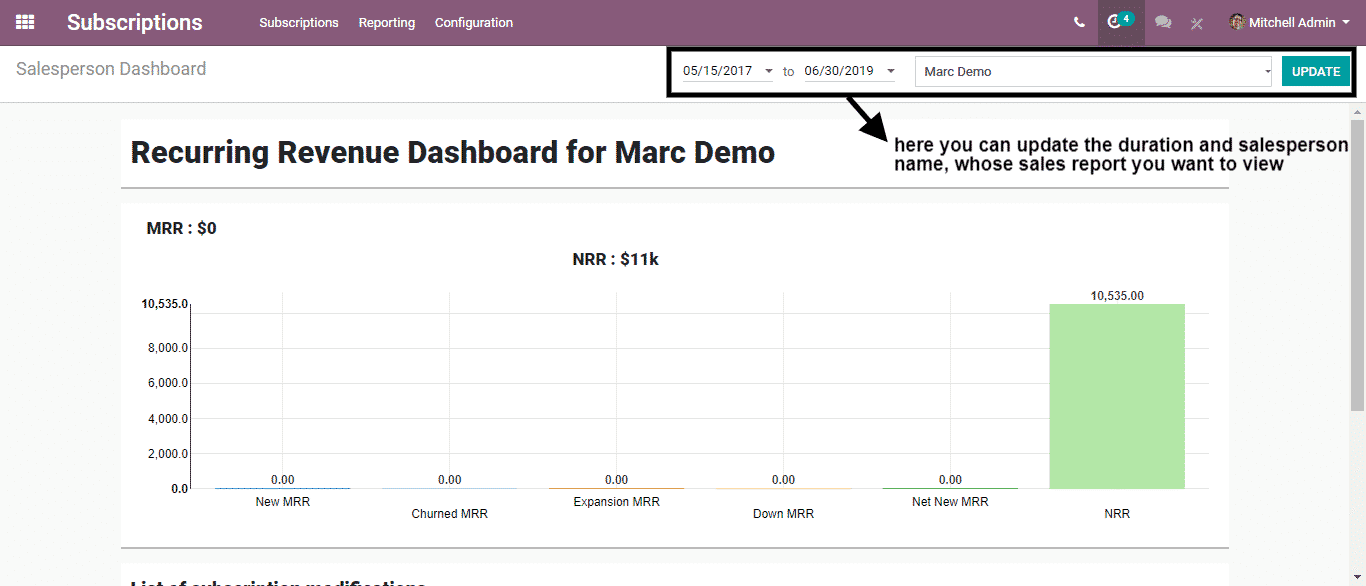
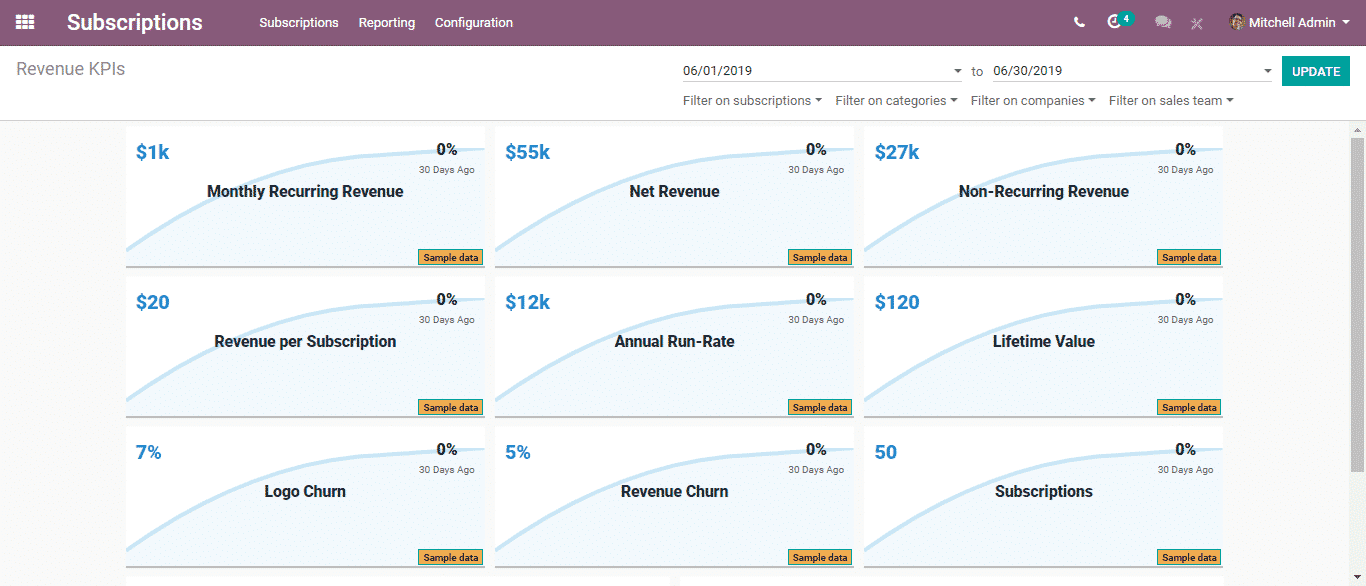
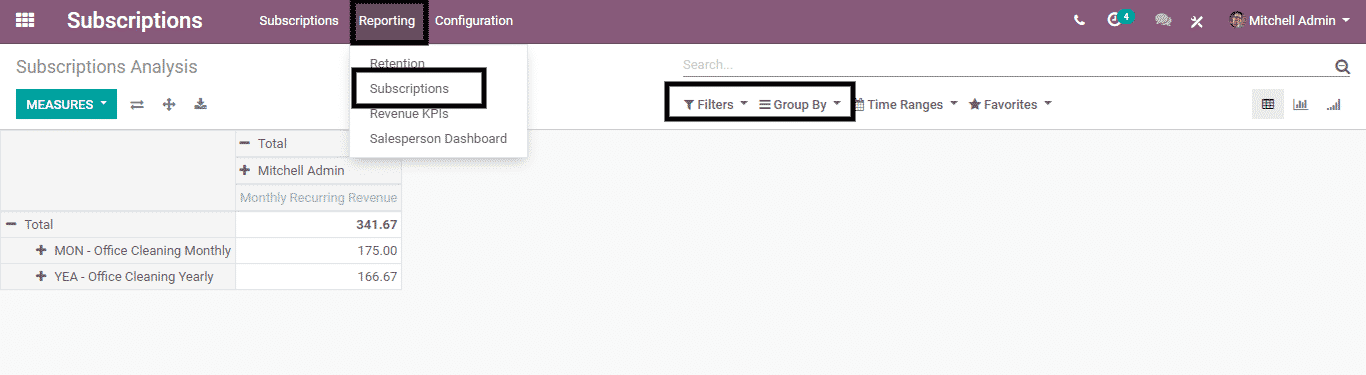


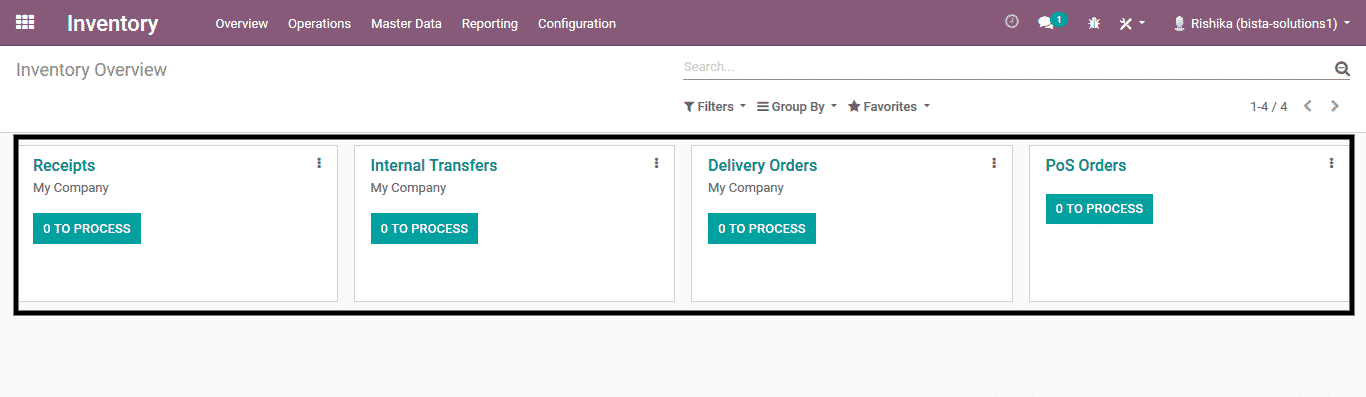 Product Configuration for POS:
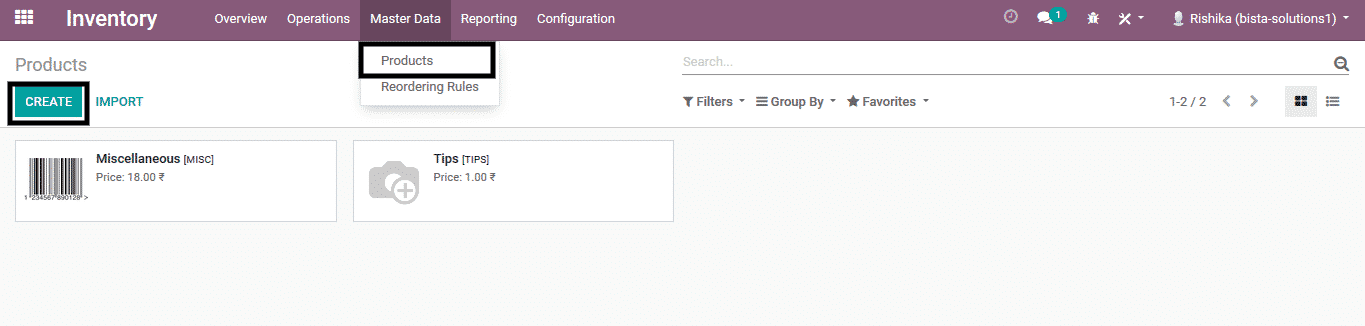


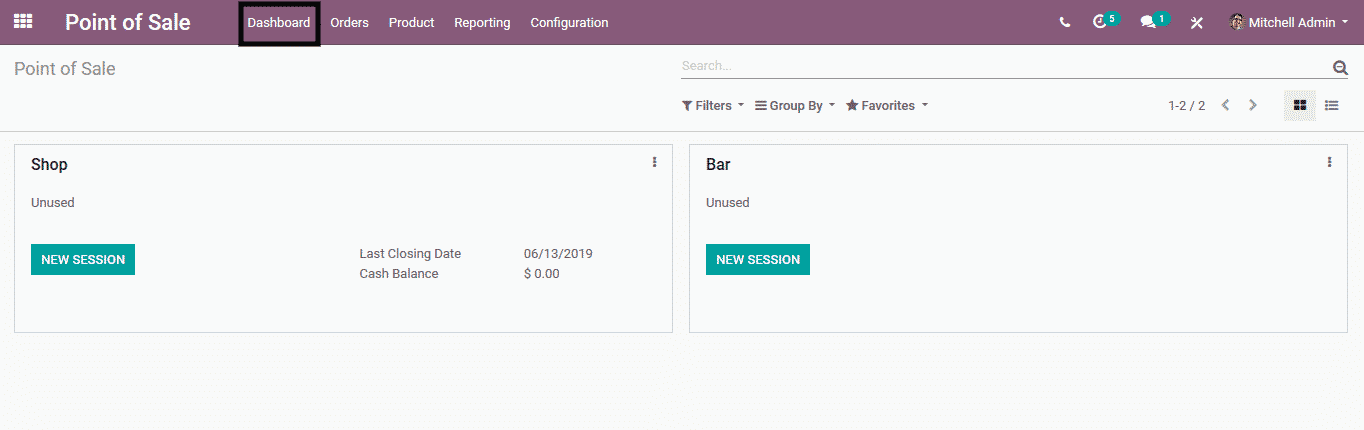
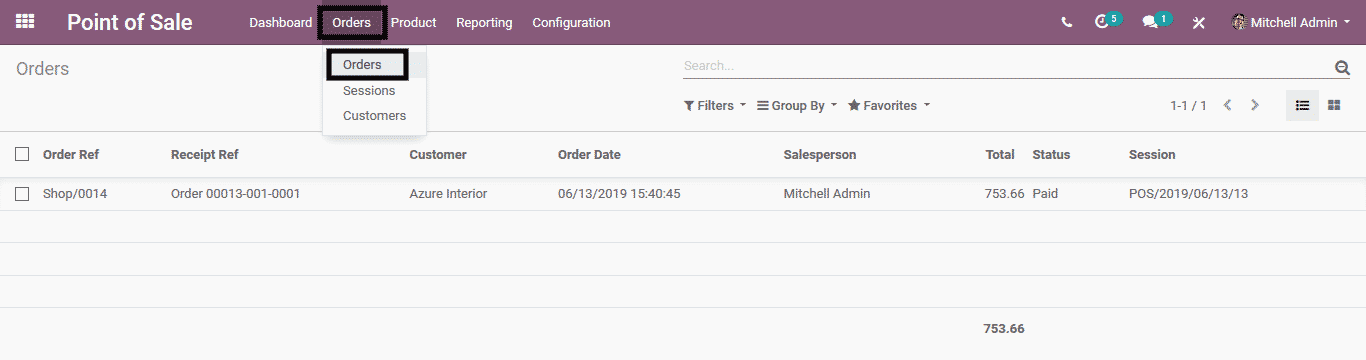
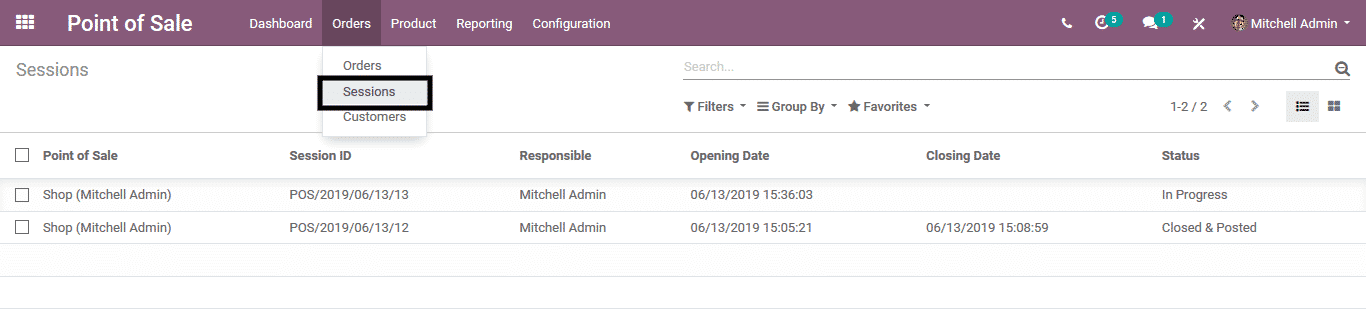

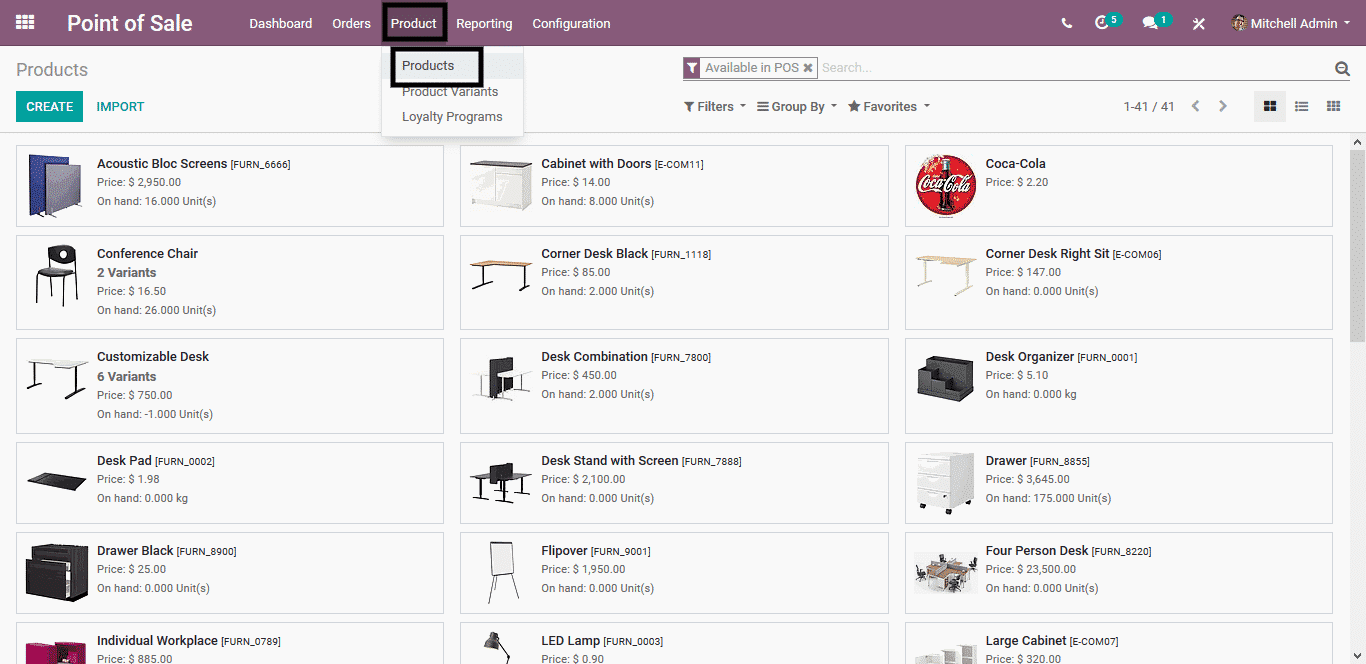
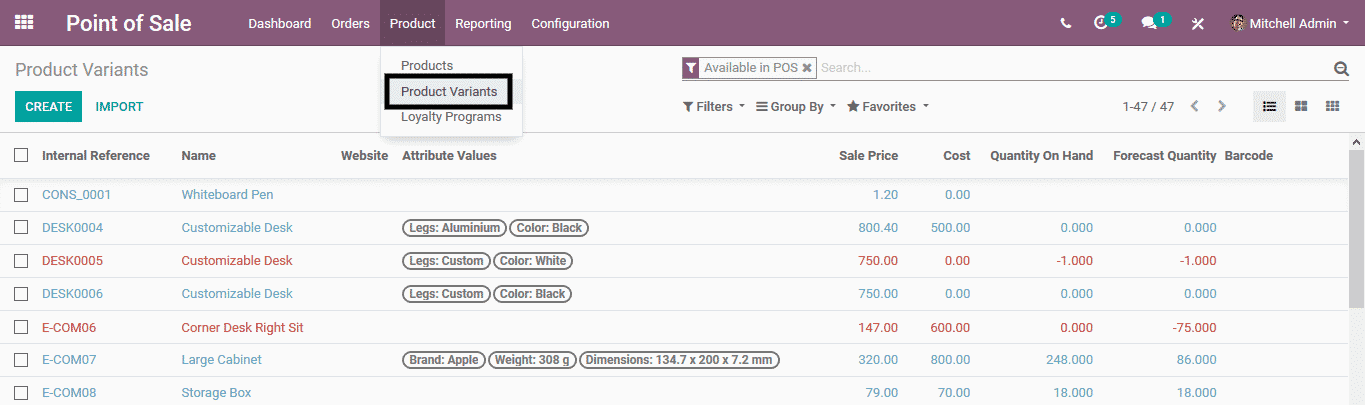

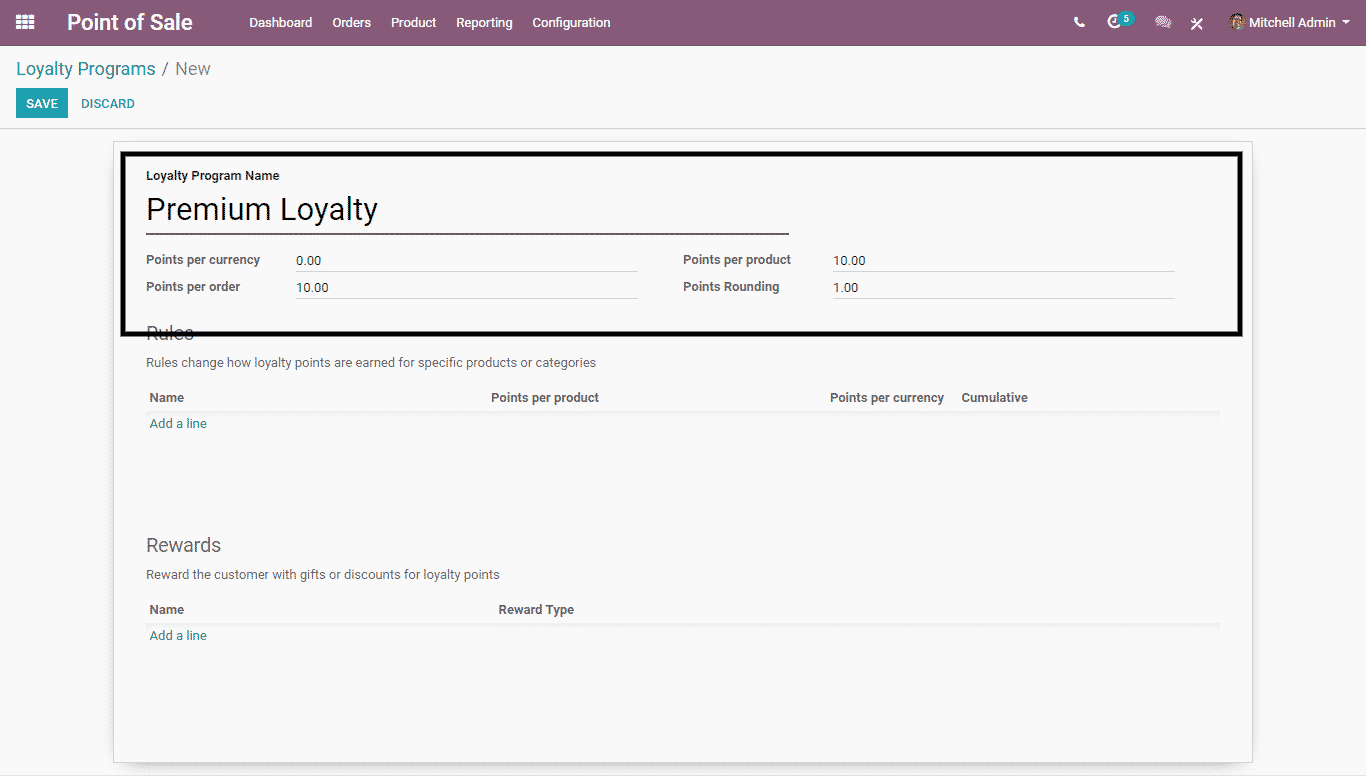
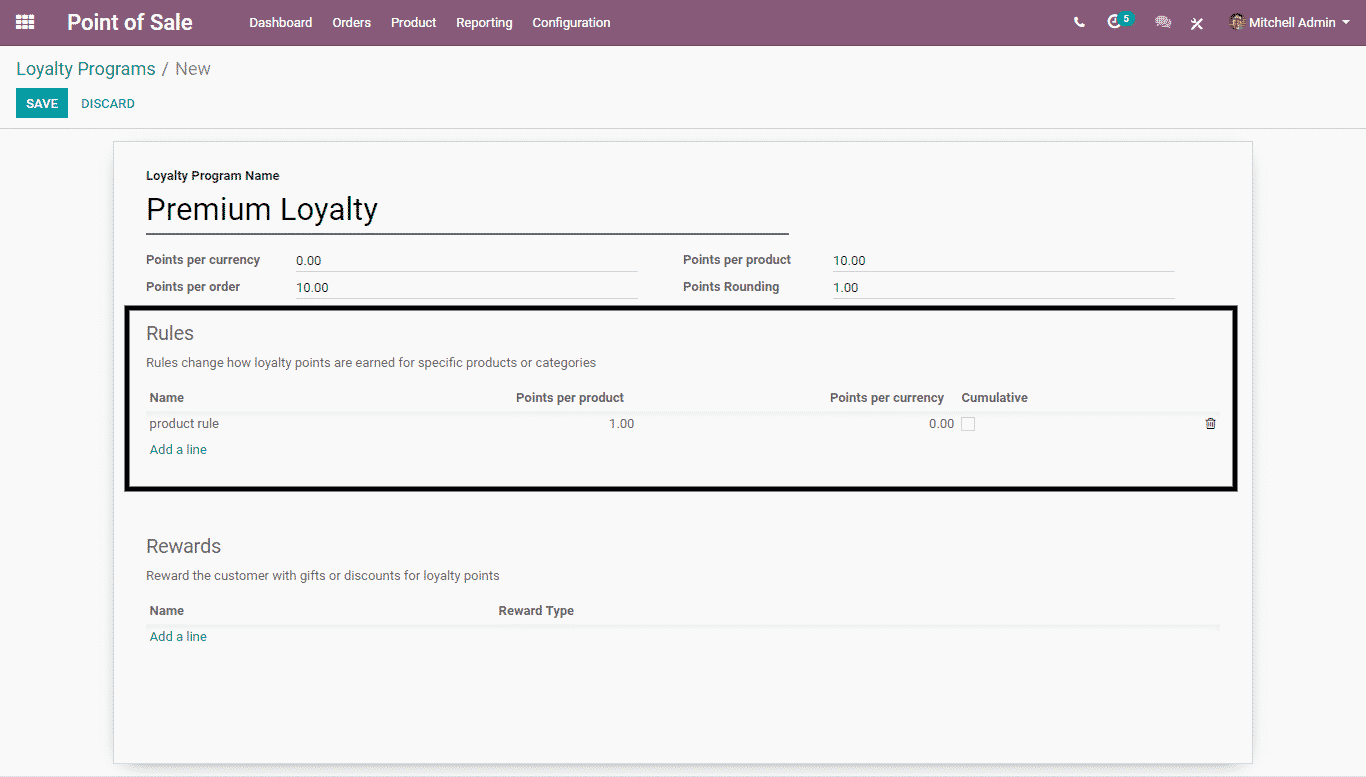
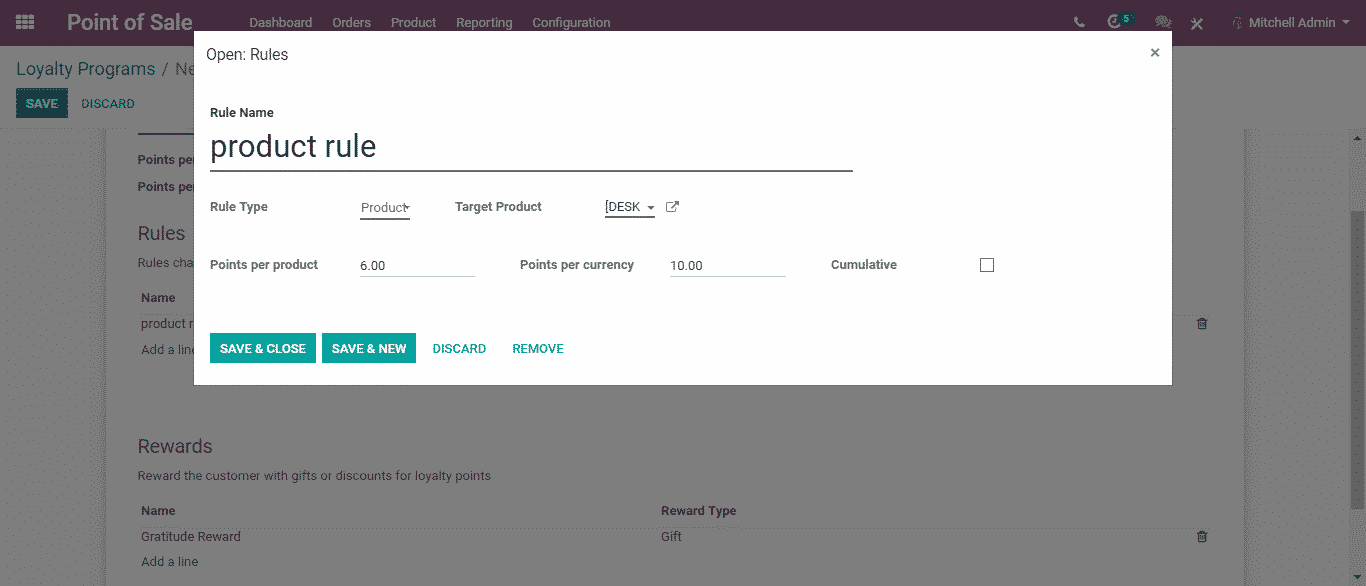
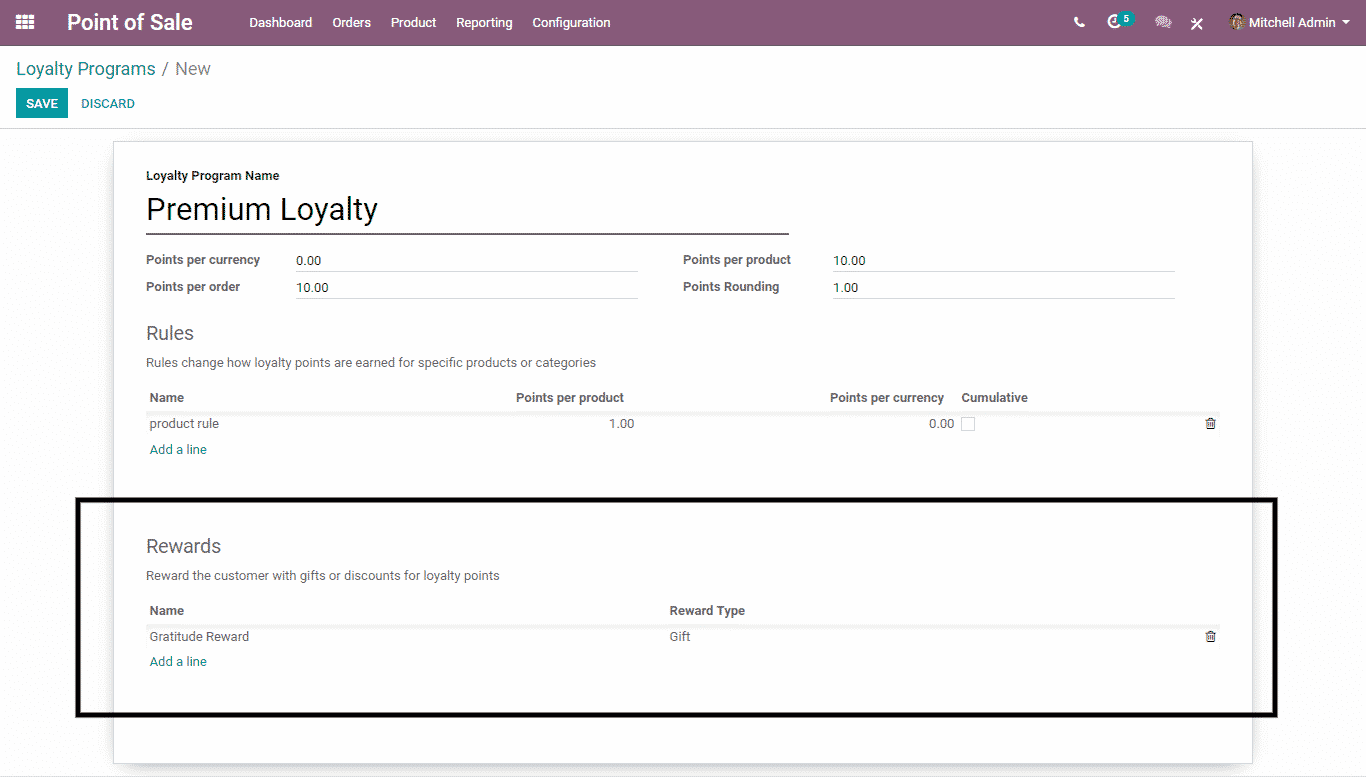
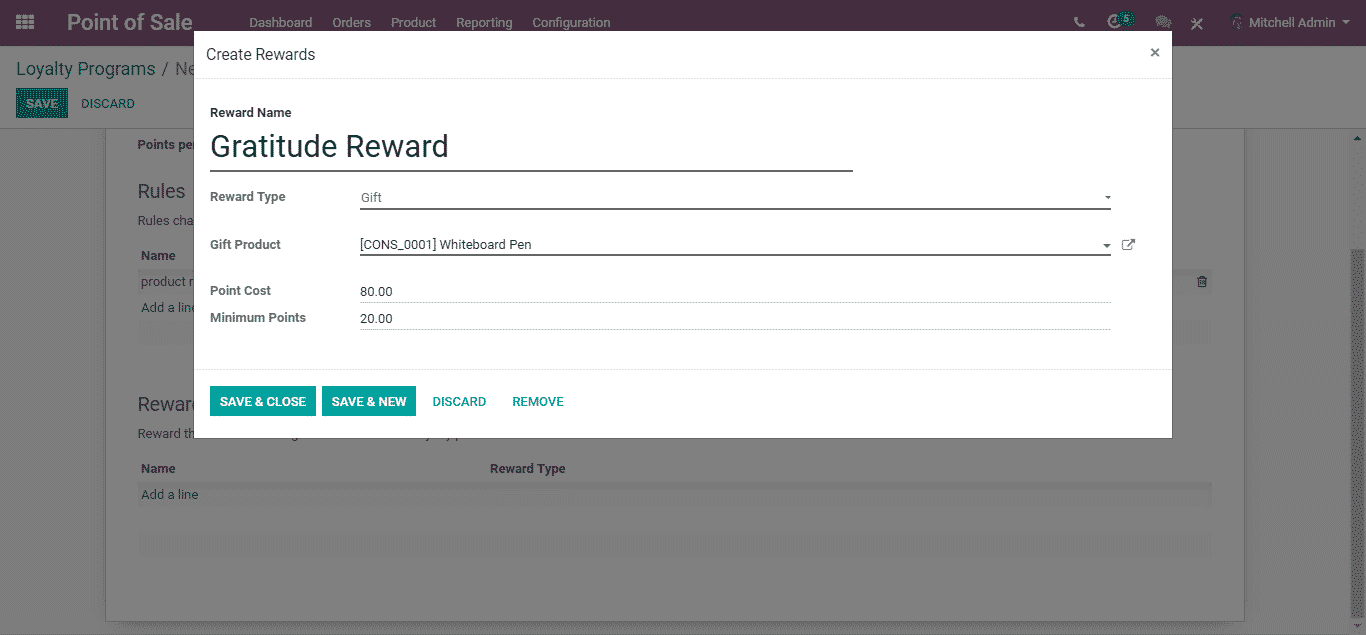
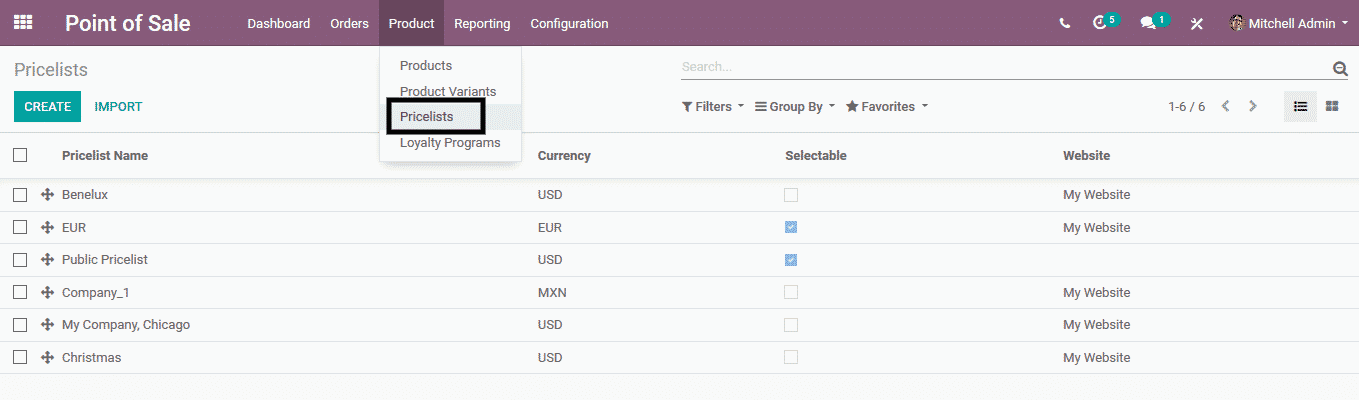
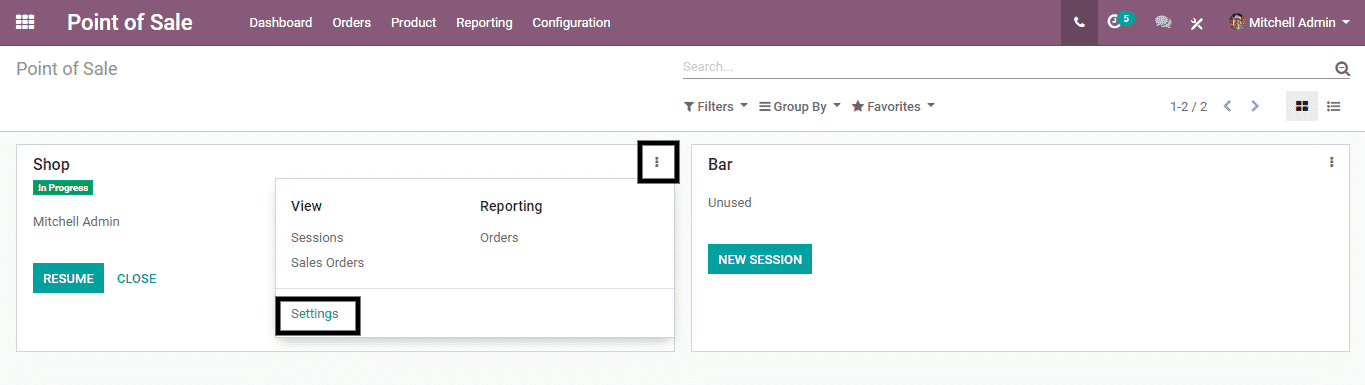
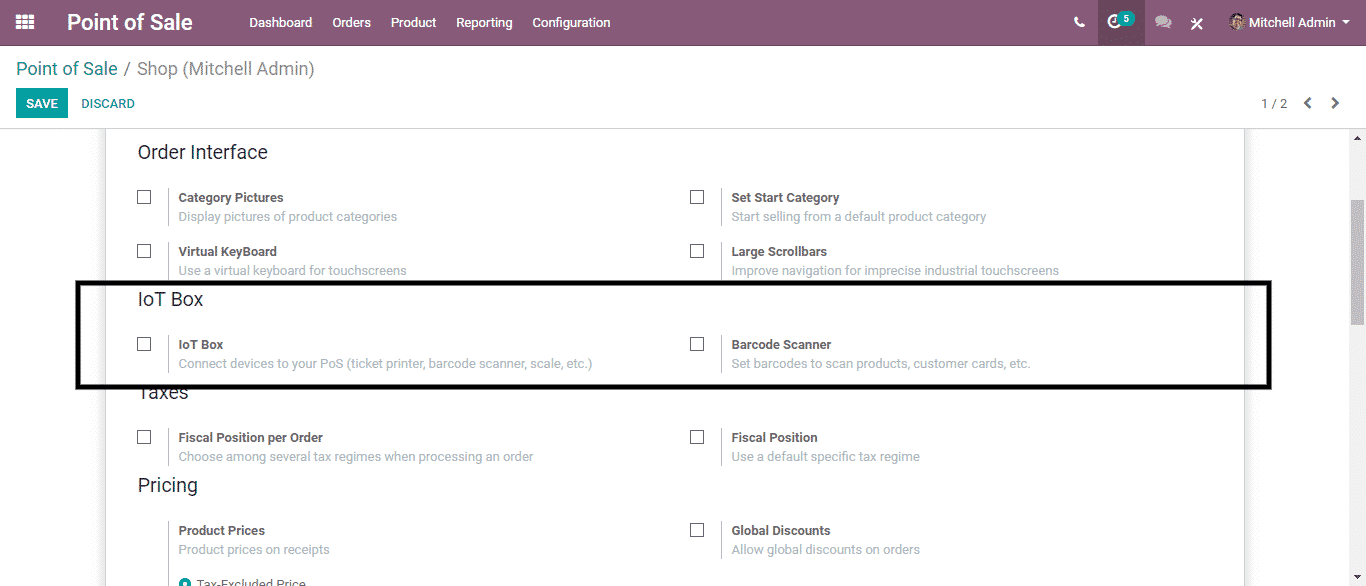
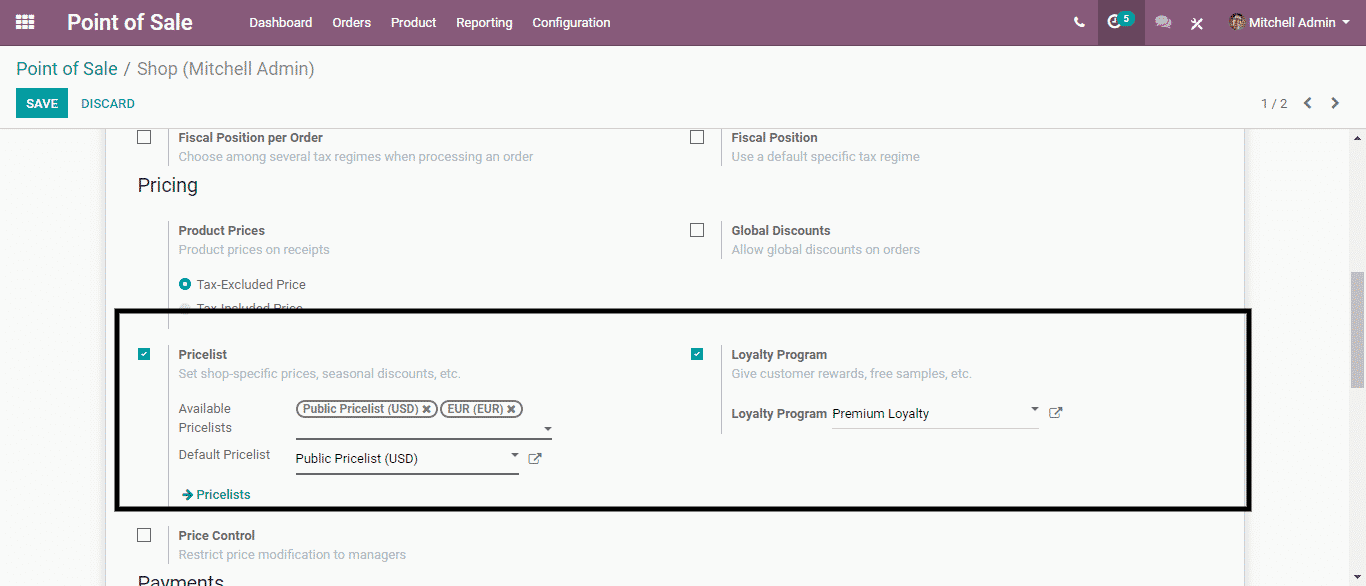
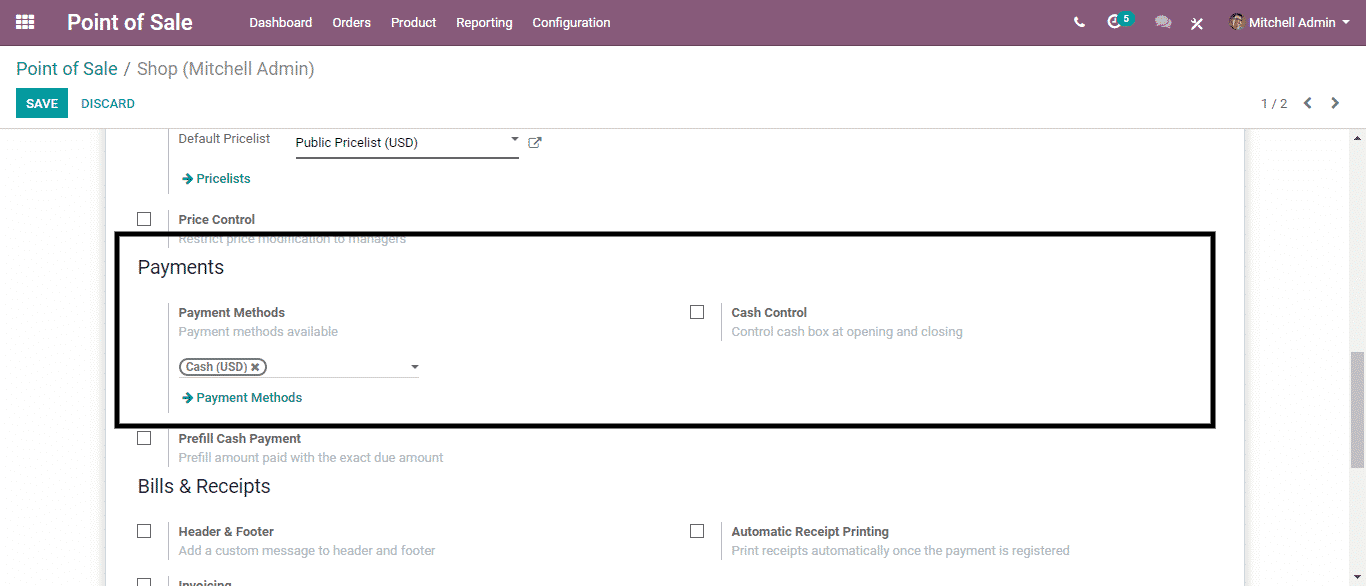
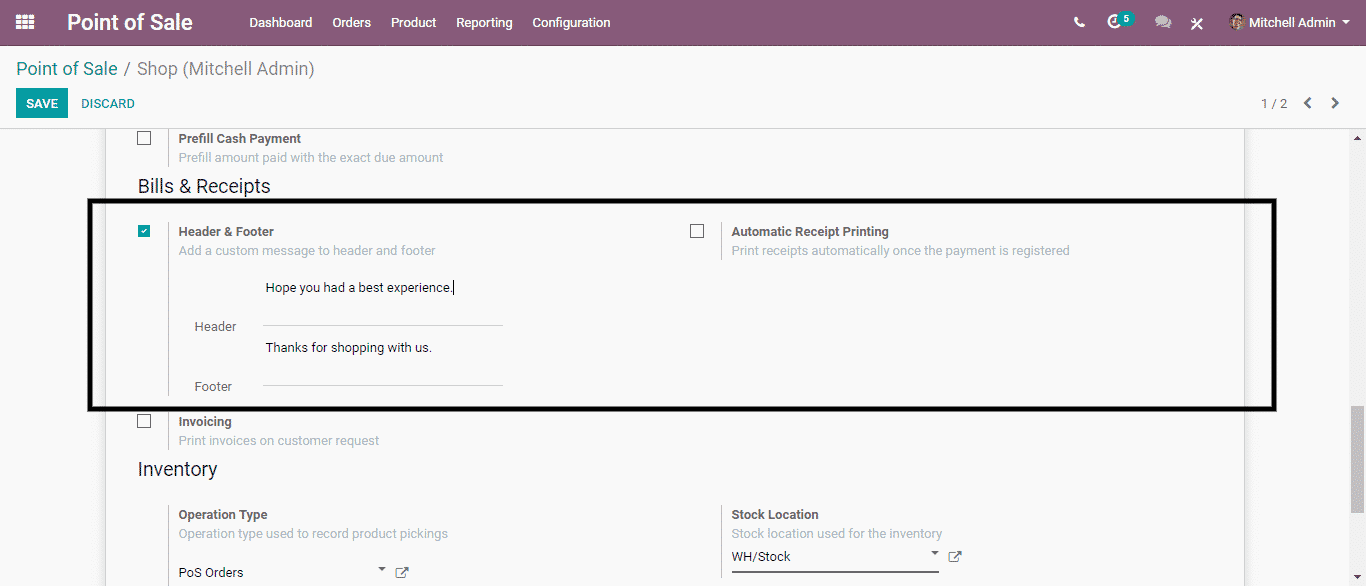

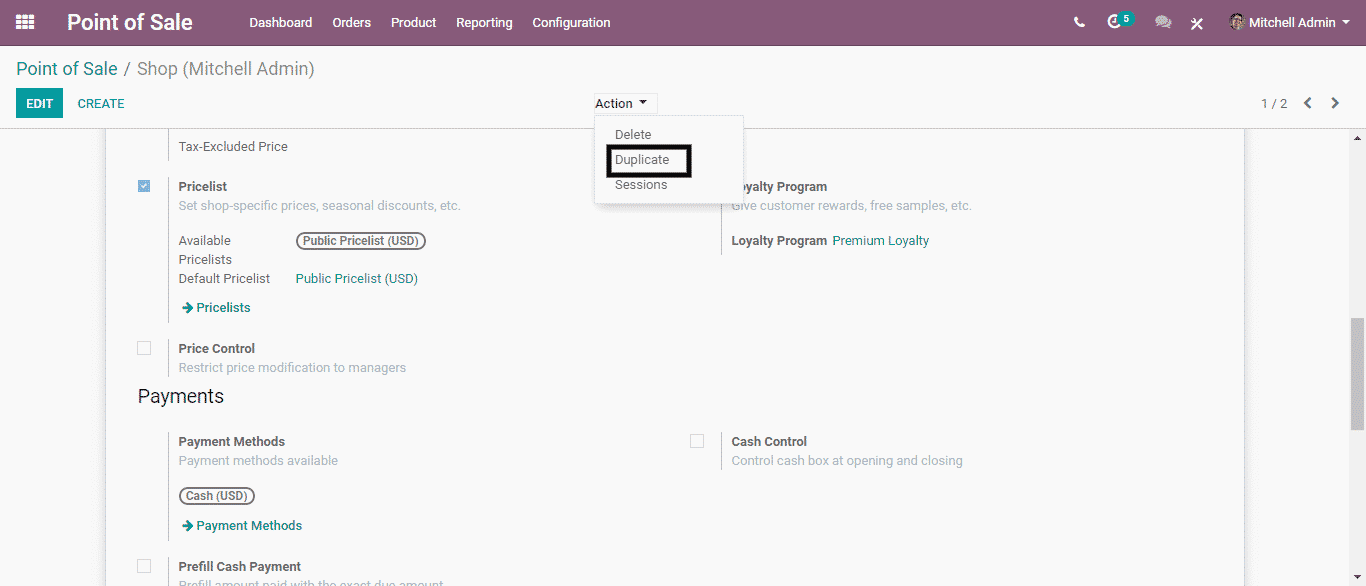
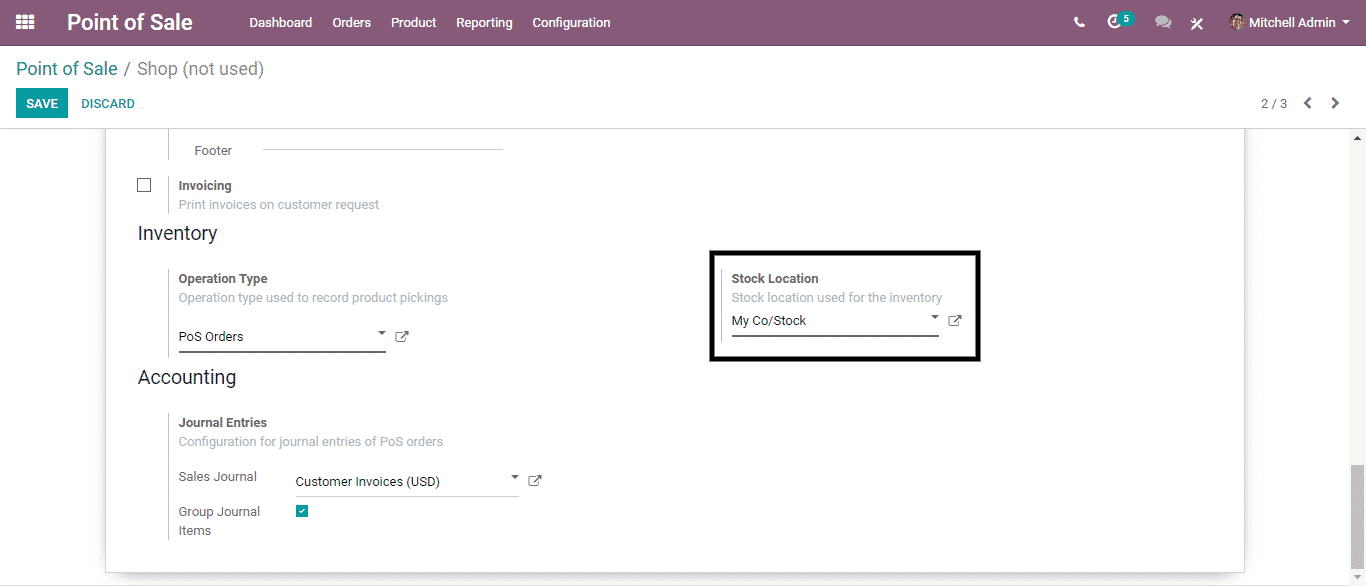
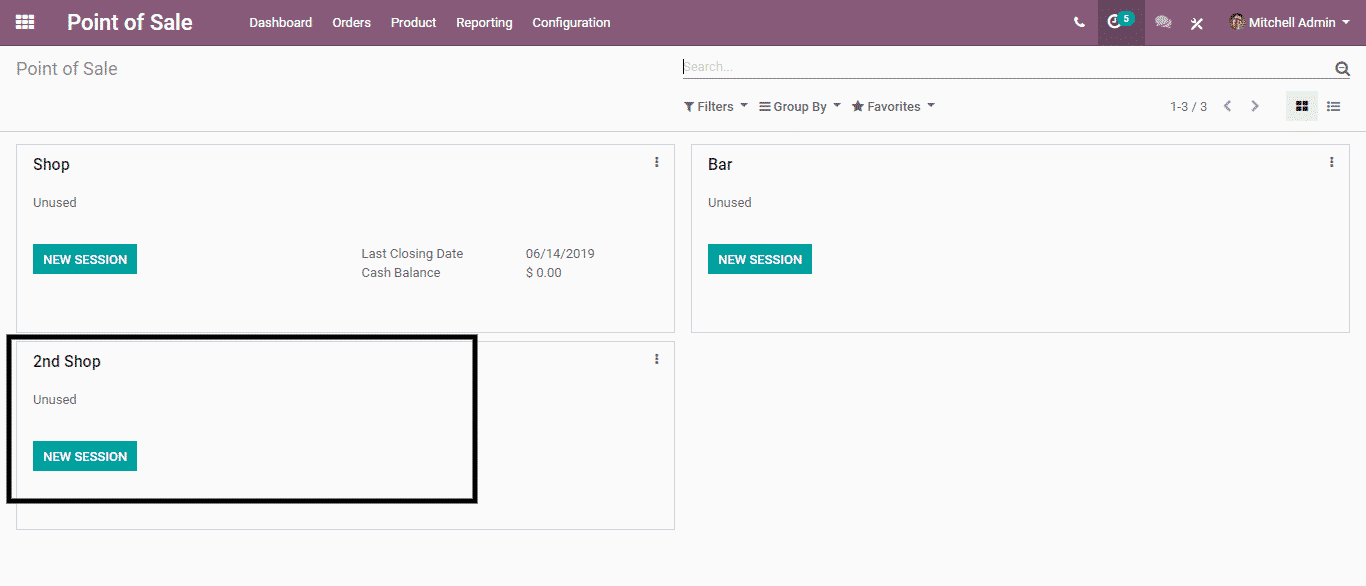
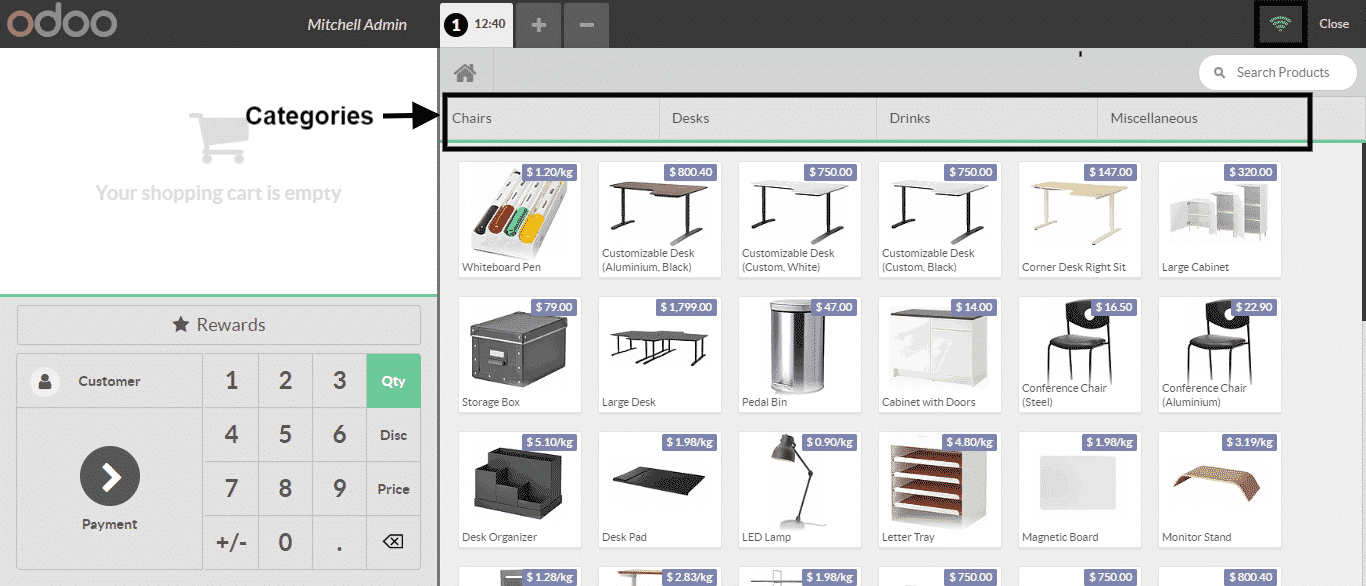
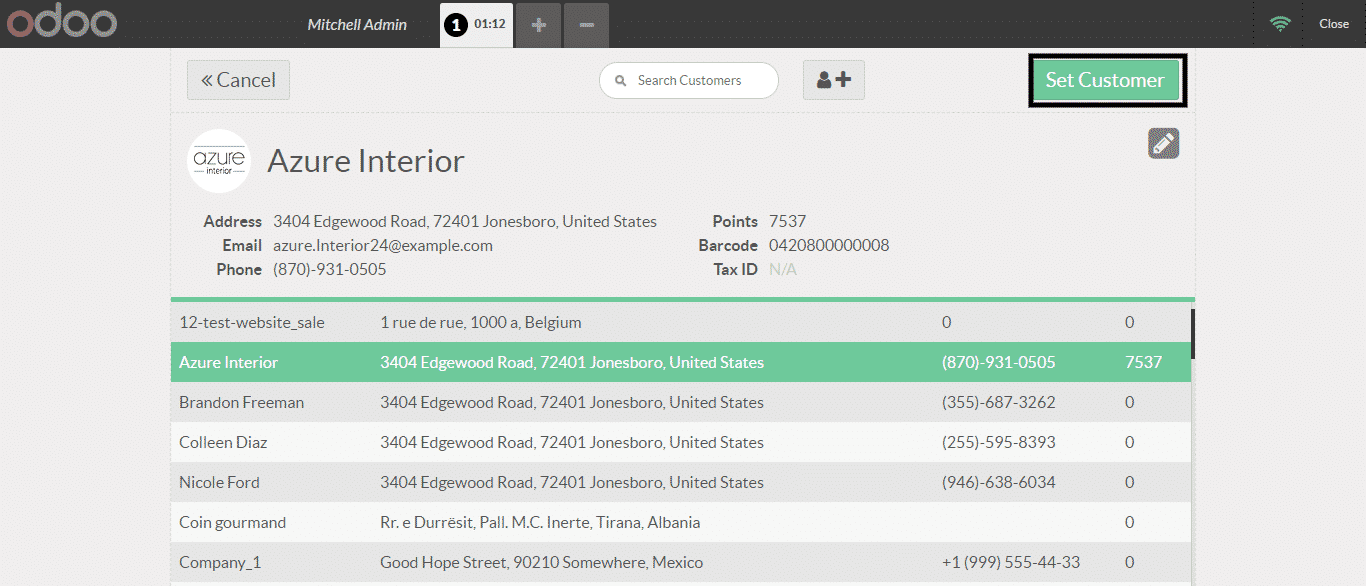
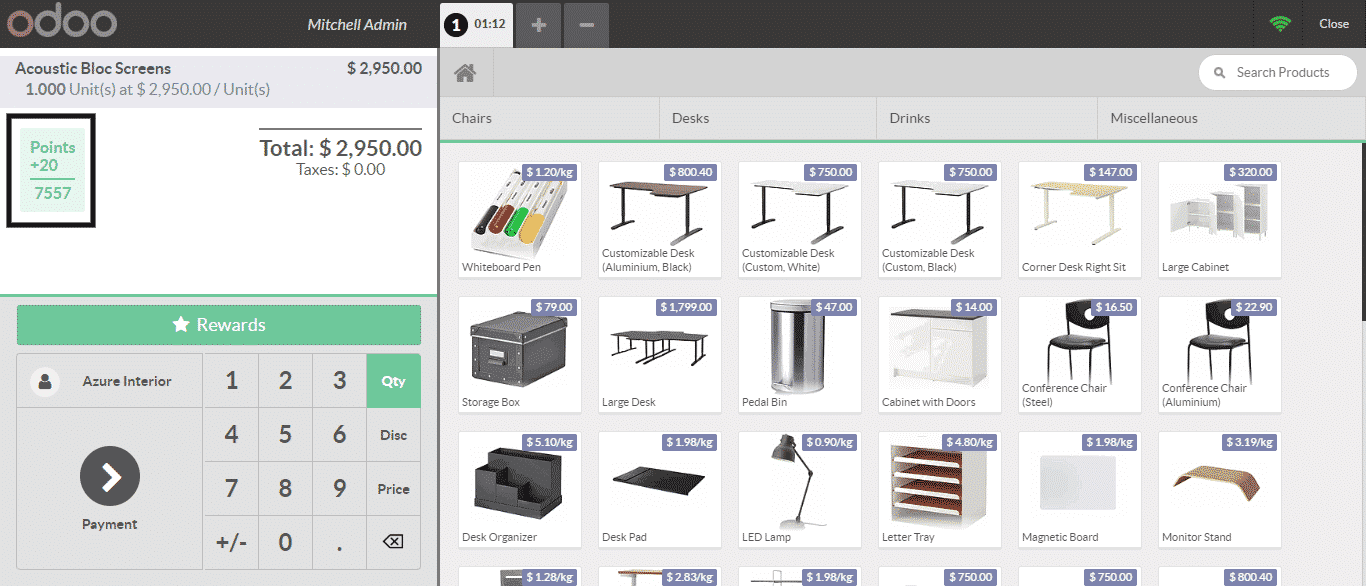
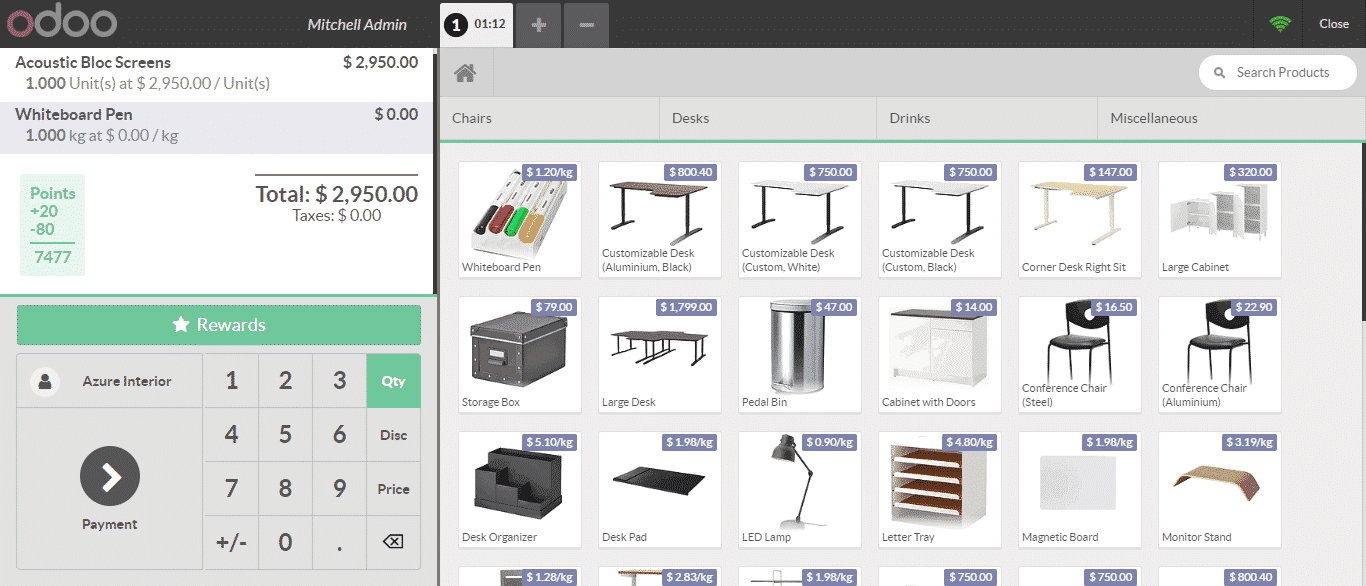
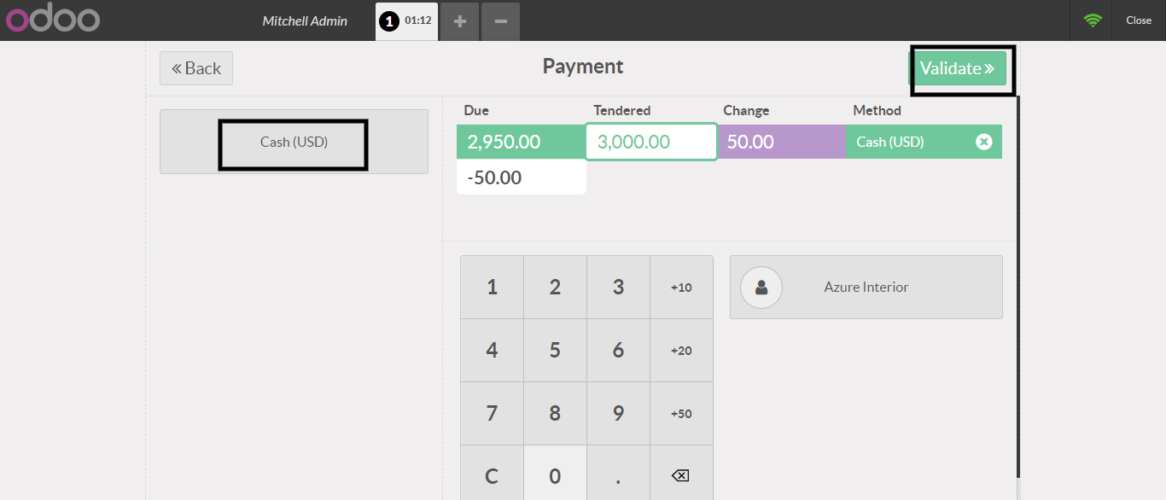
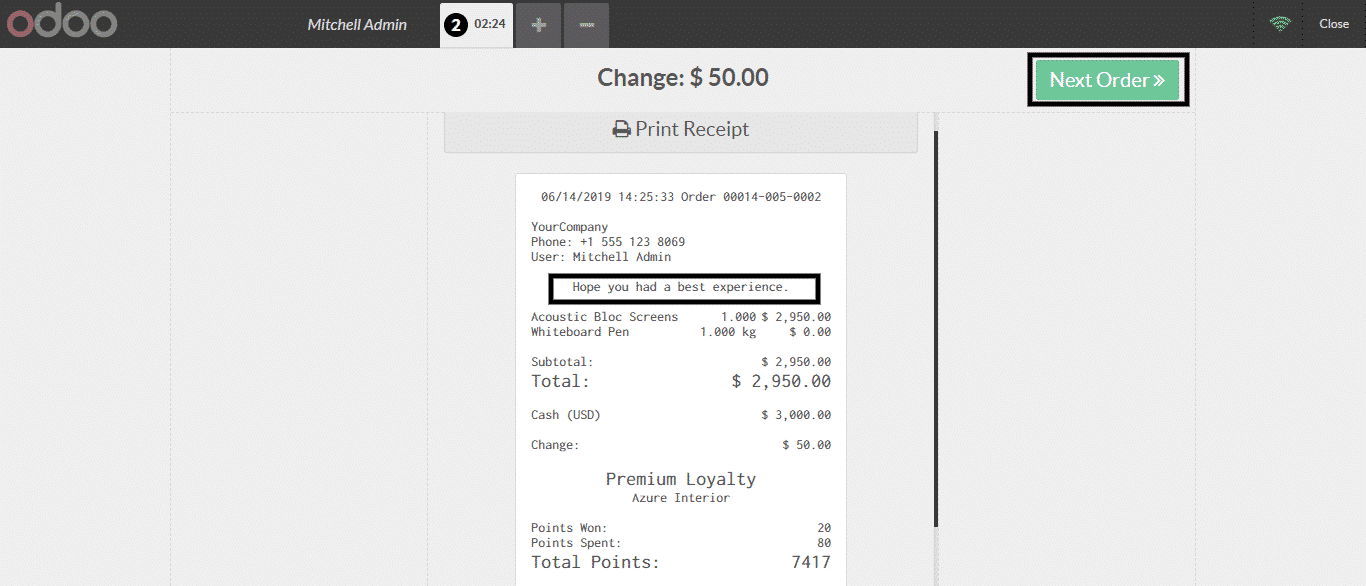
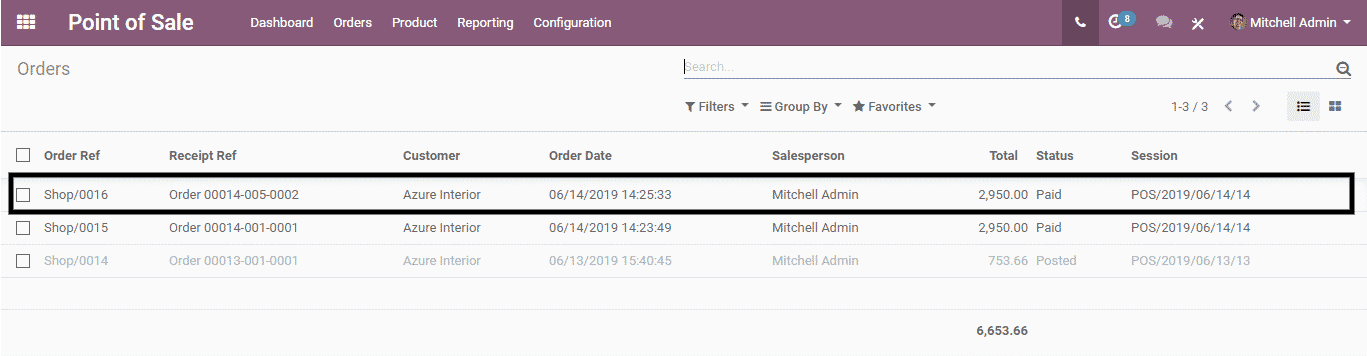
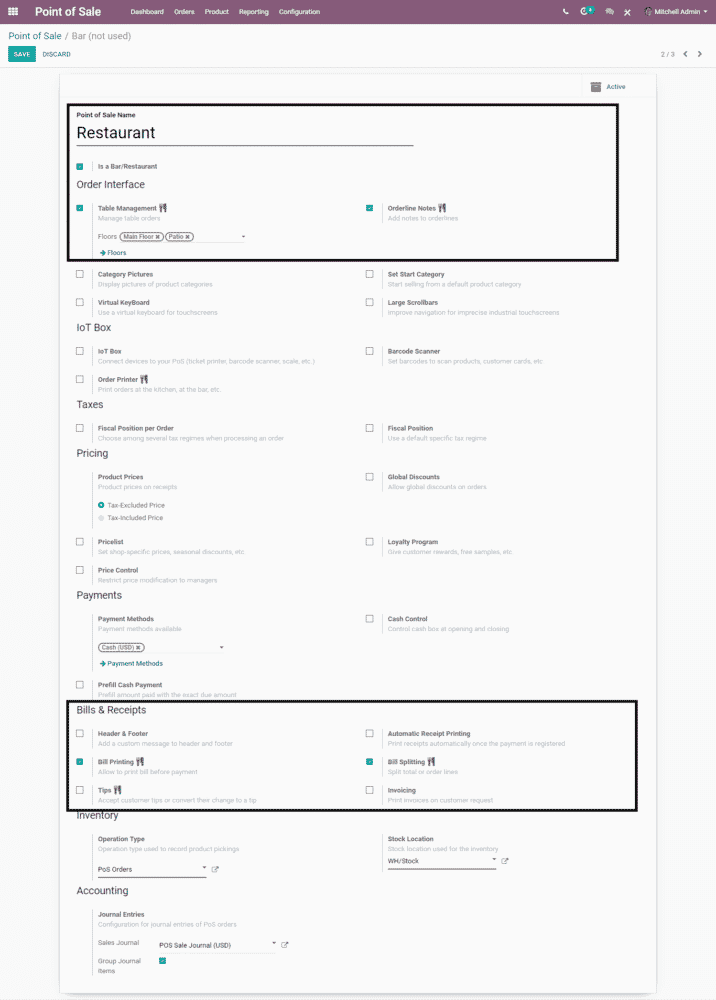
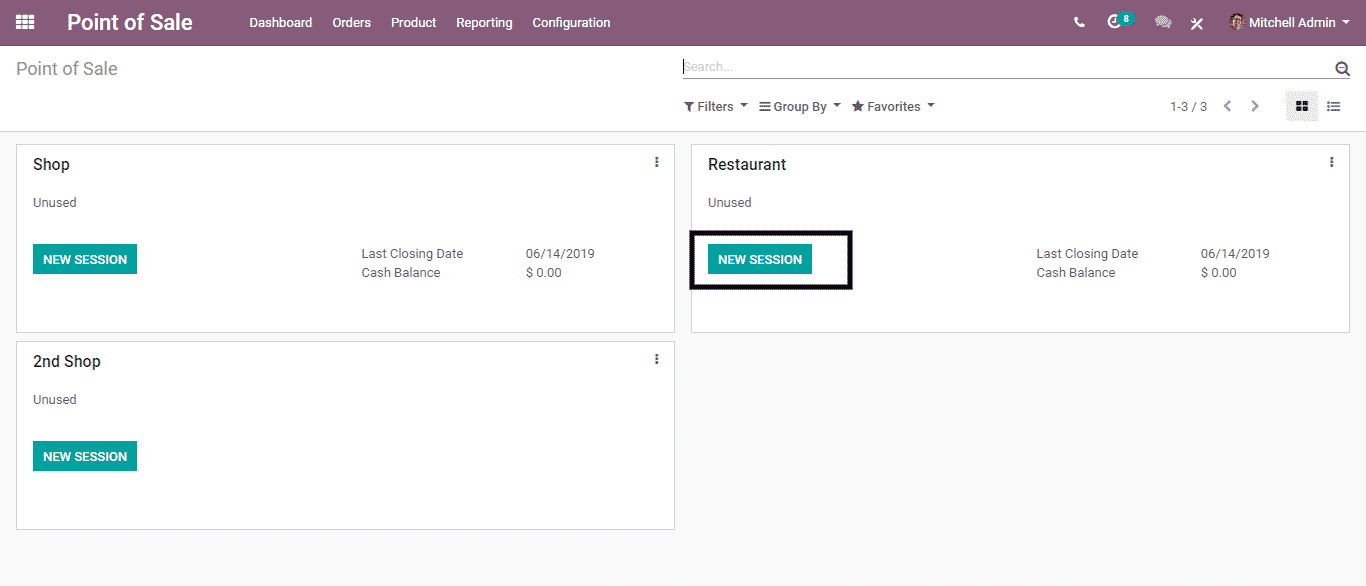
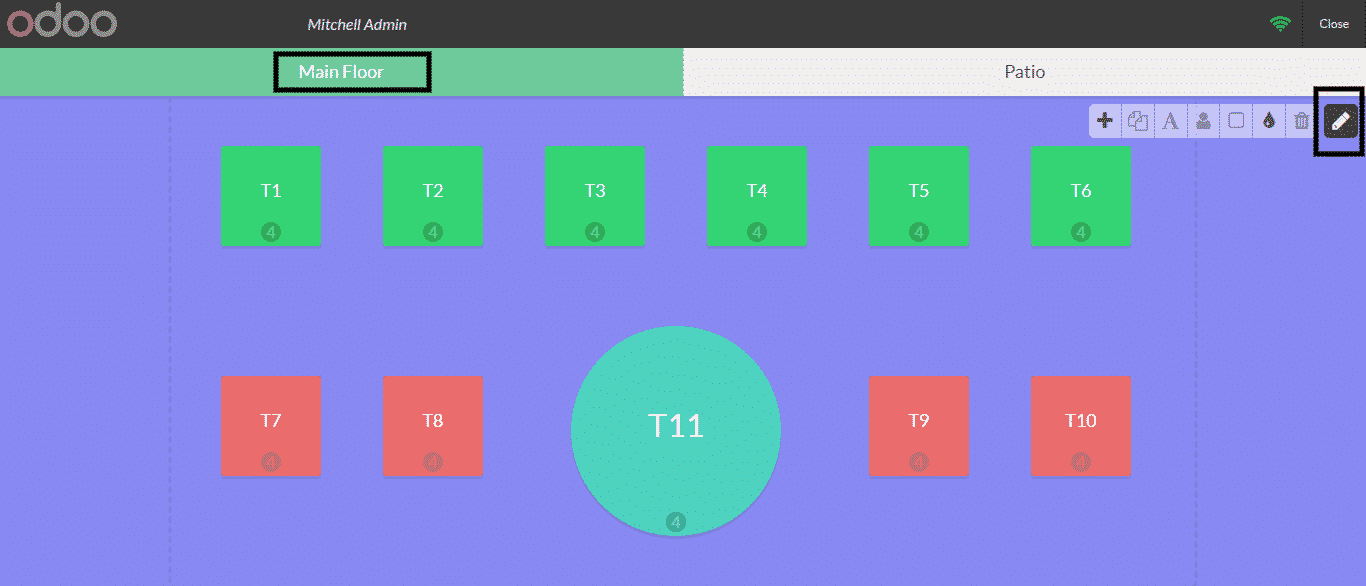
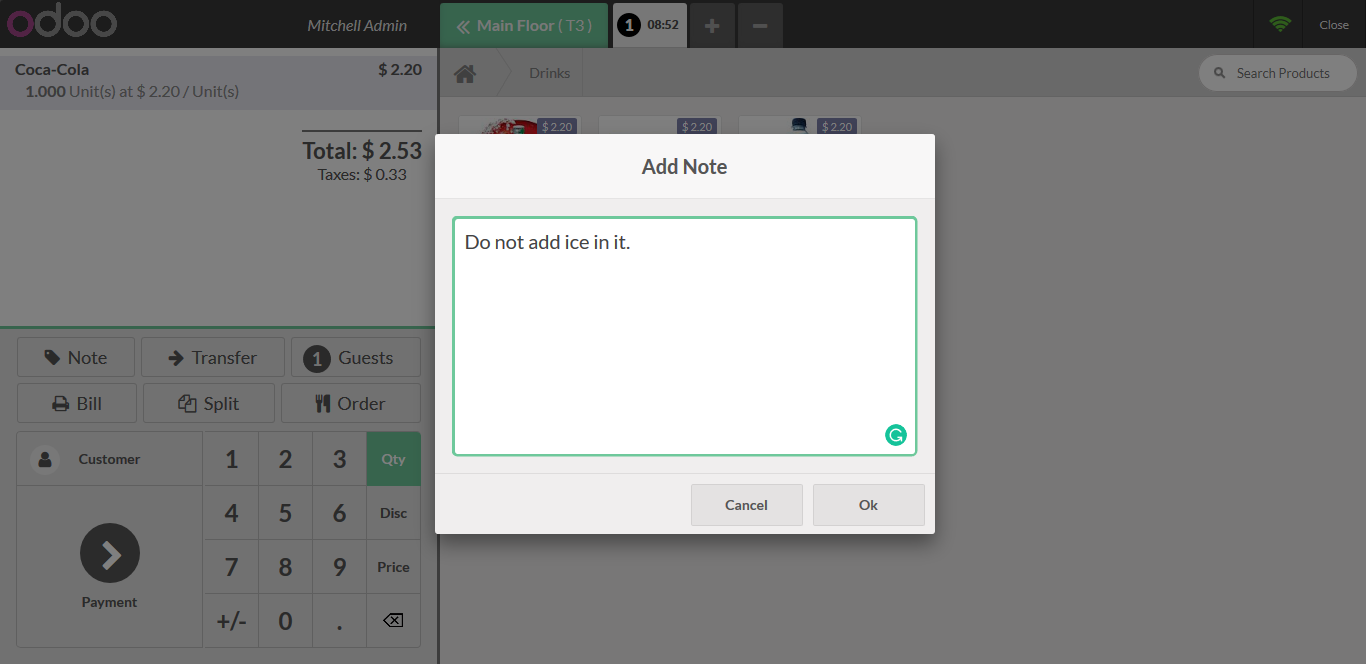
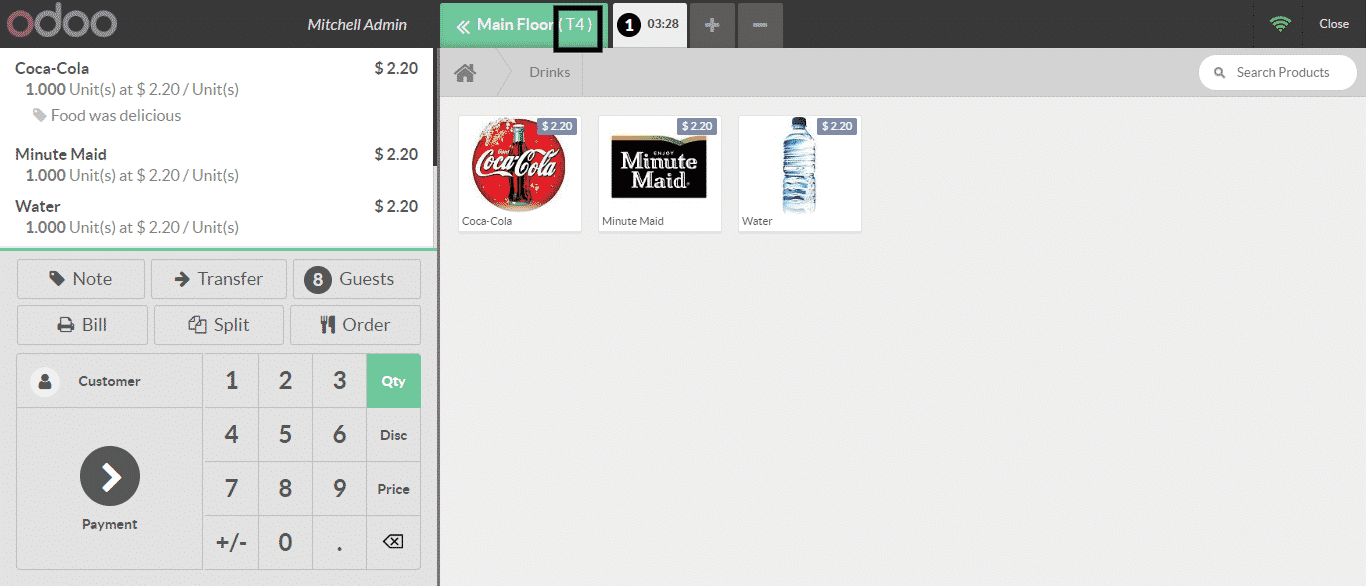
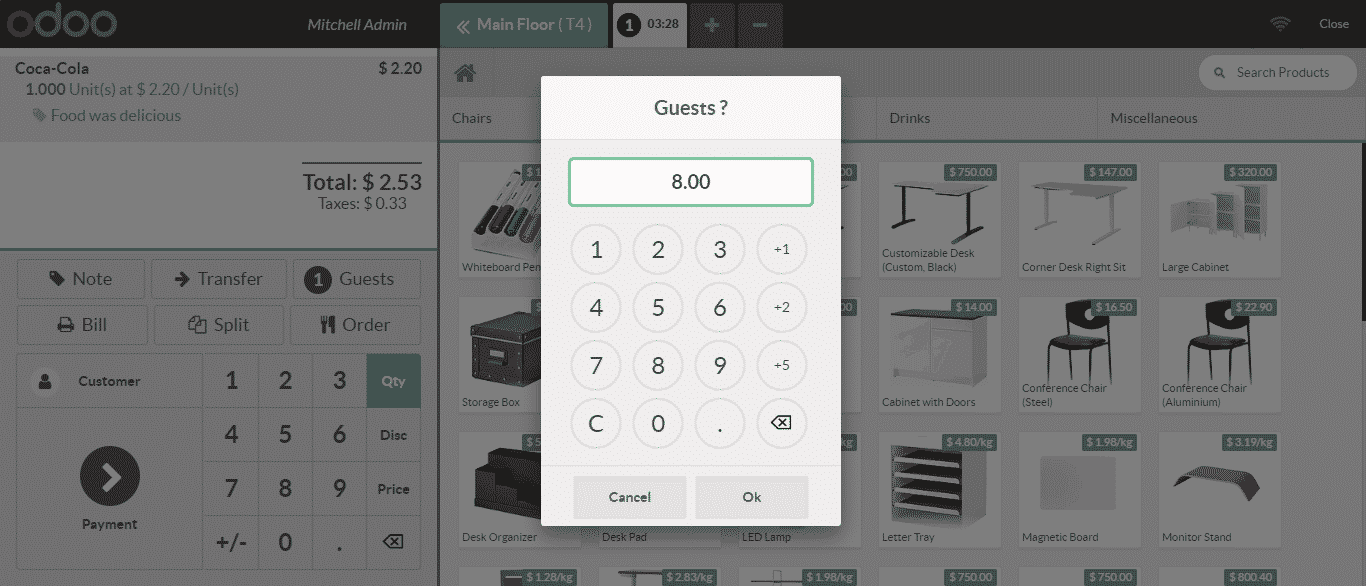
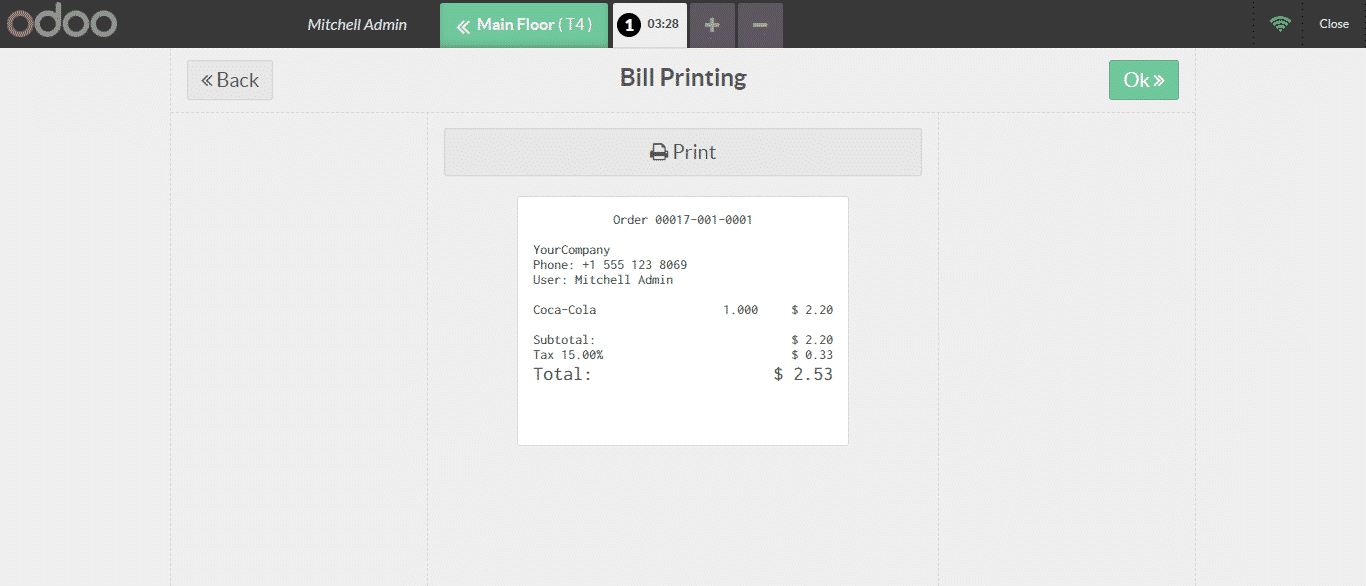
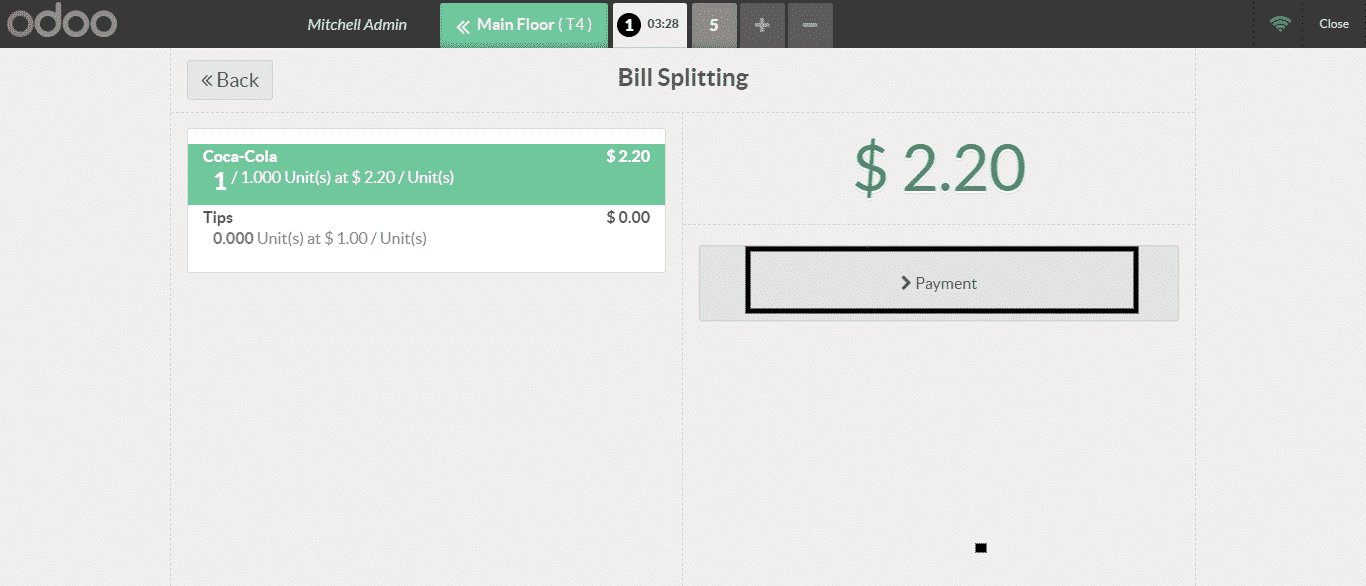
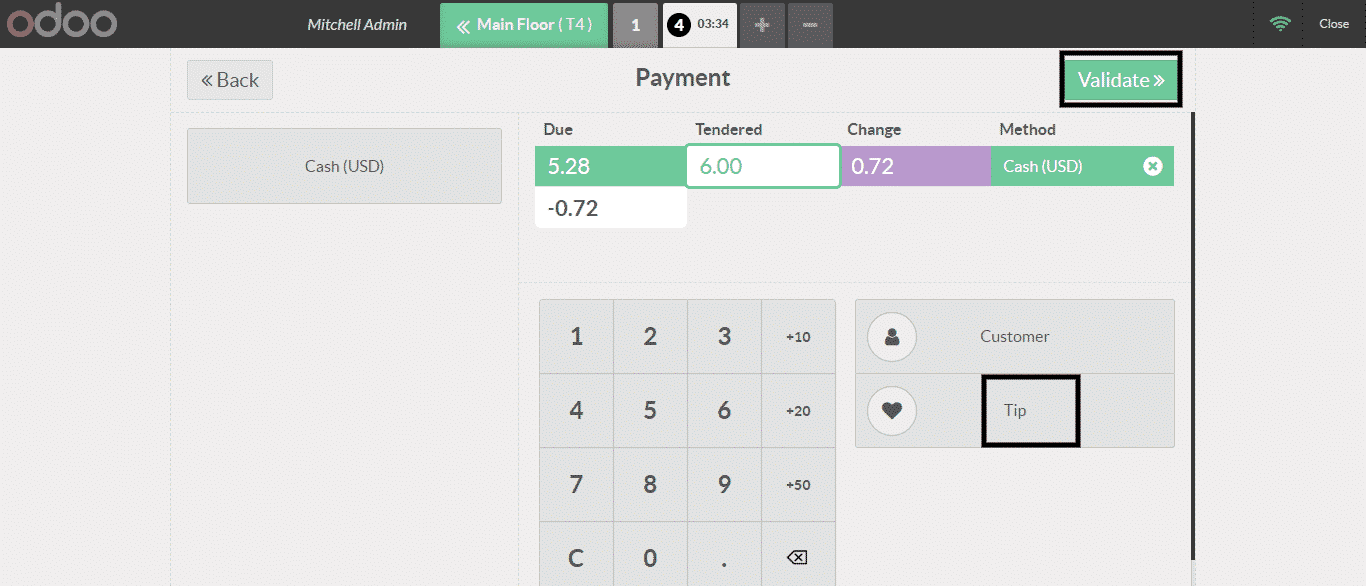
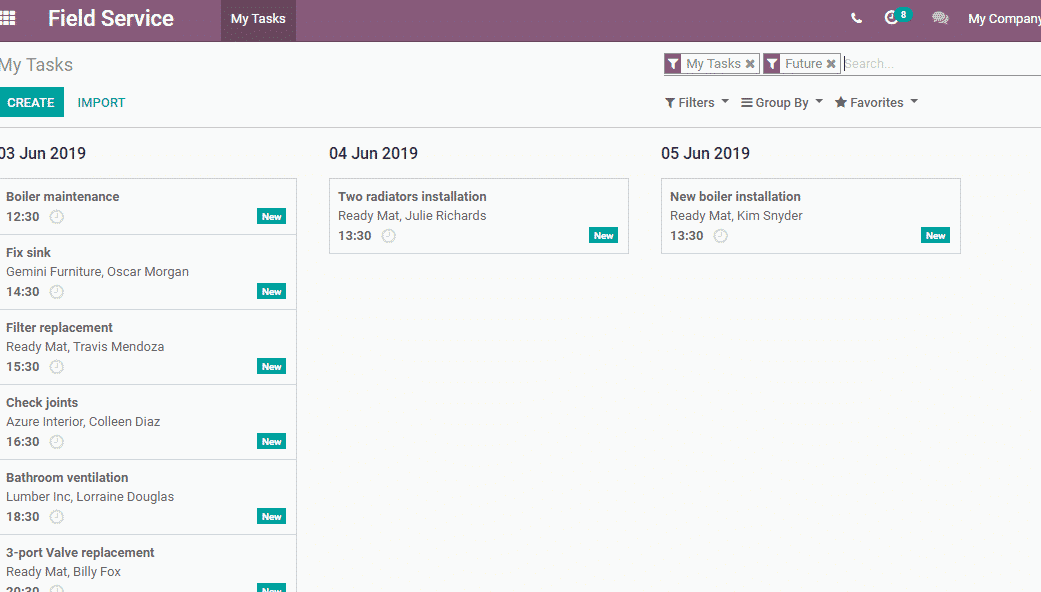
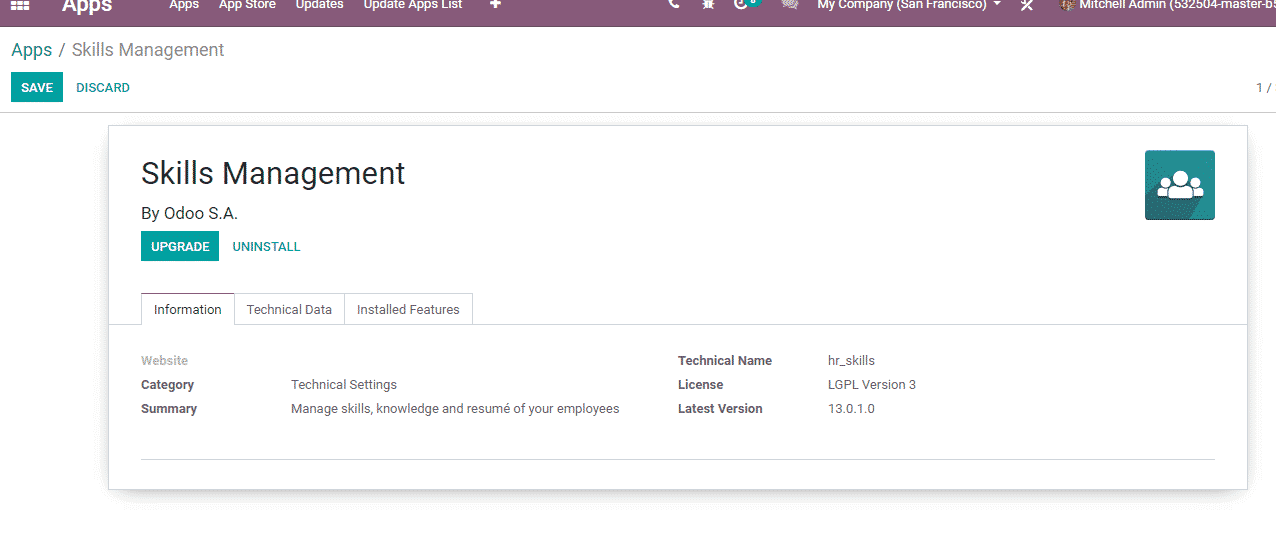
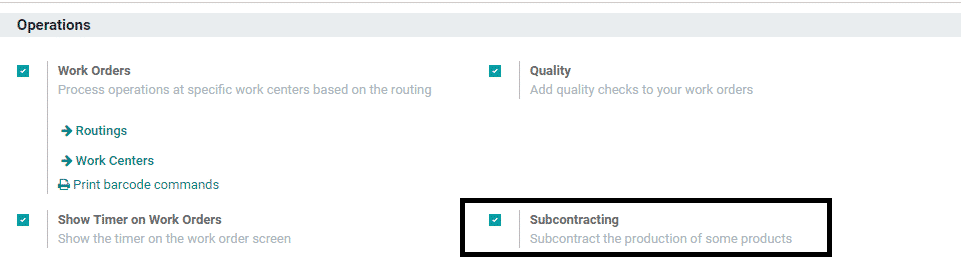
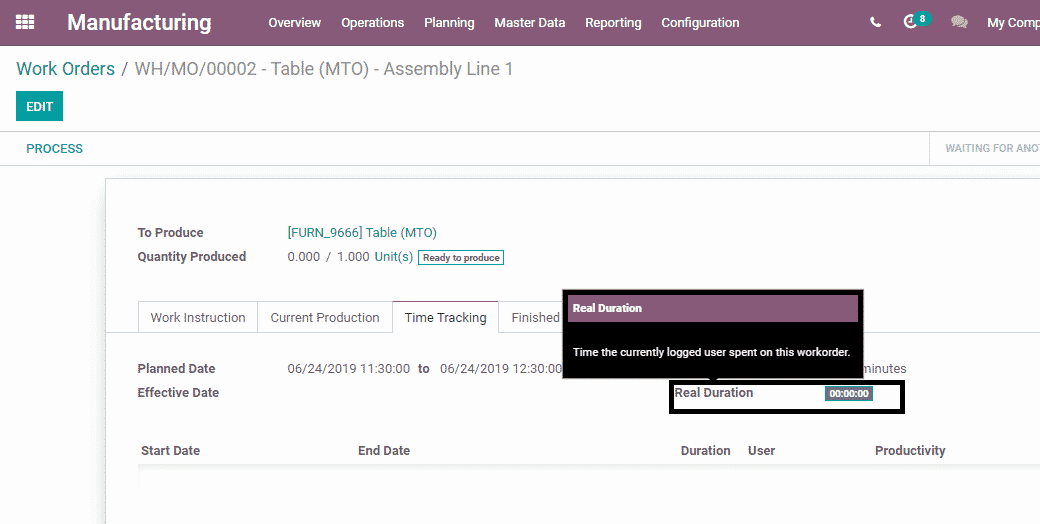
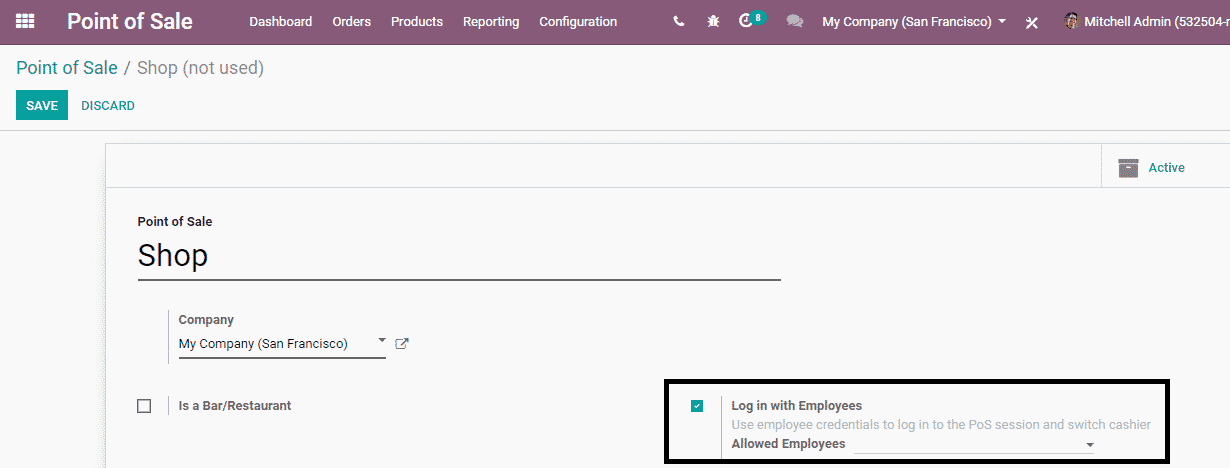
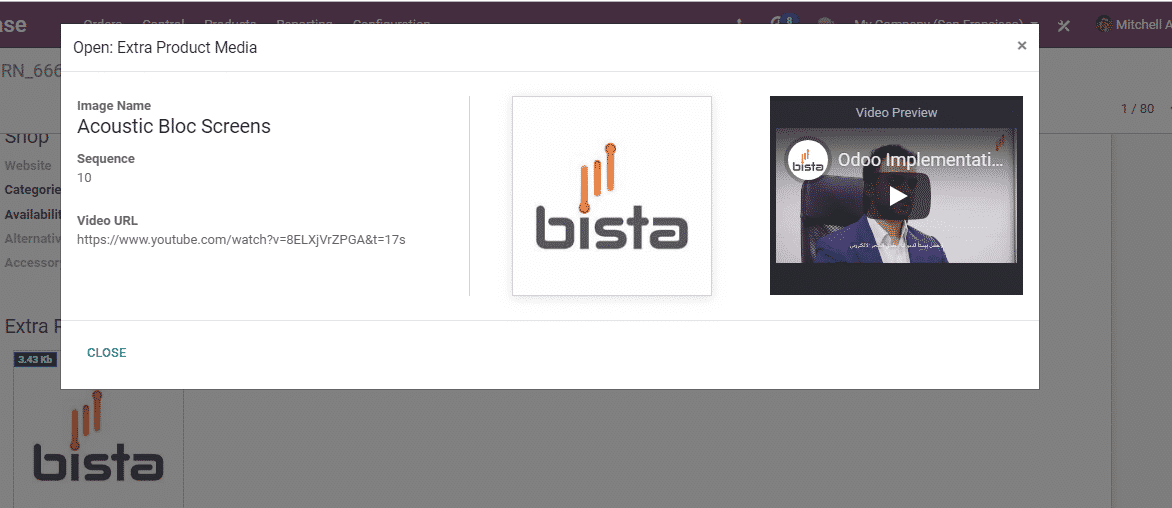

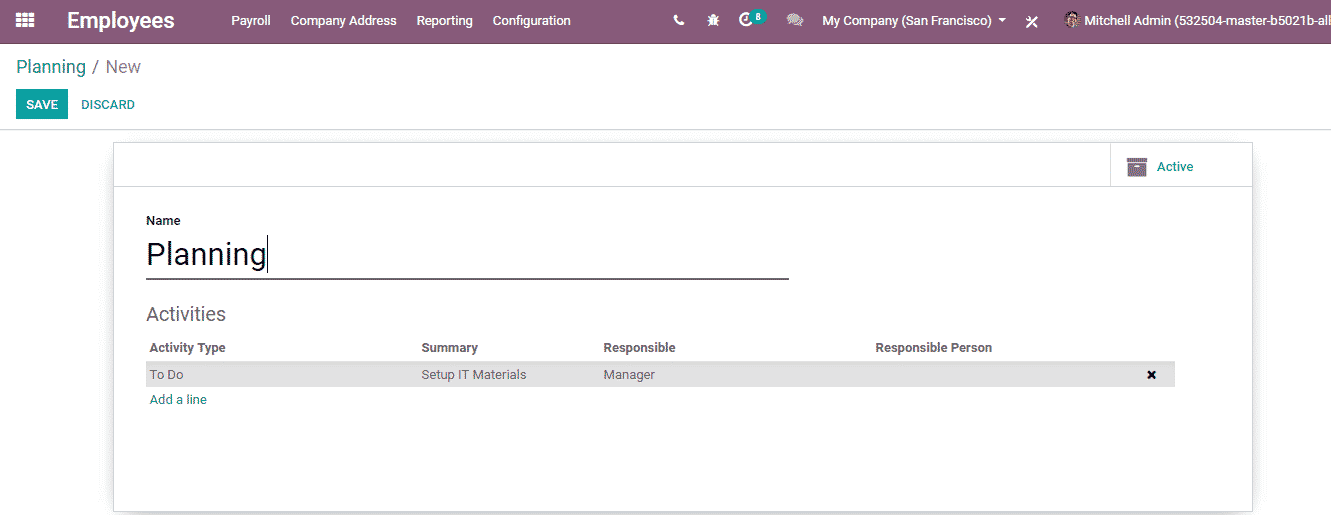
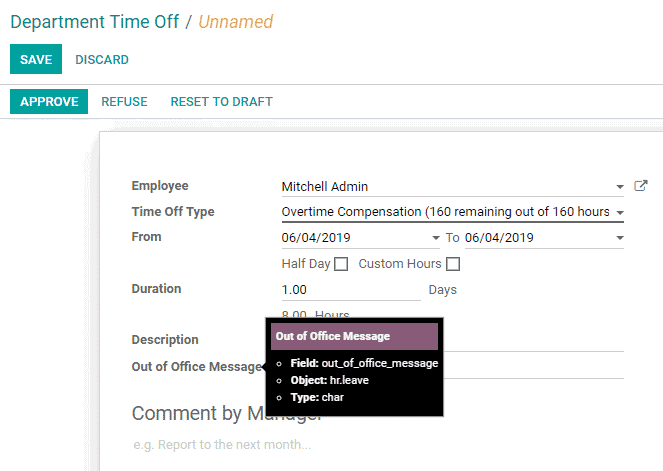
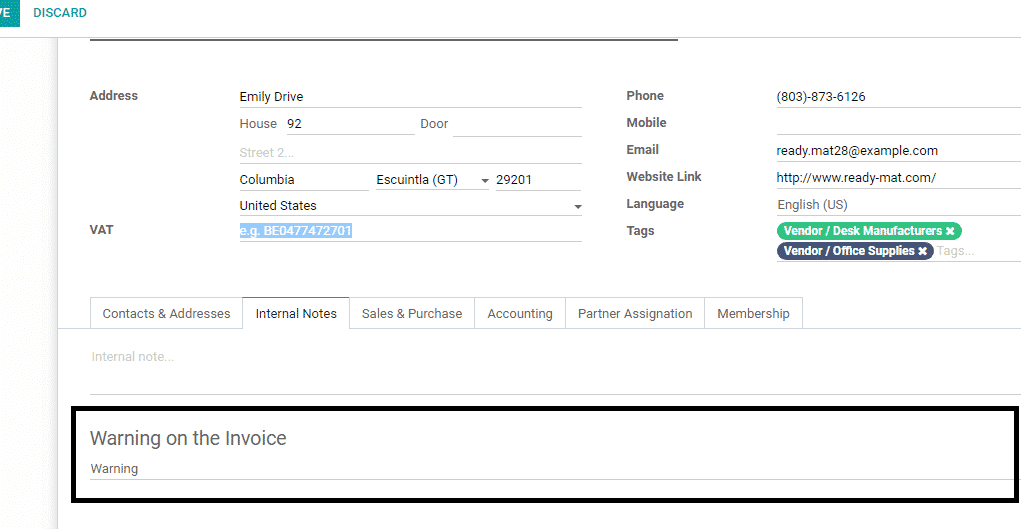
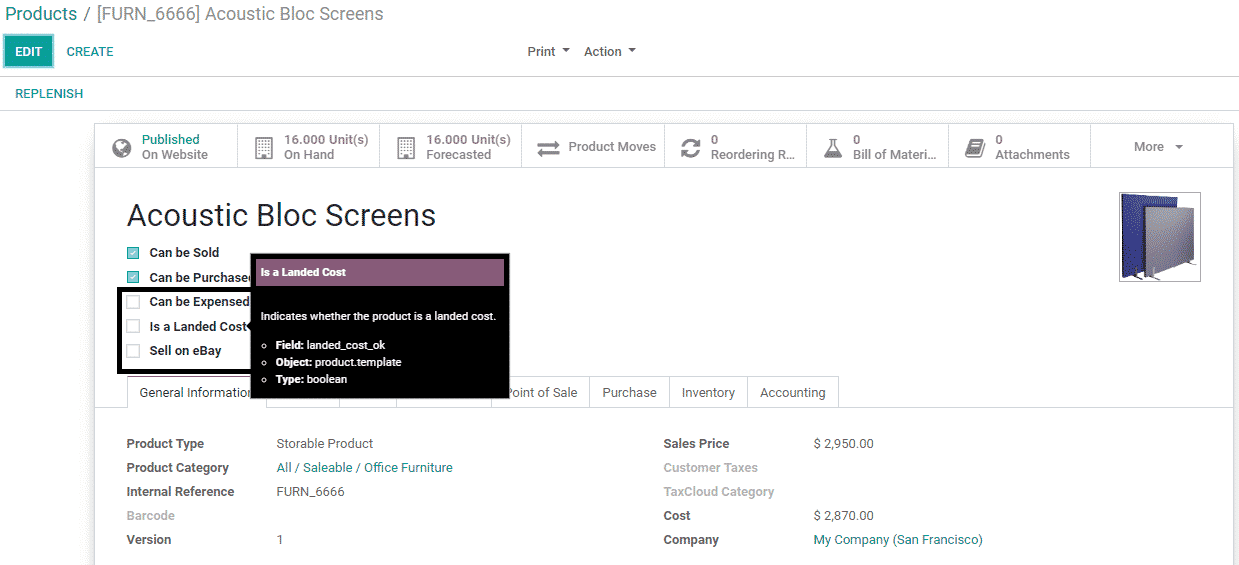
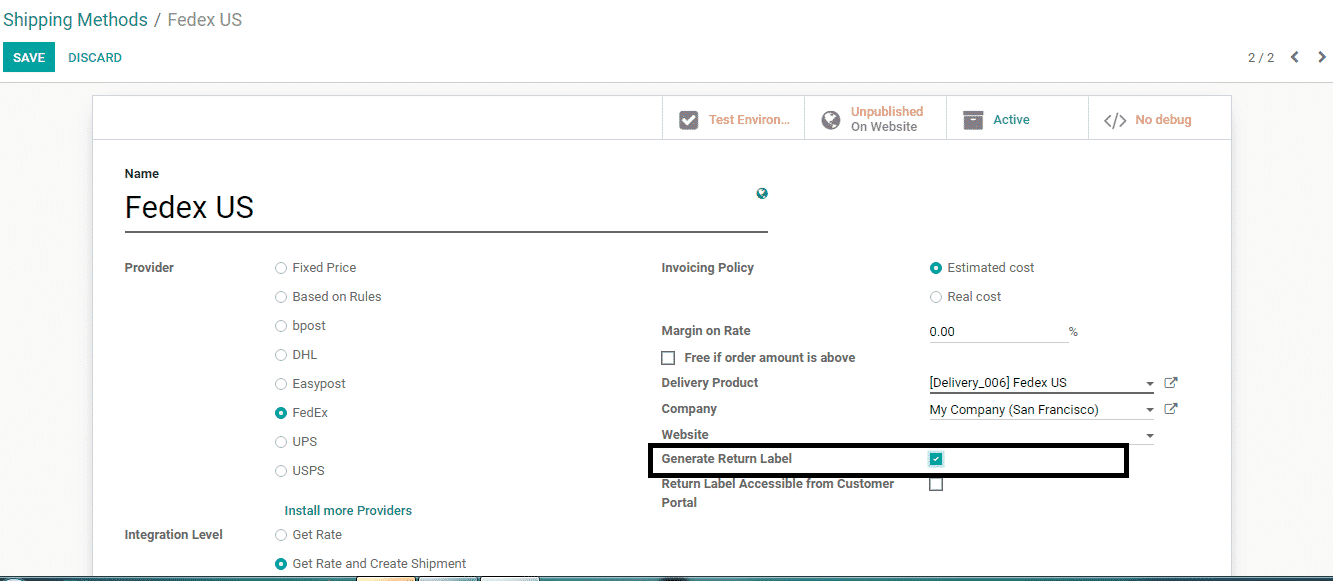
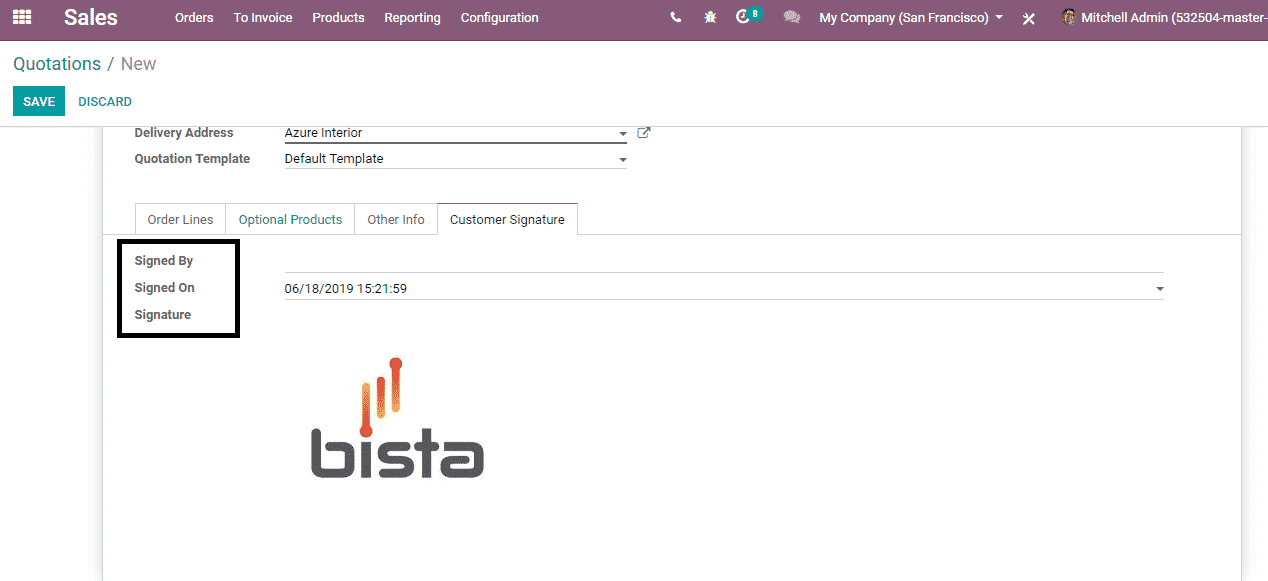
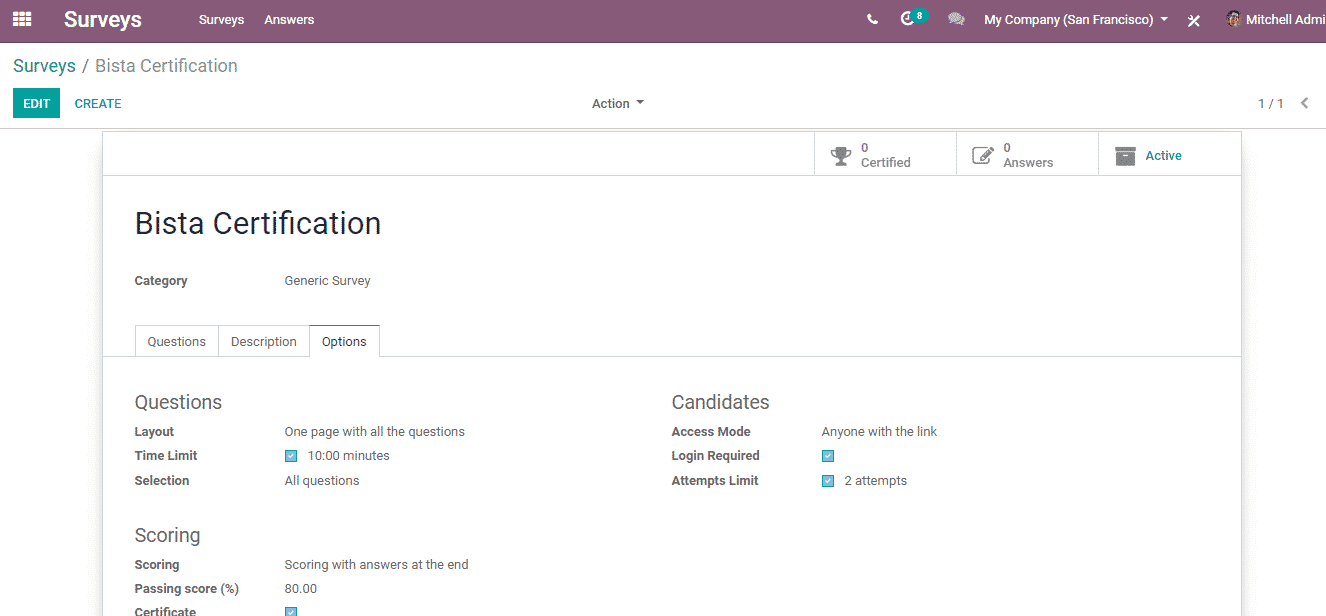
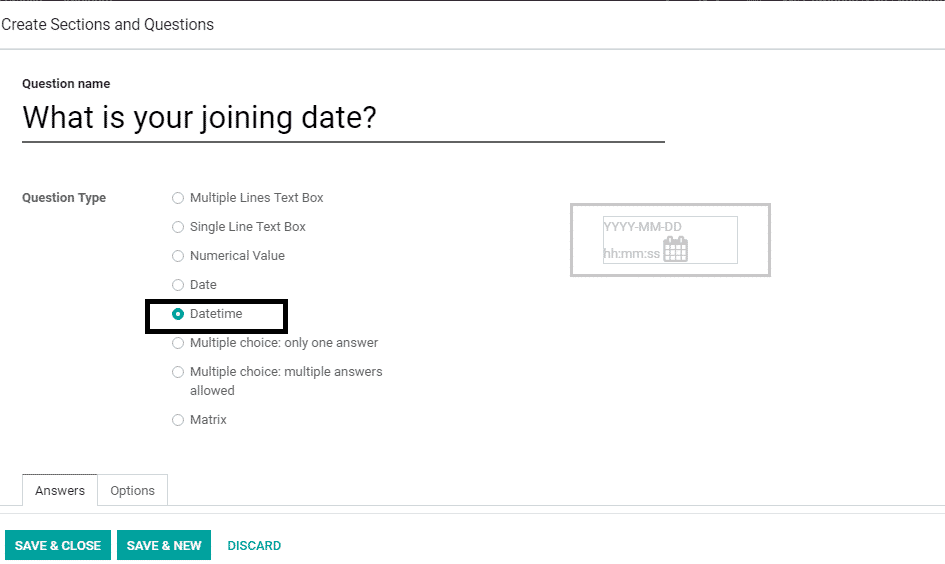
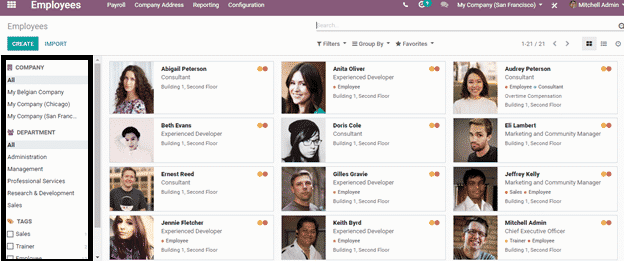

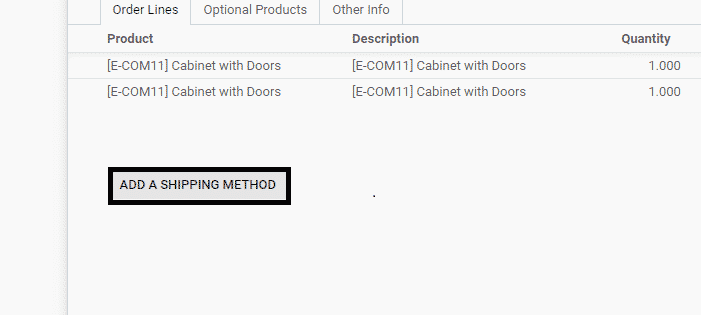
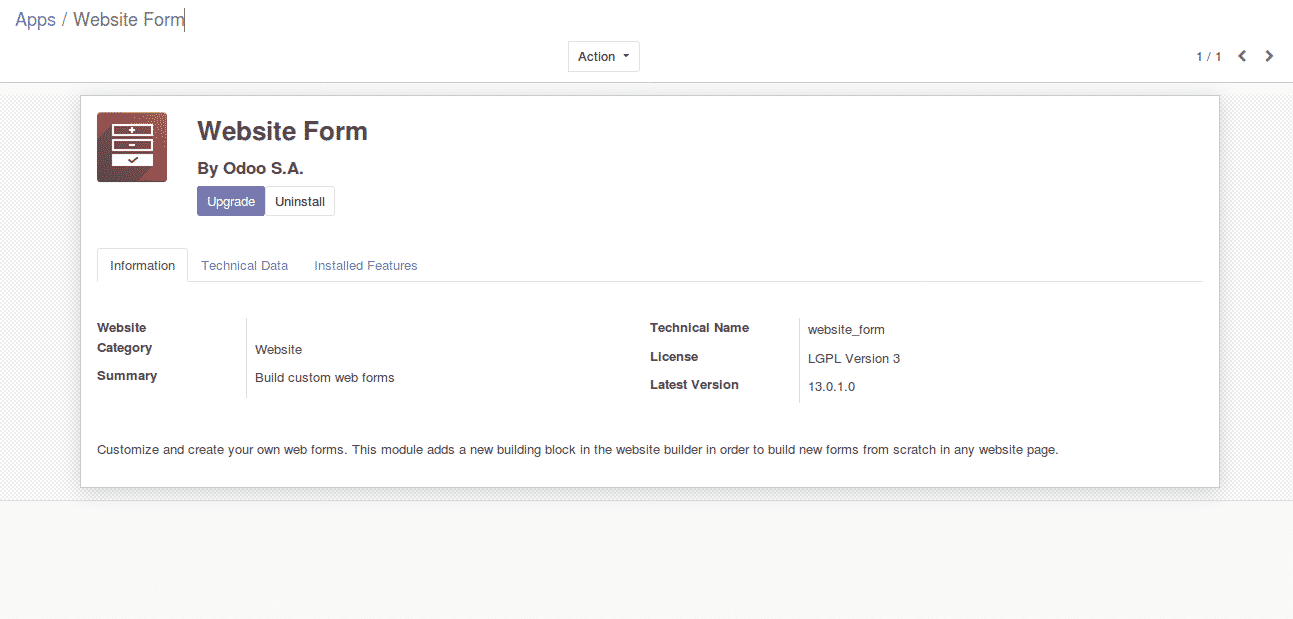
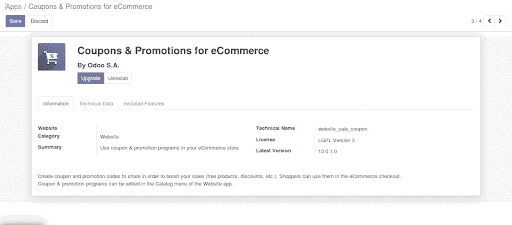
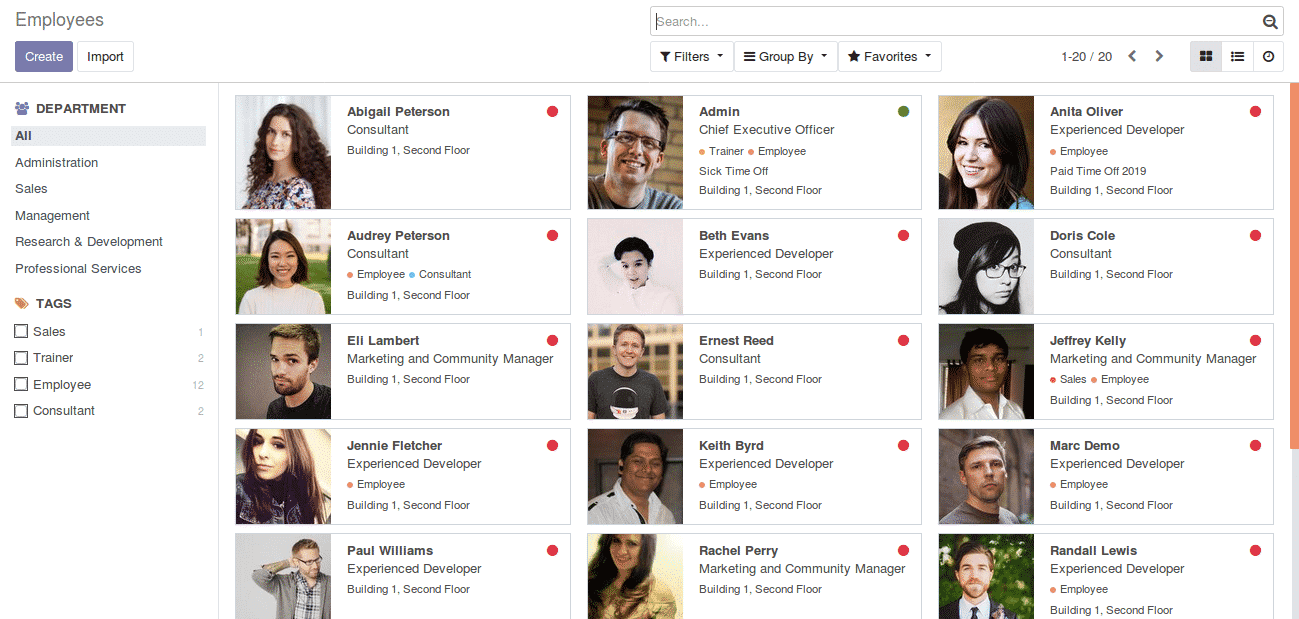
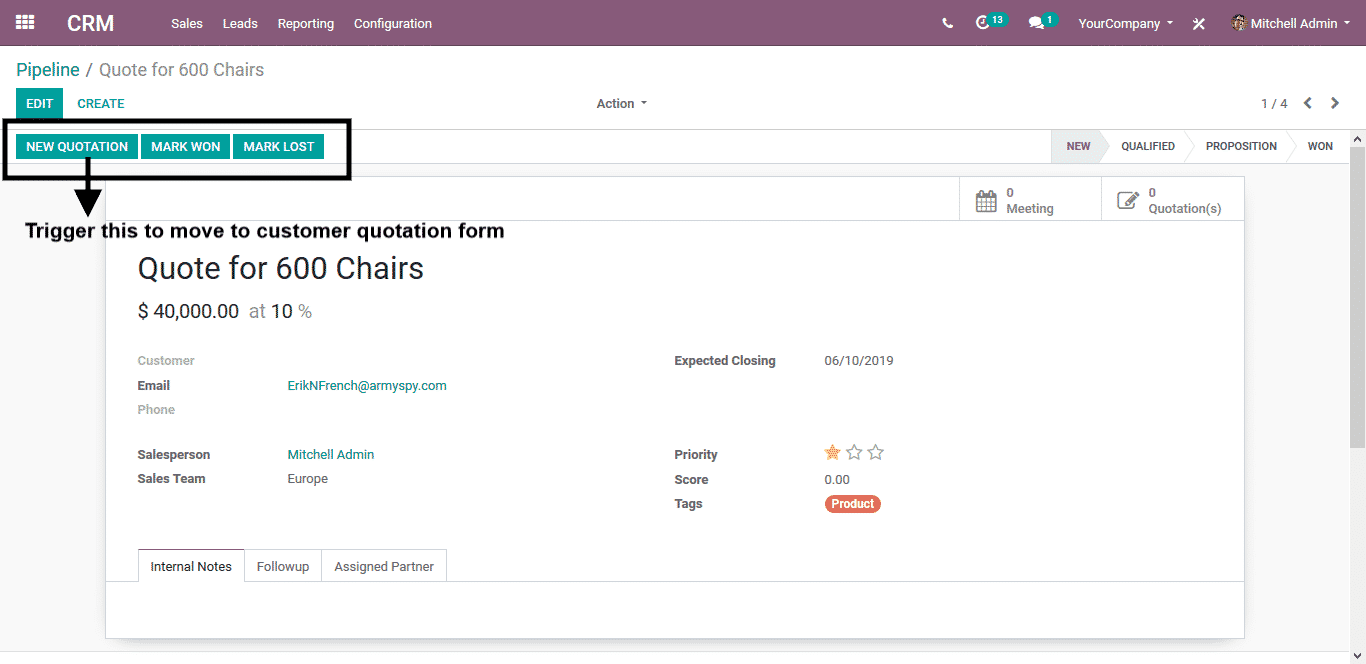

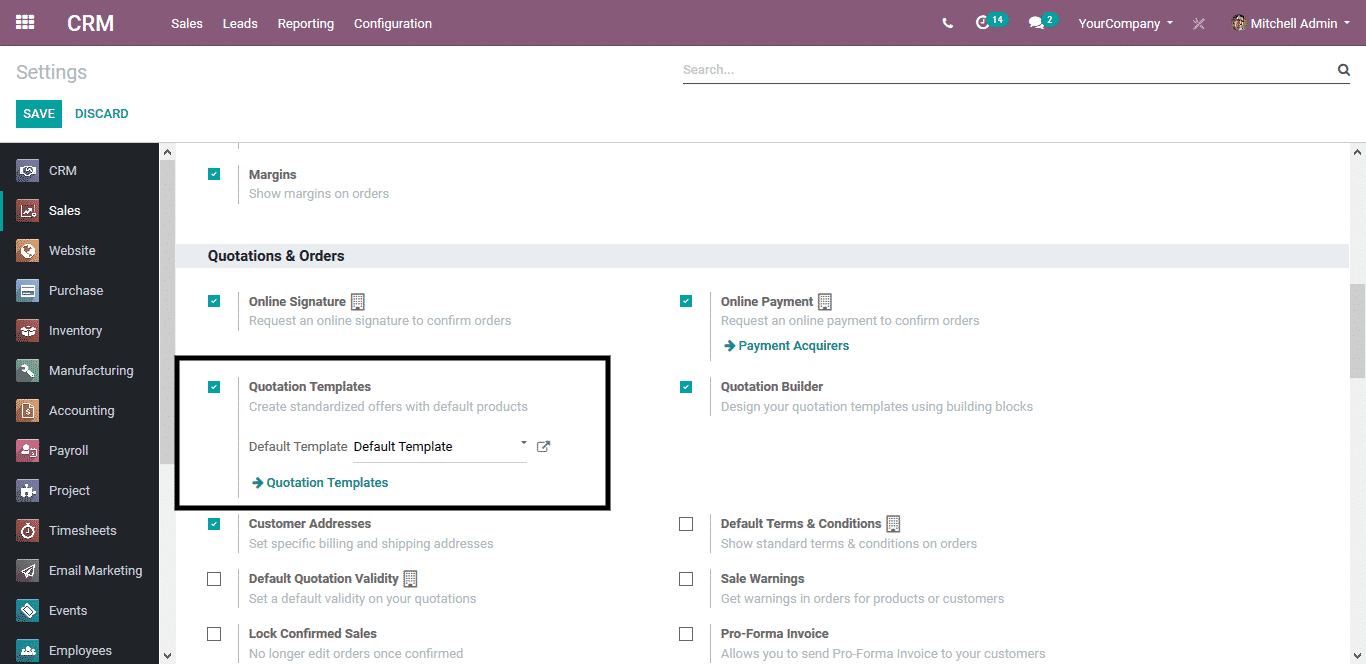
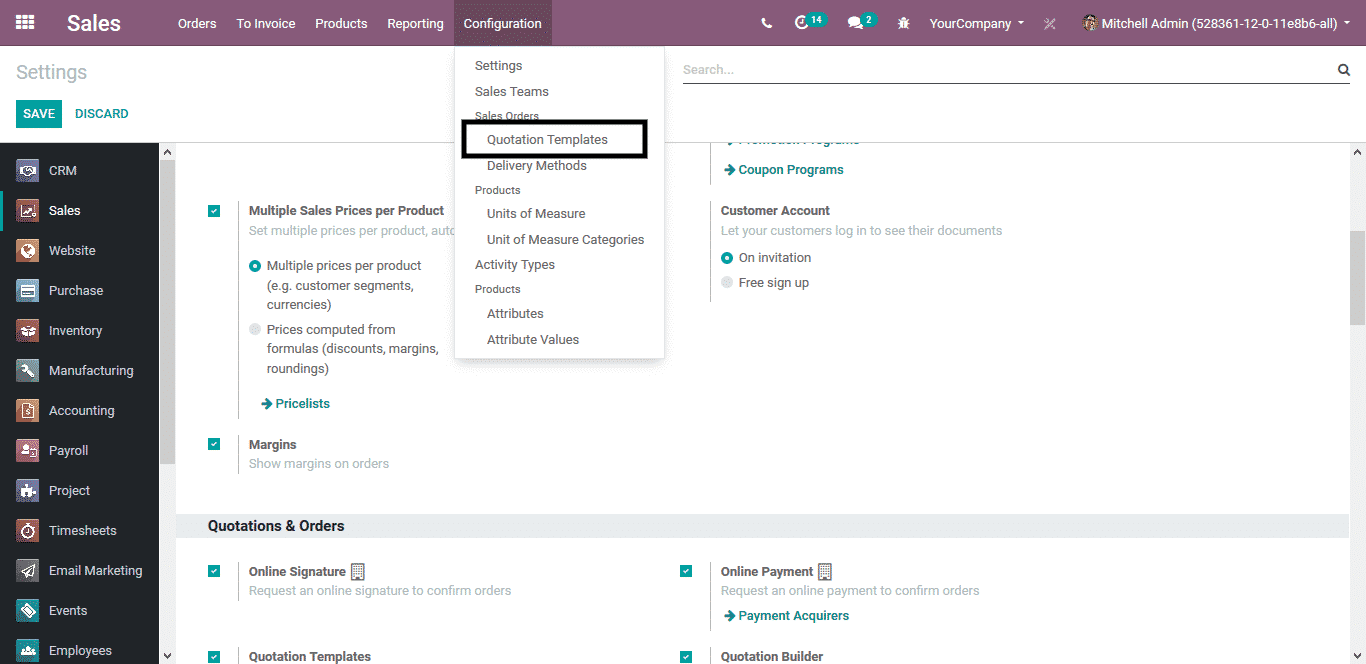
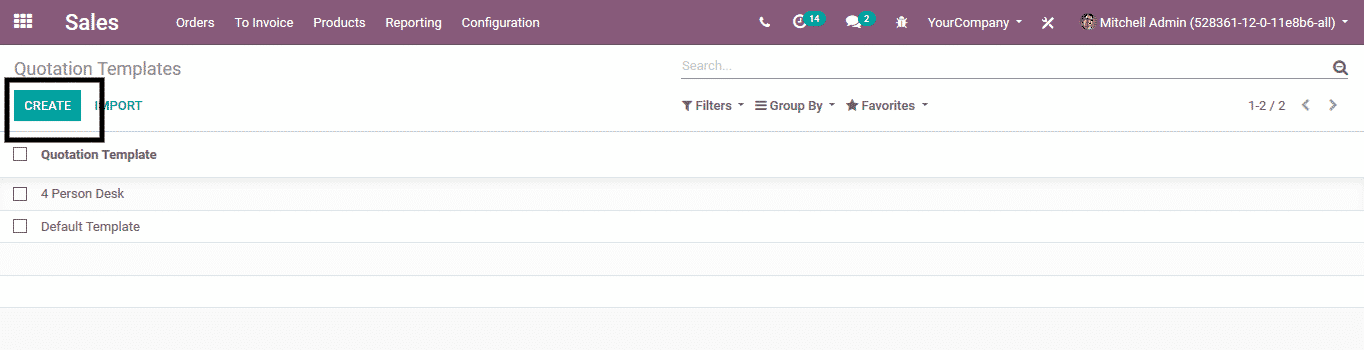

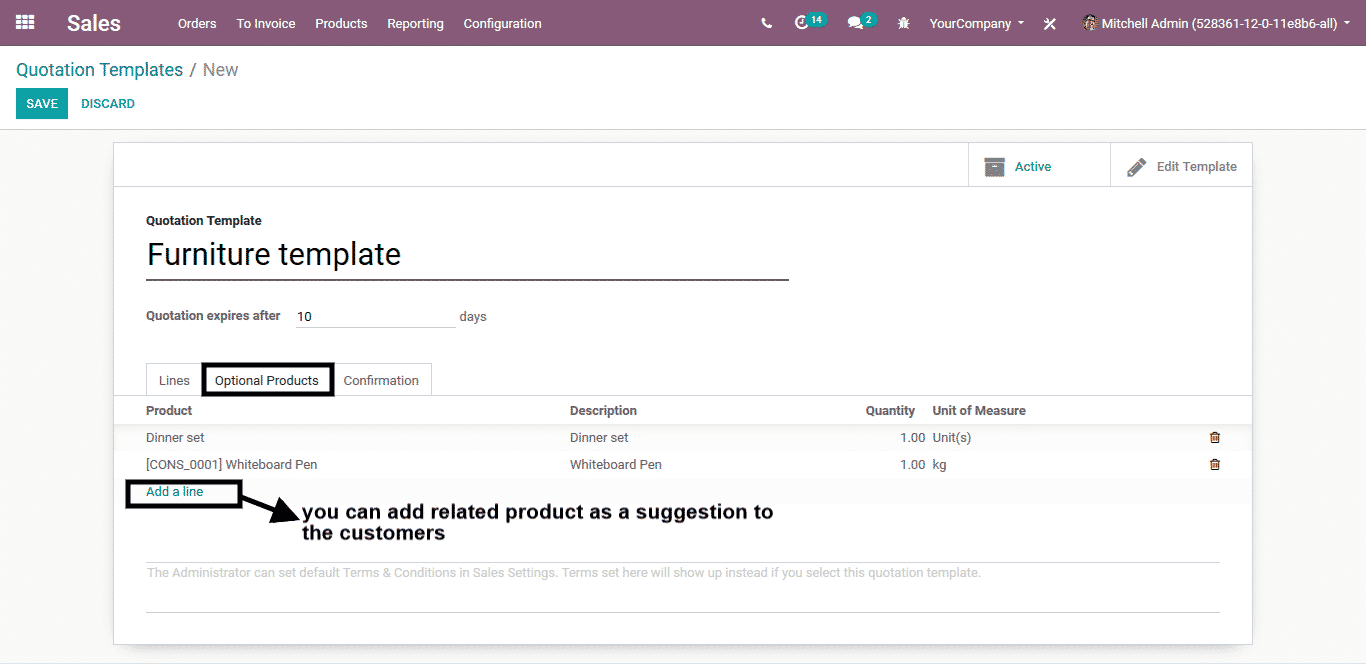
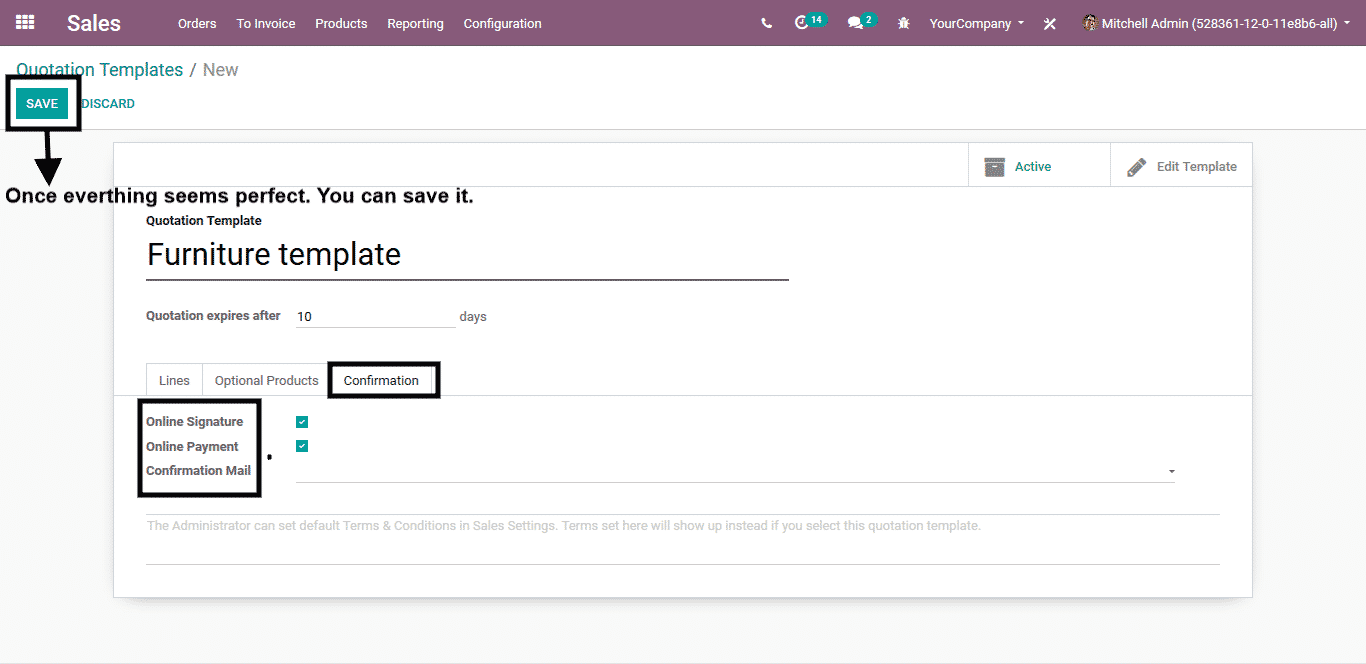
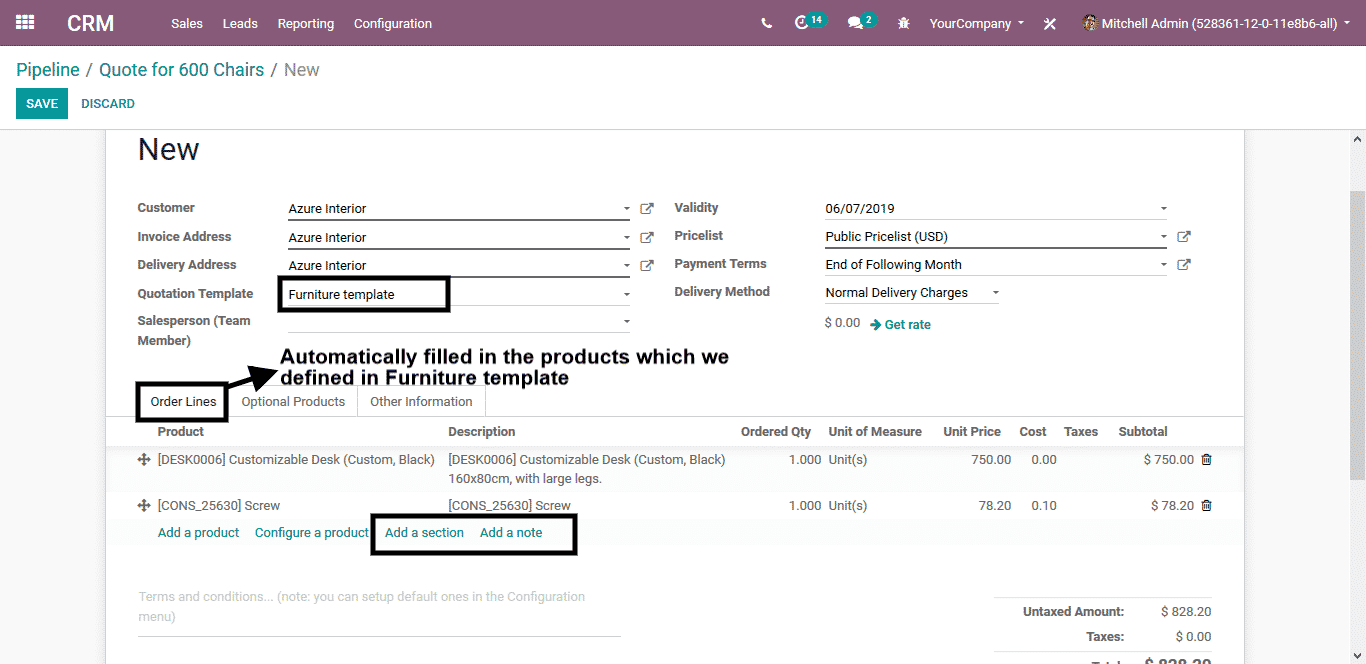
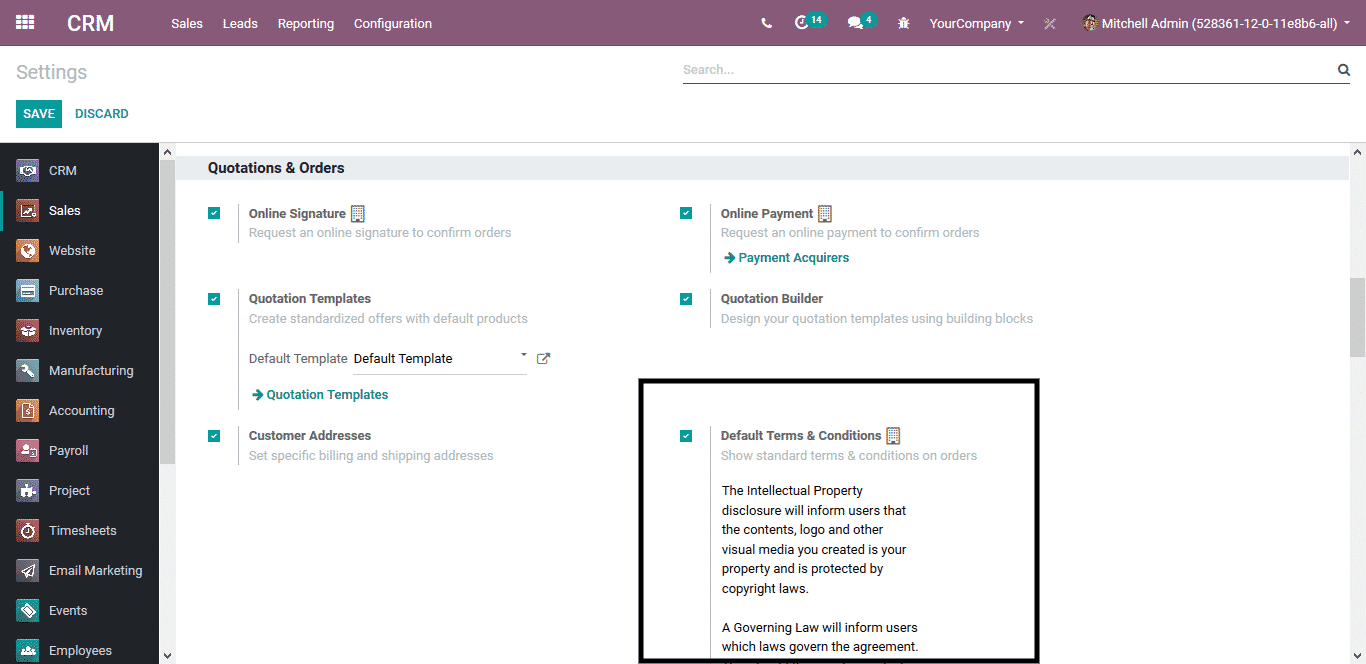
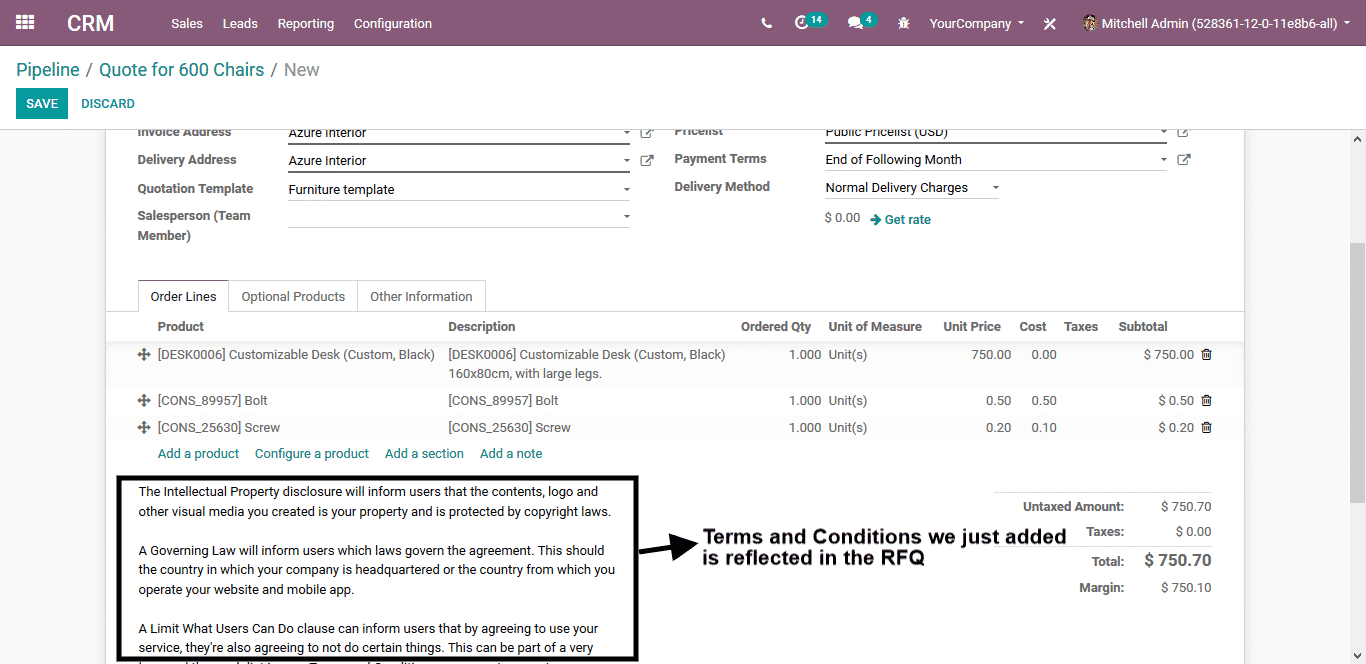
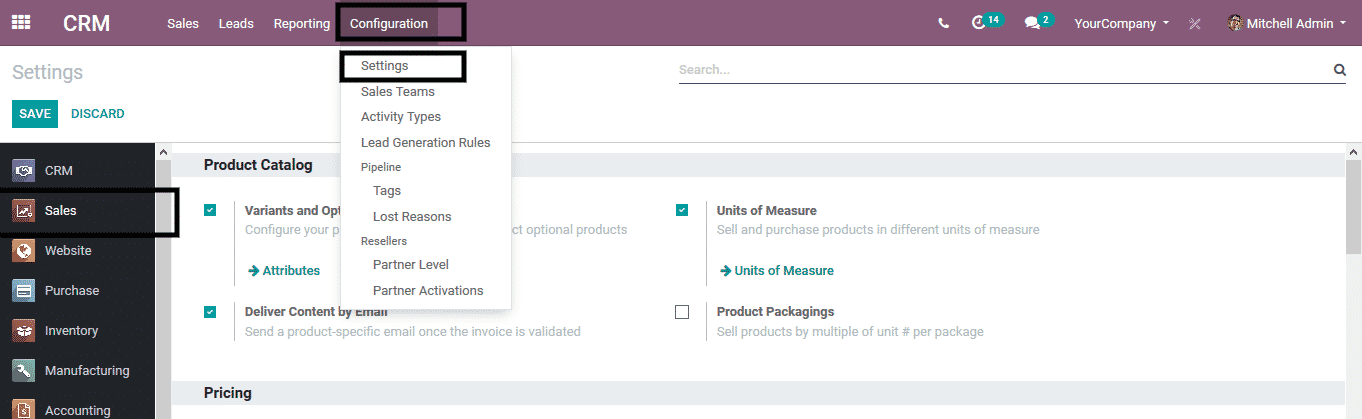
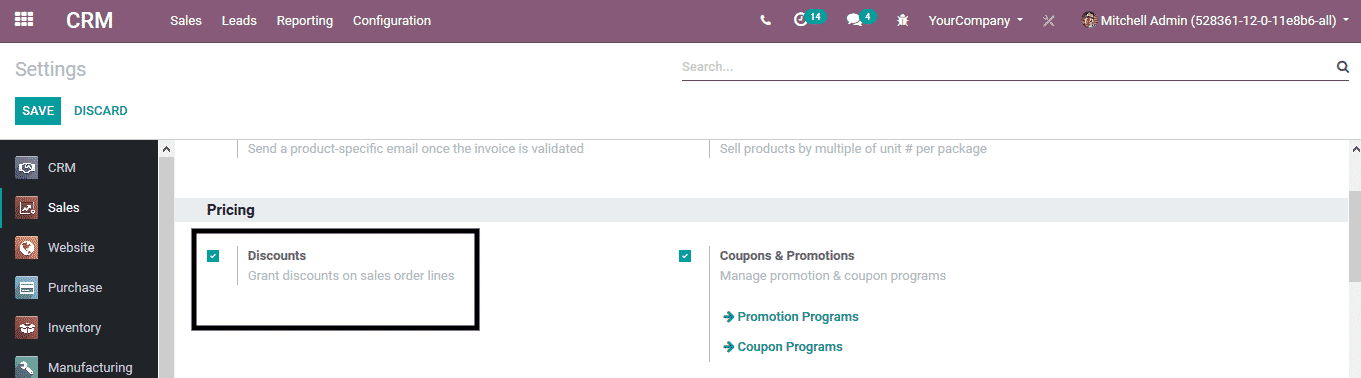
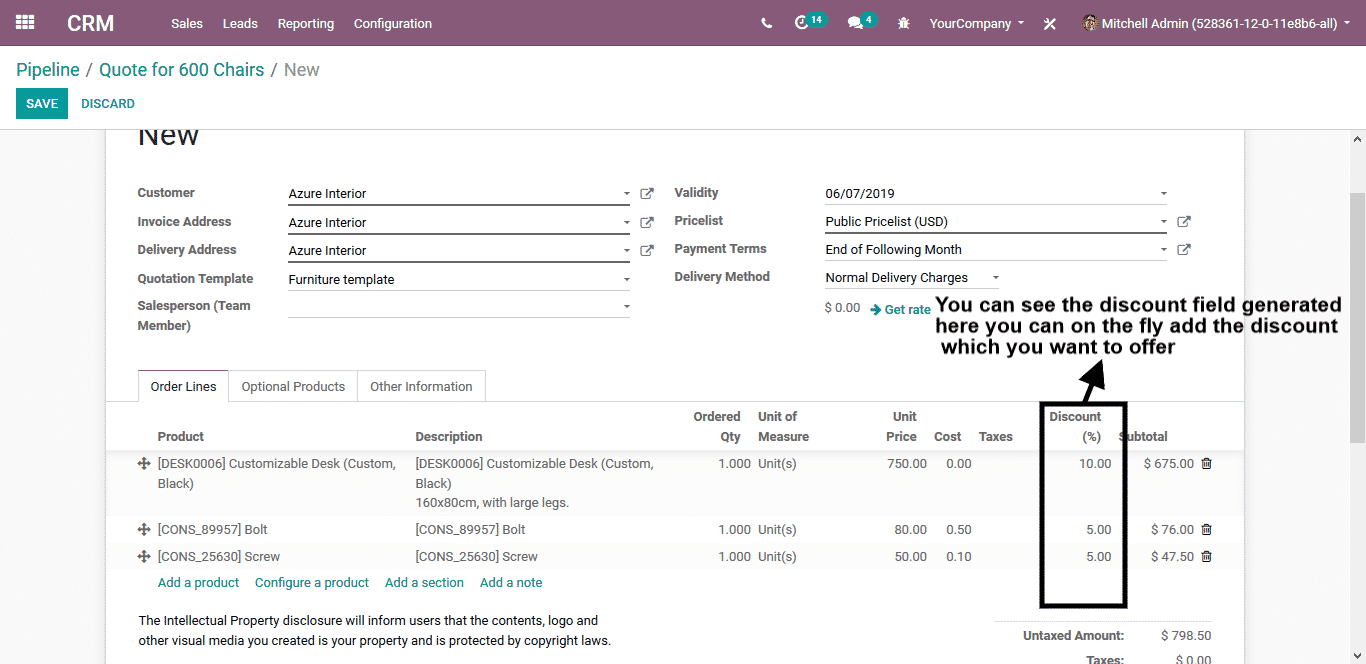
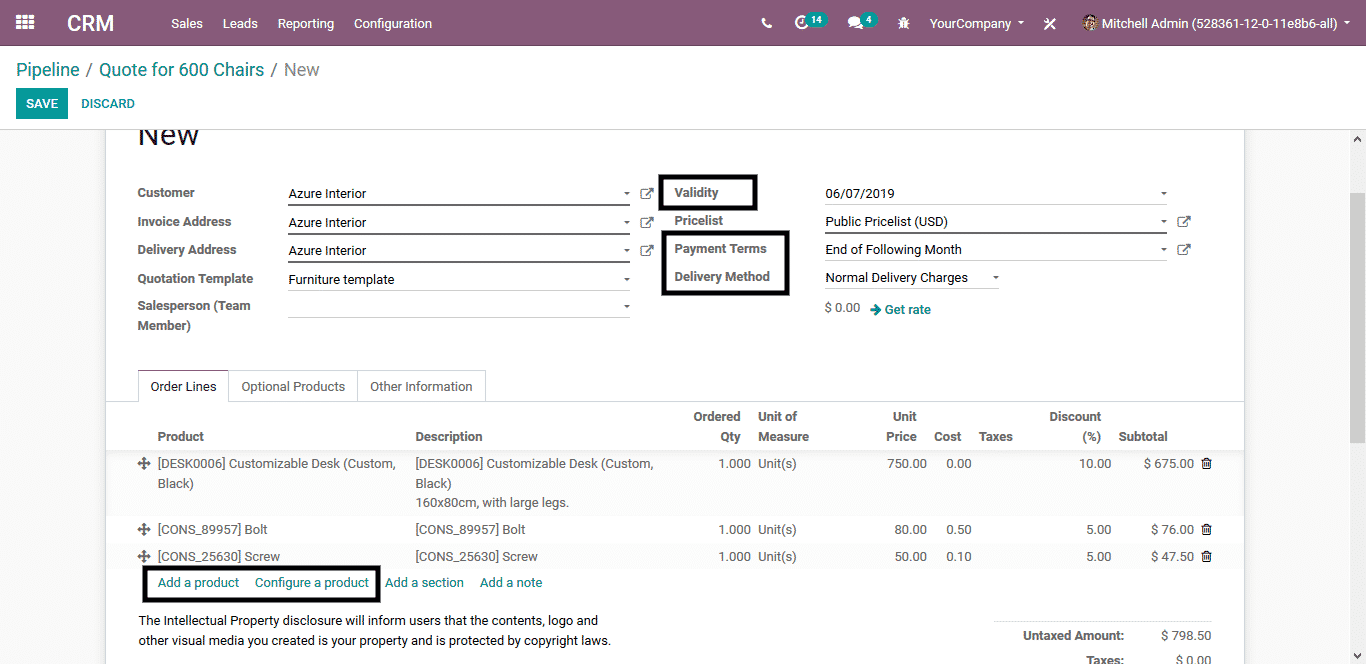
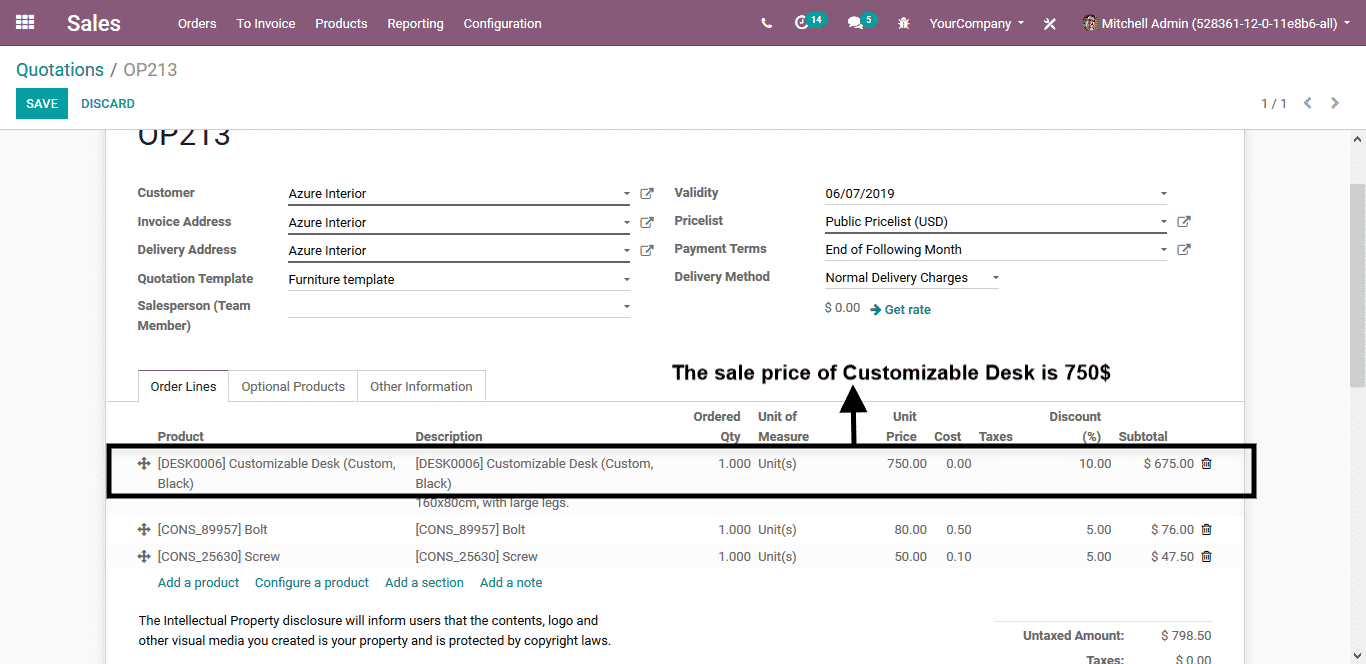
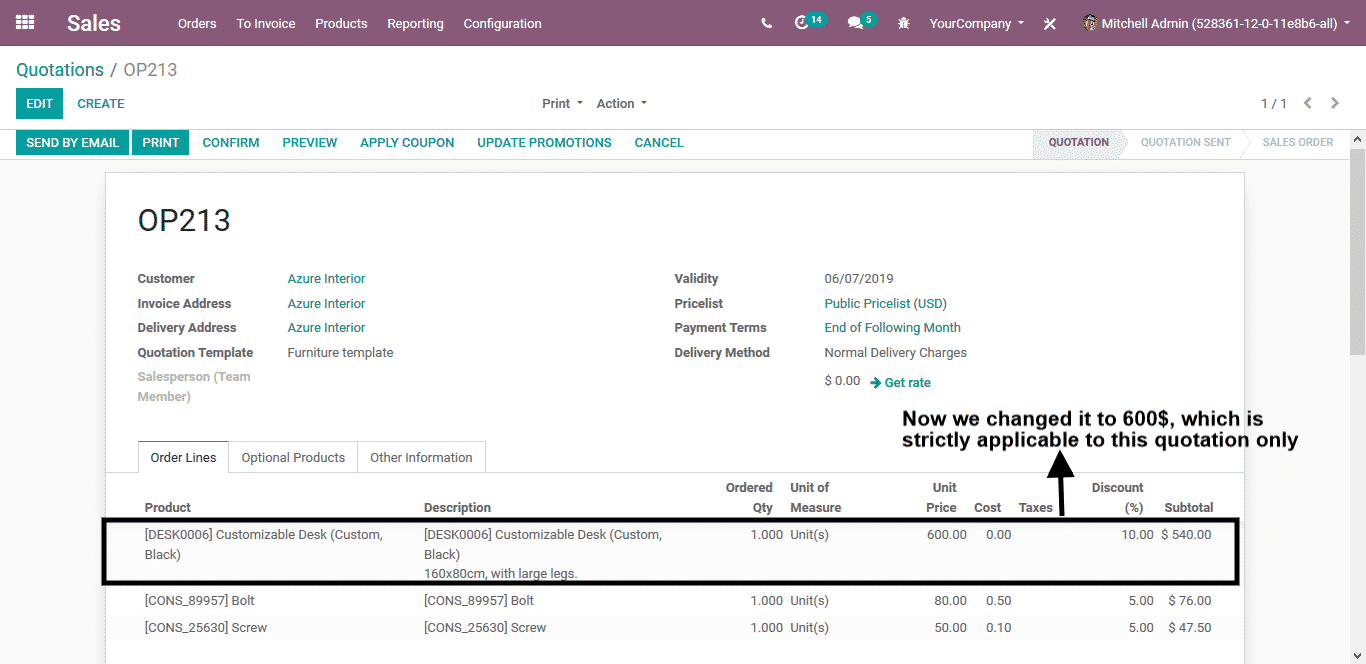
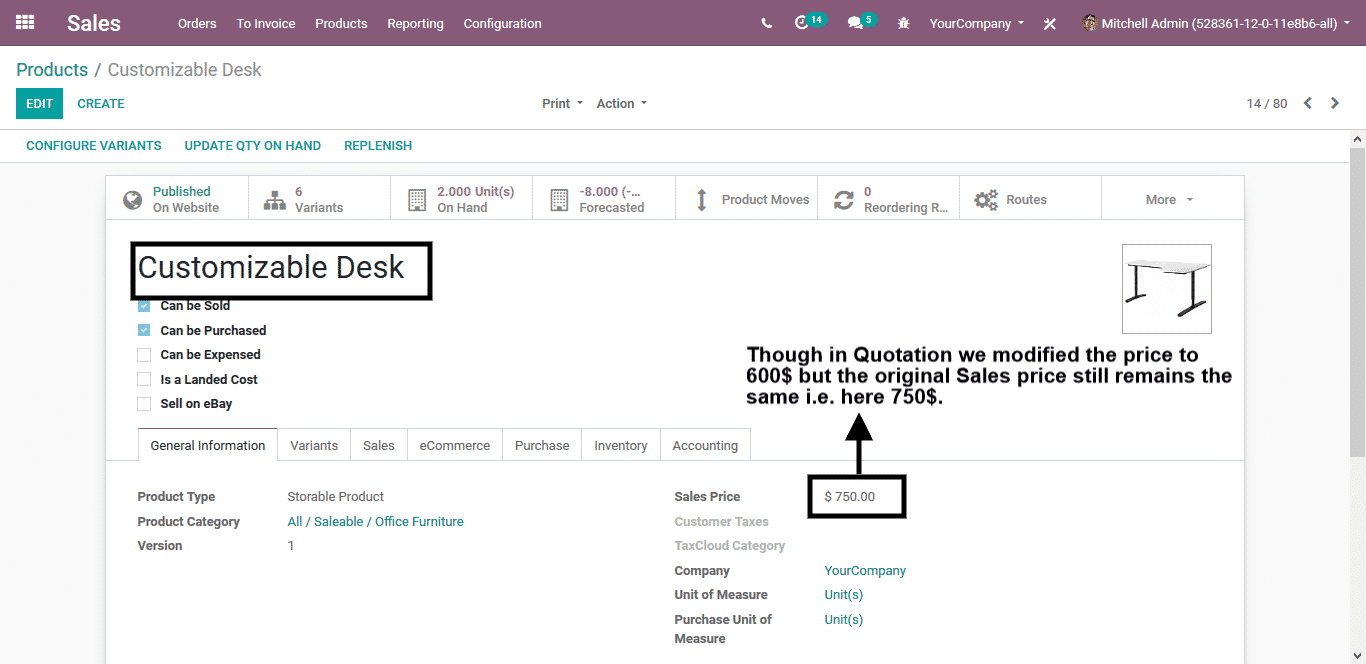
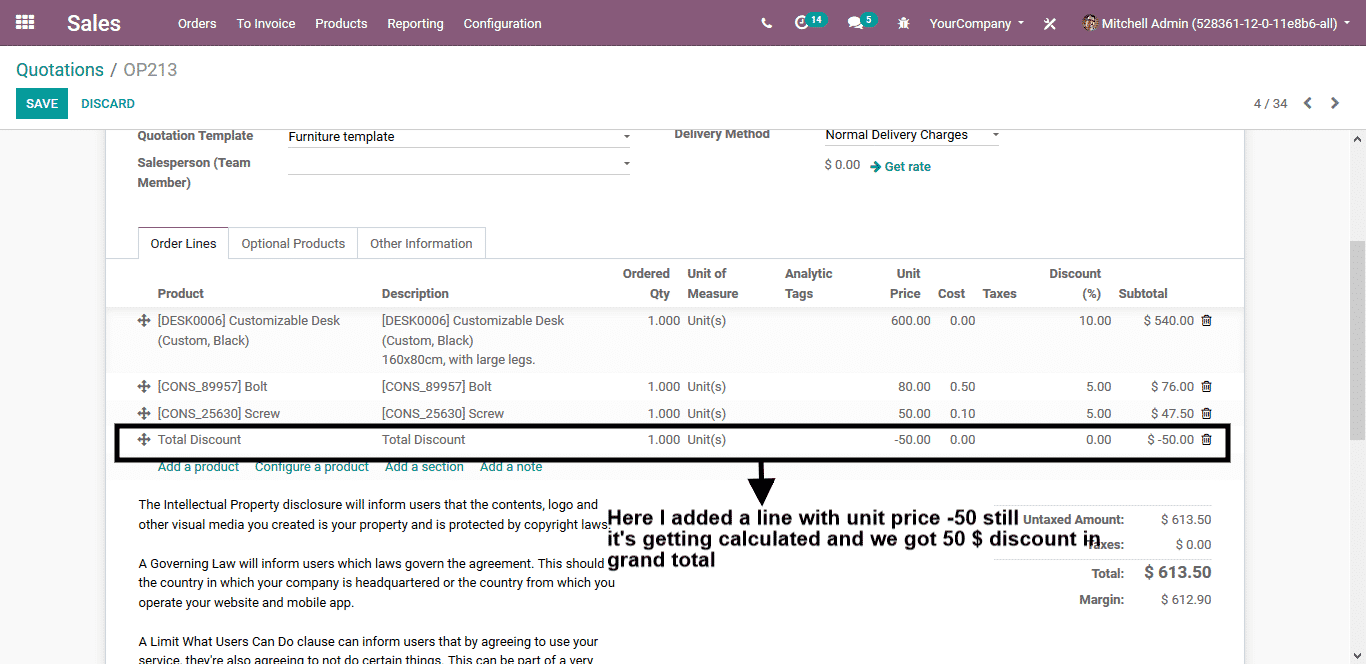

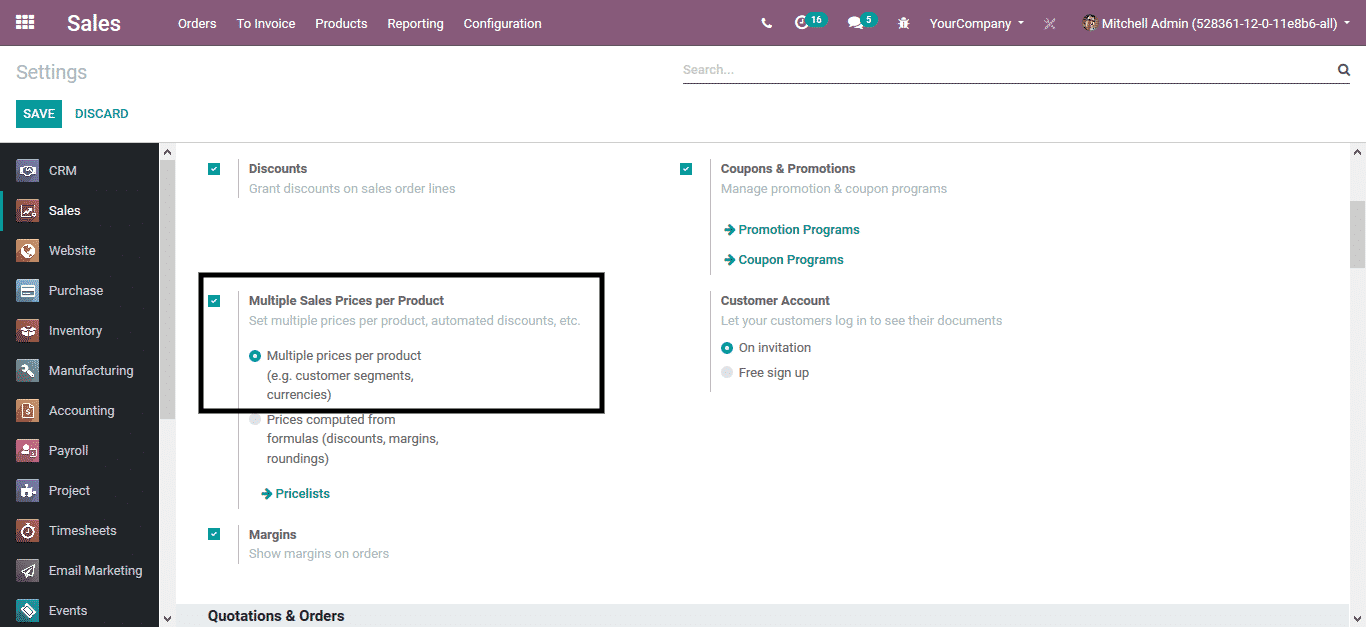
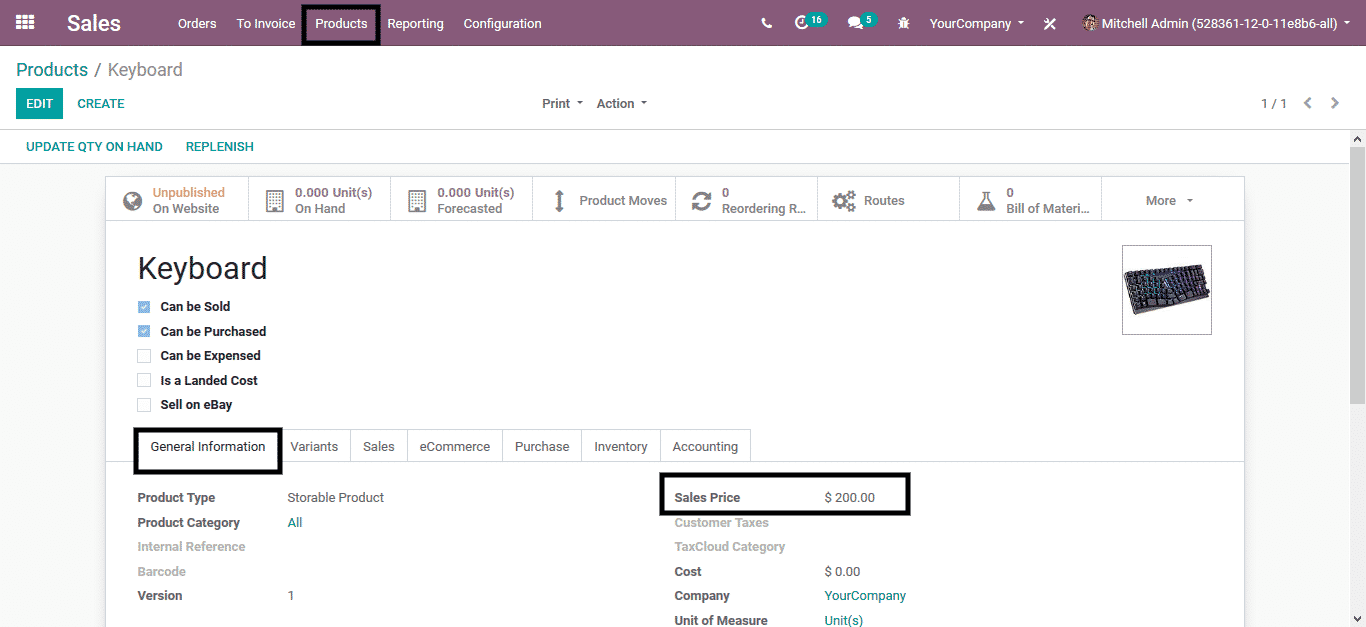
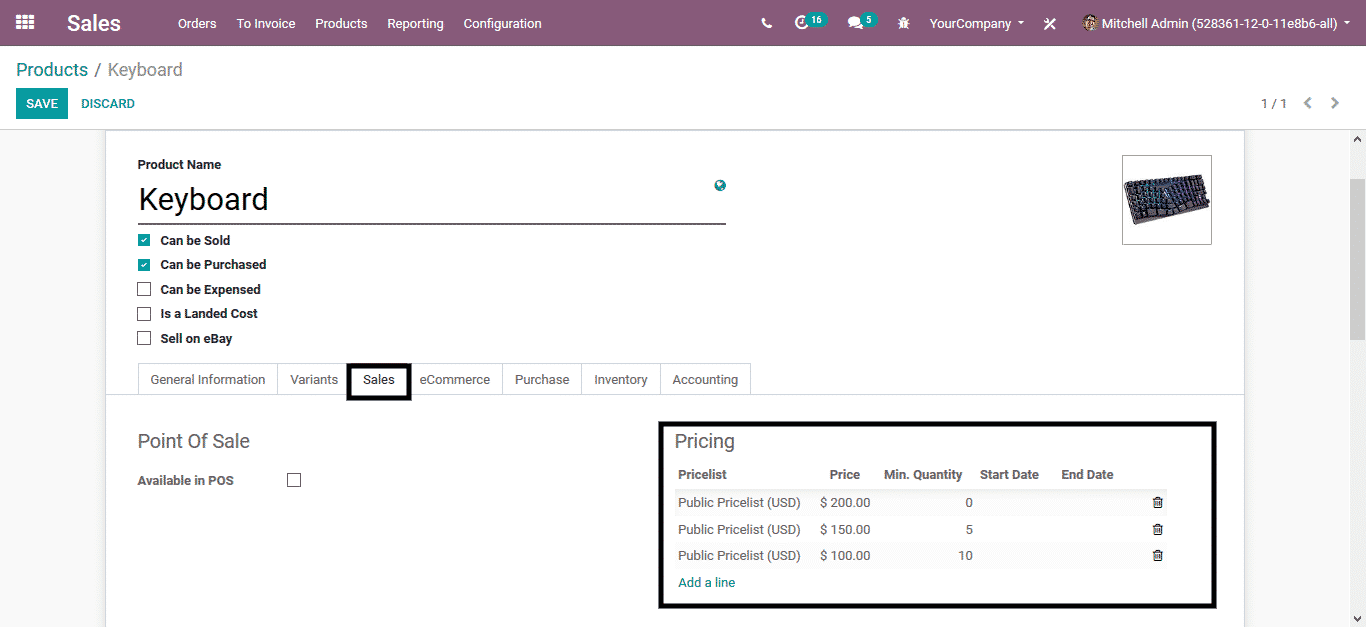
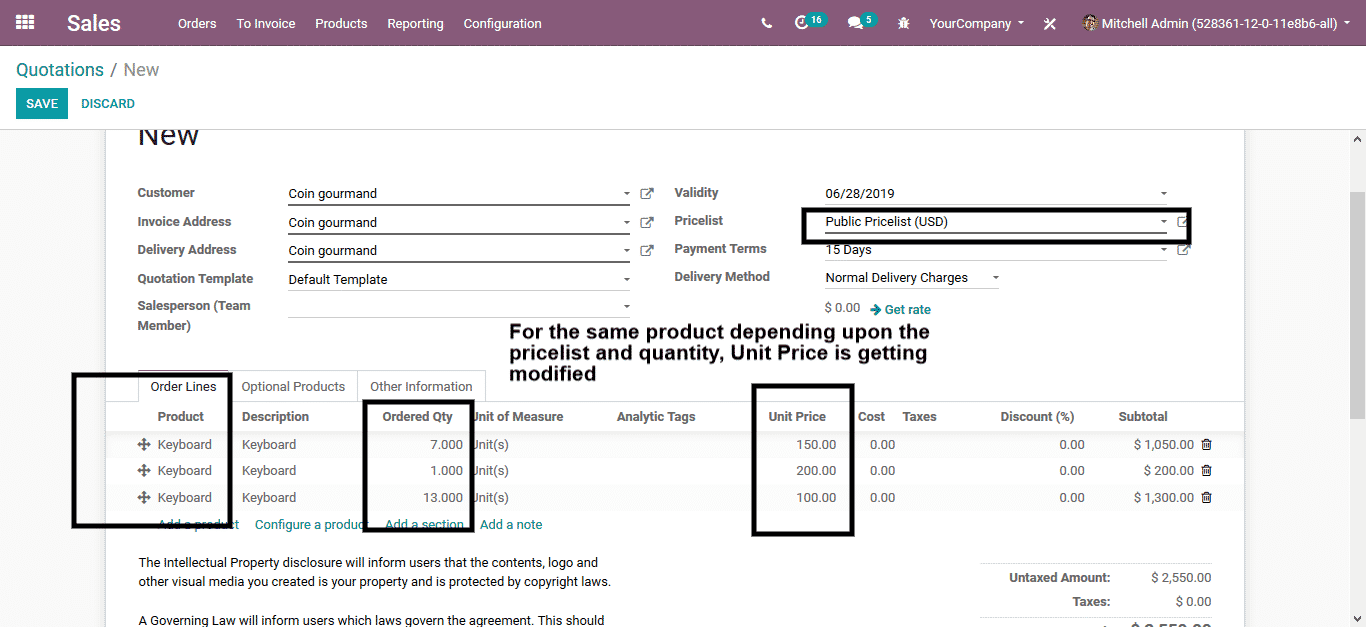
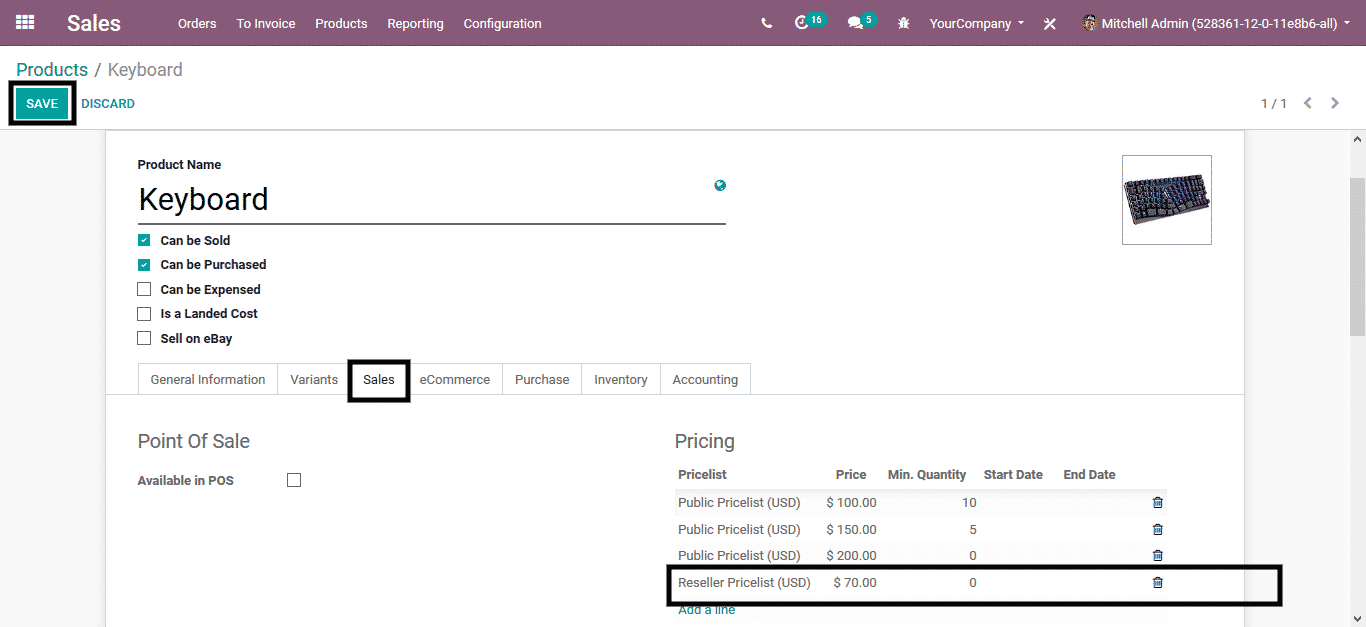
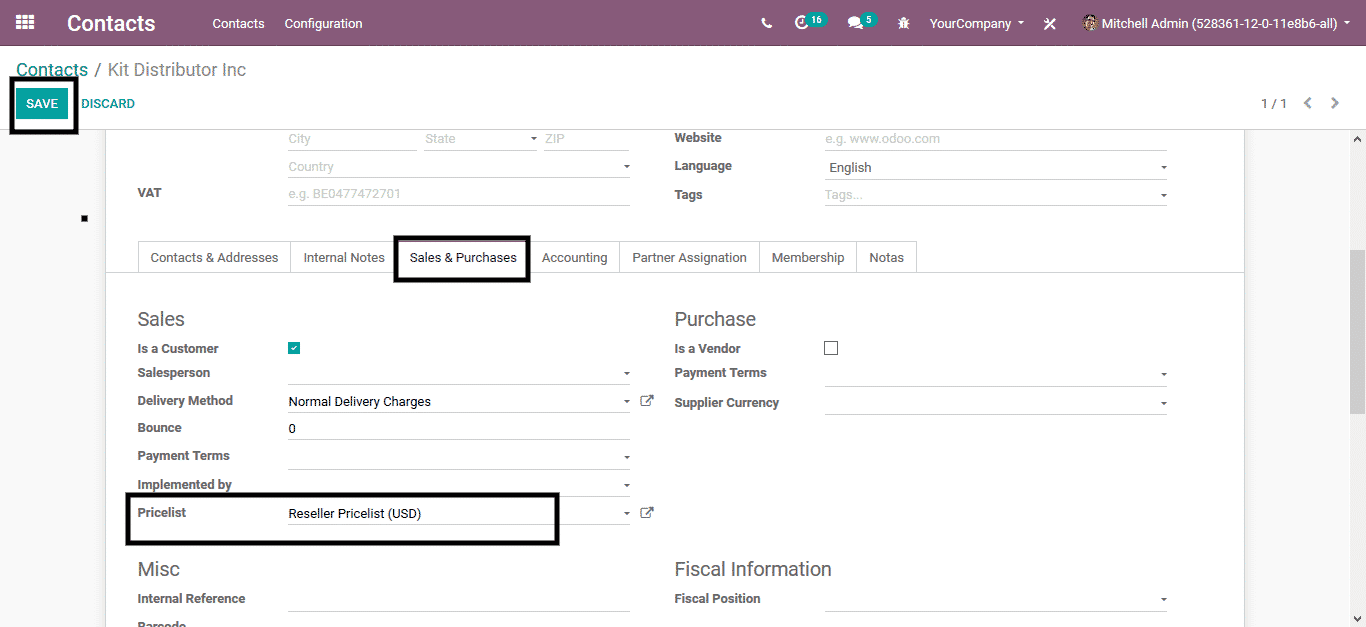
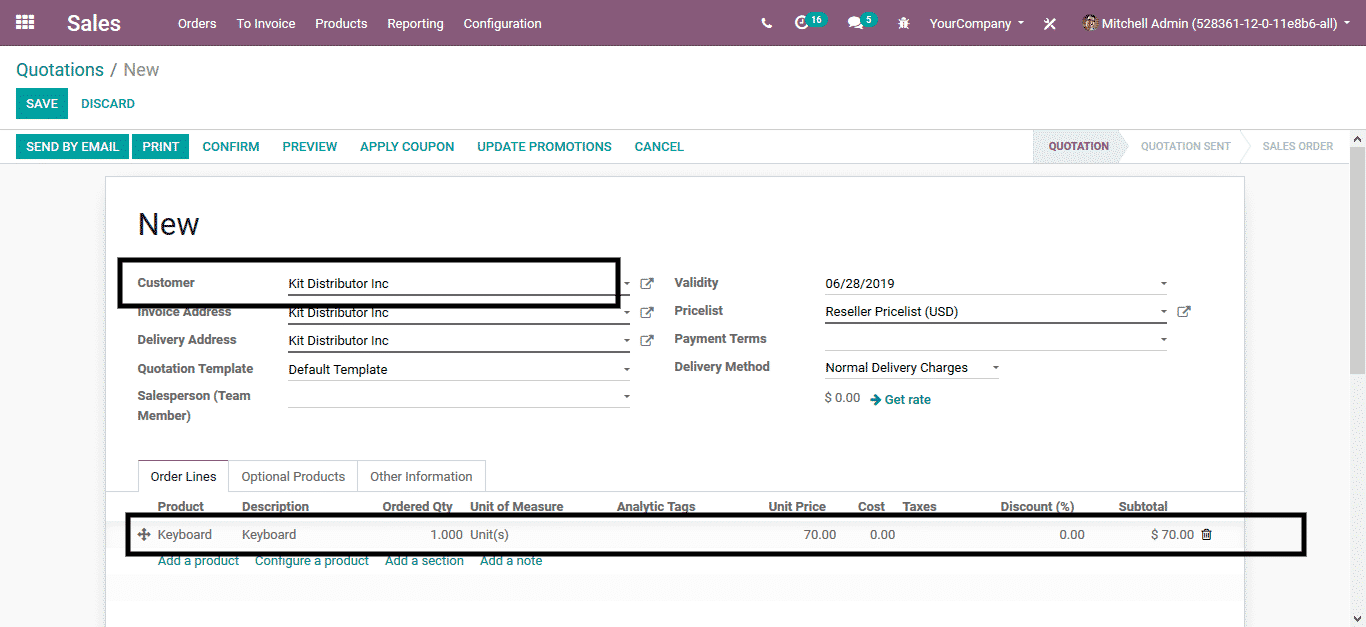

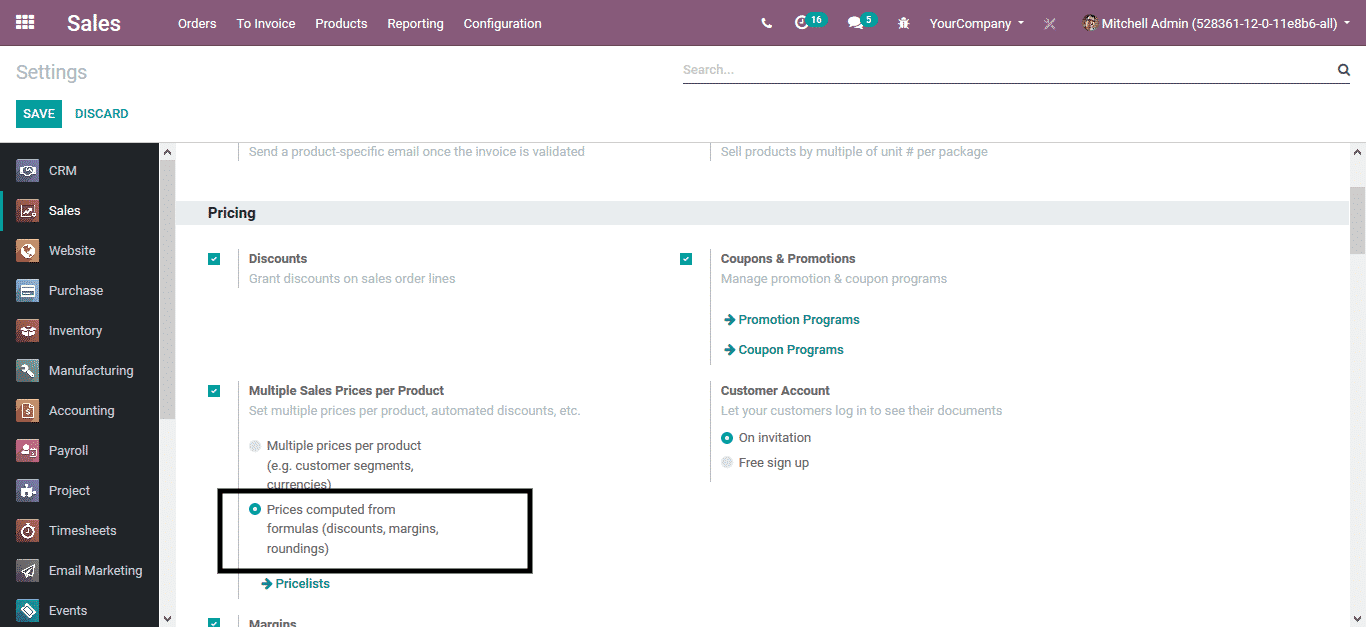

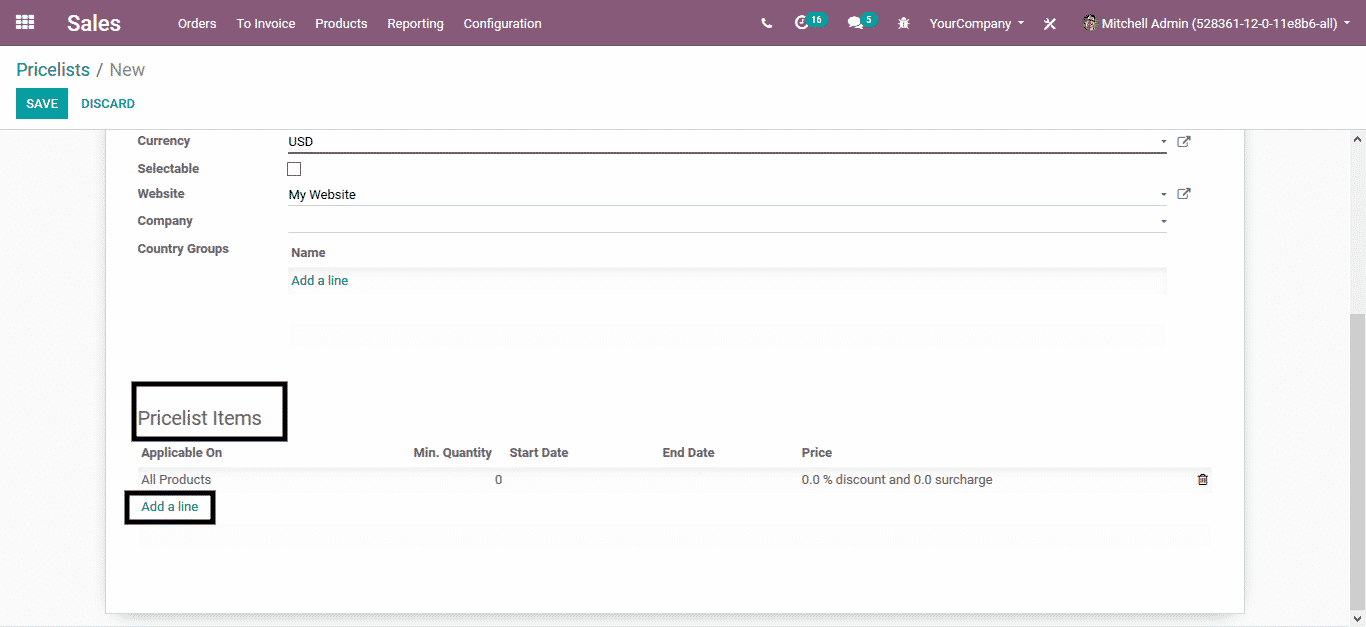
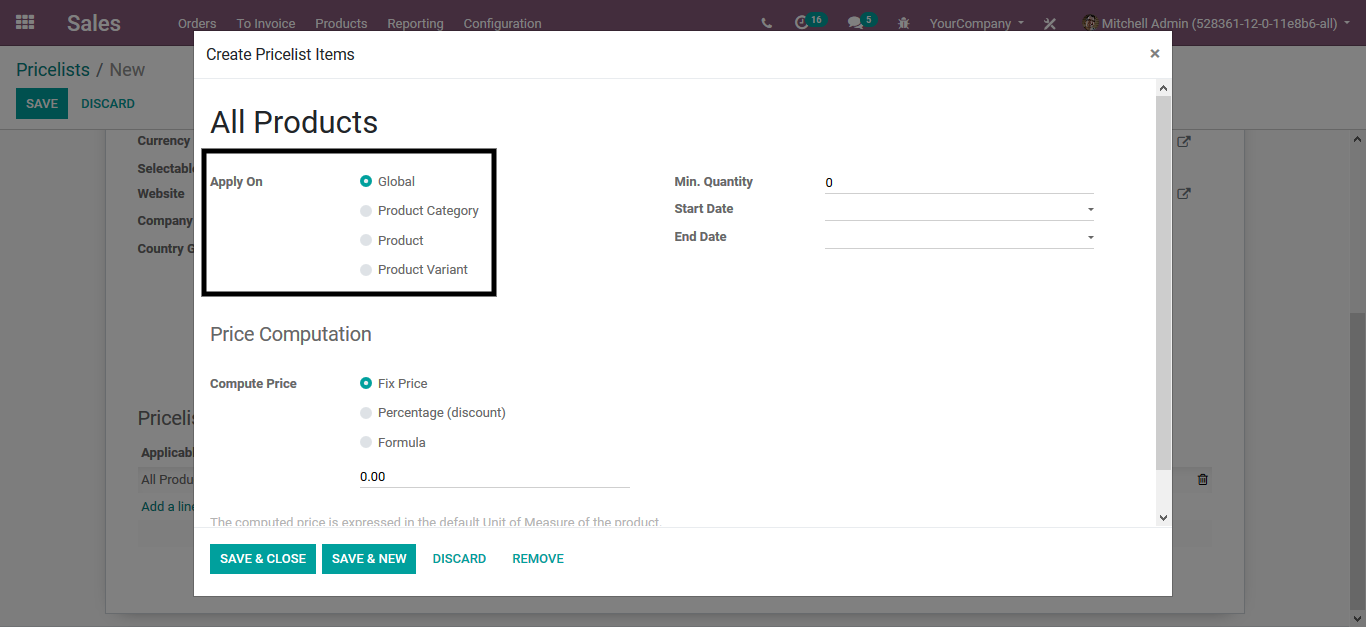


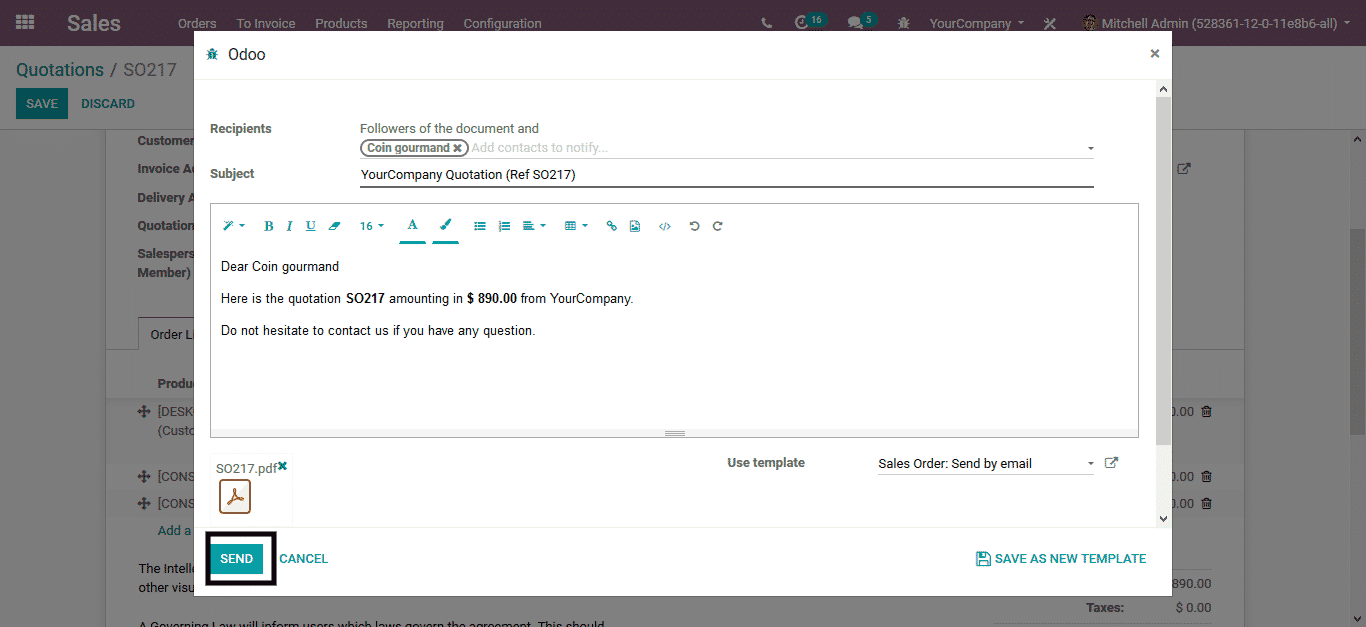
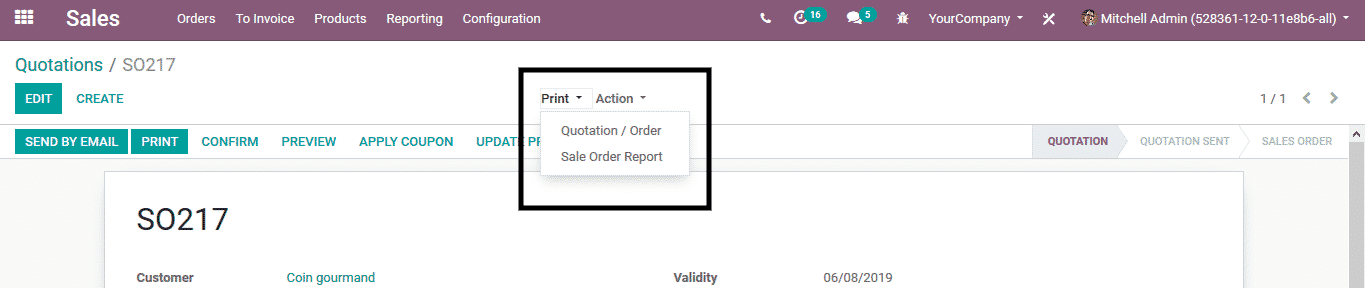
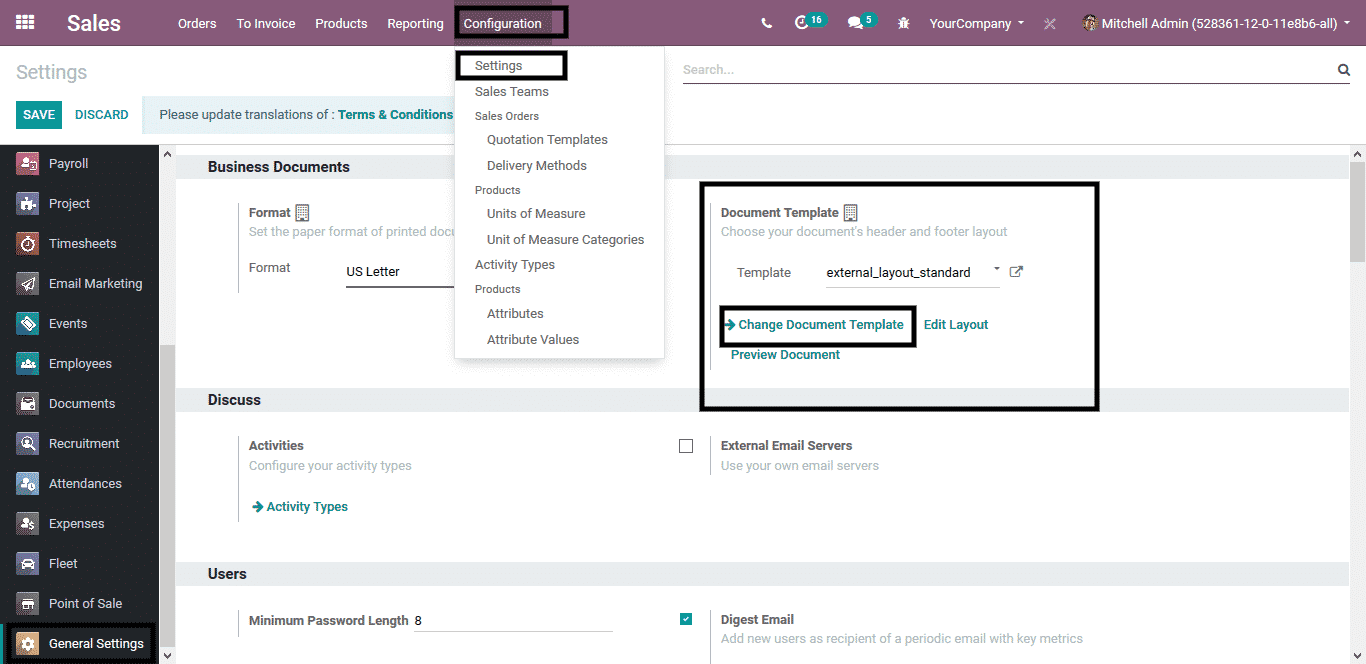
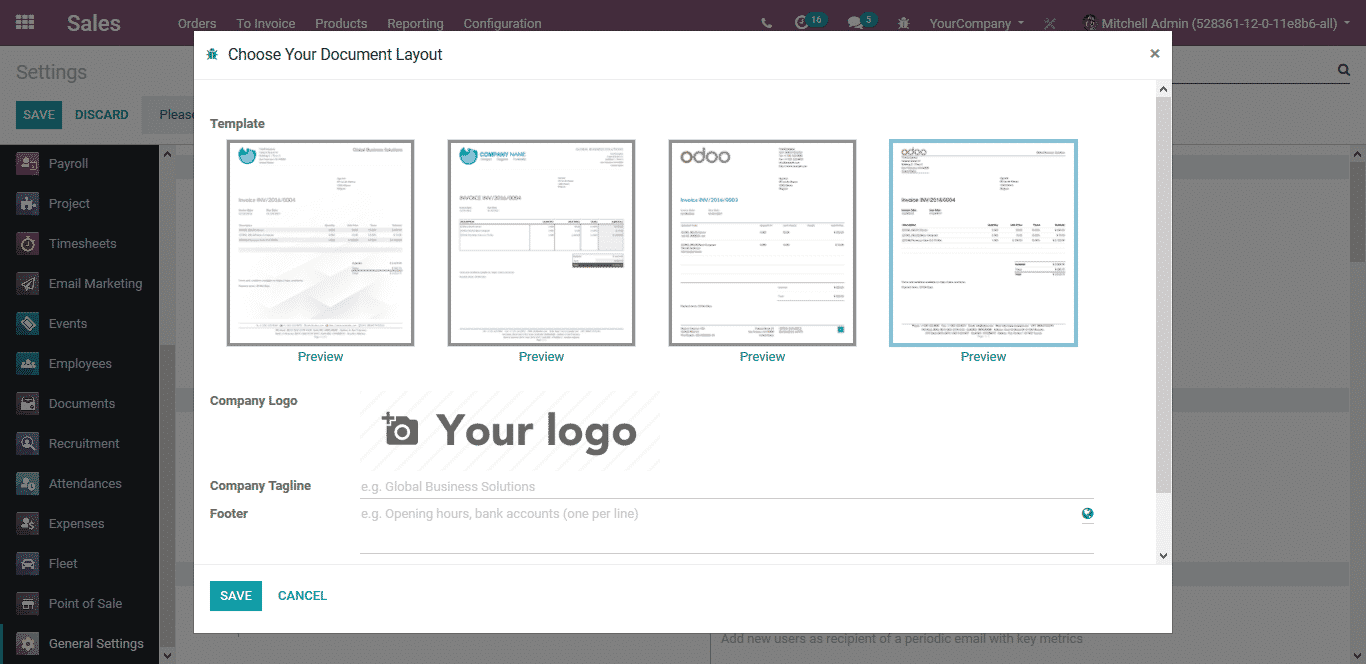

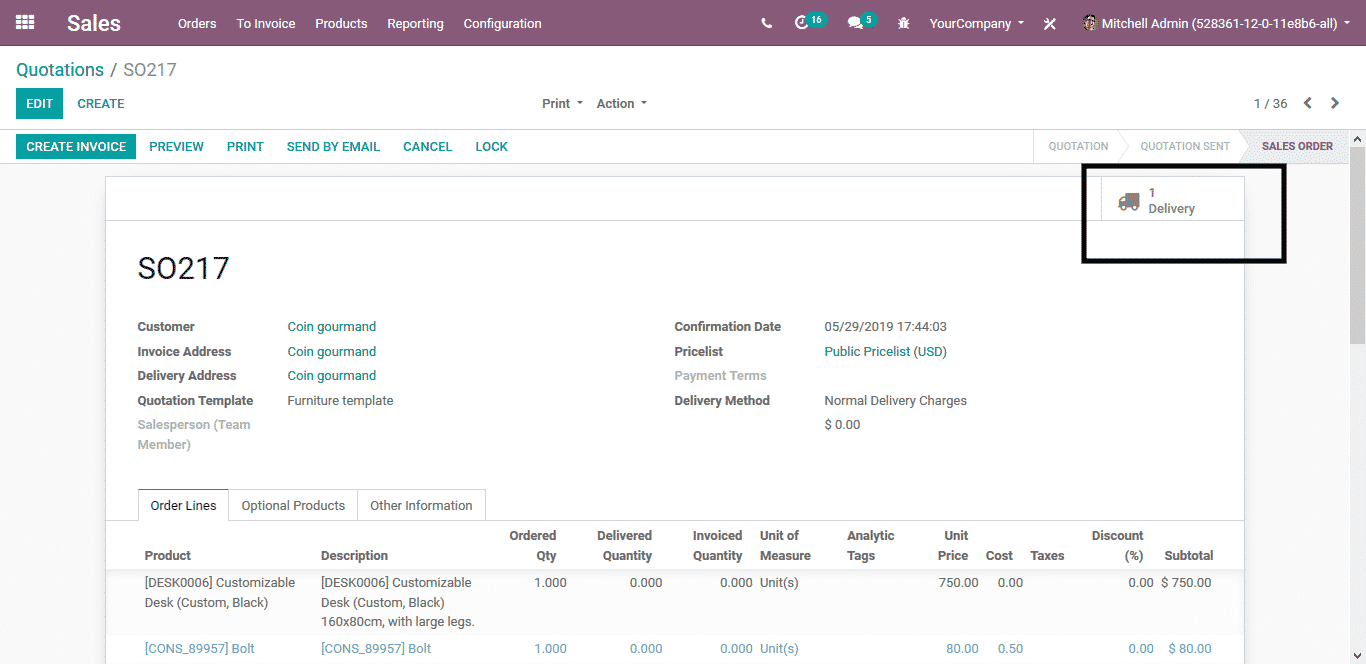
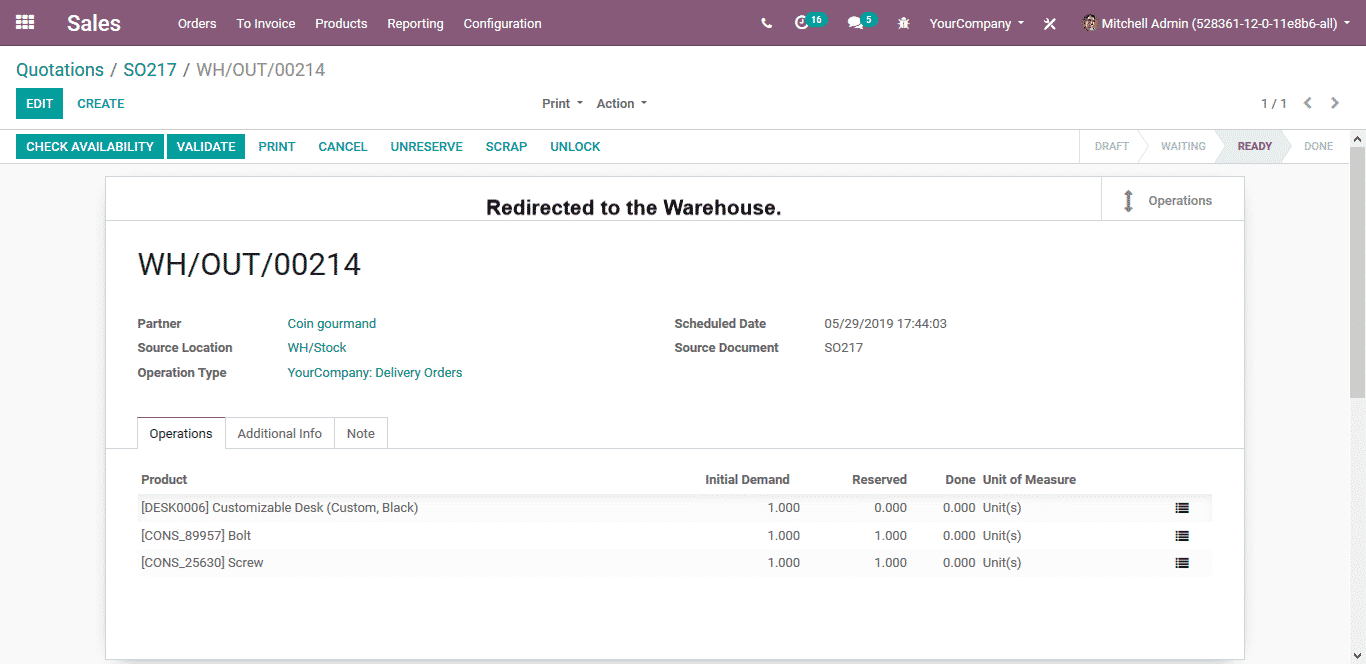
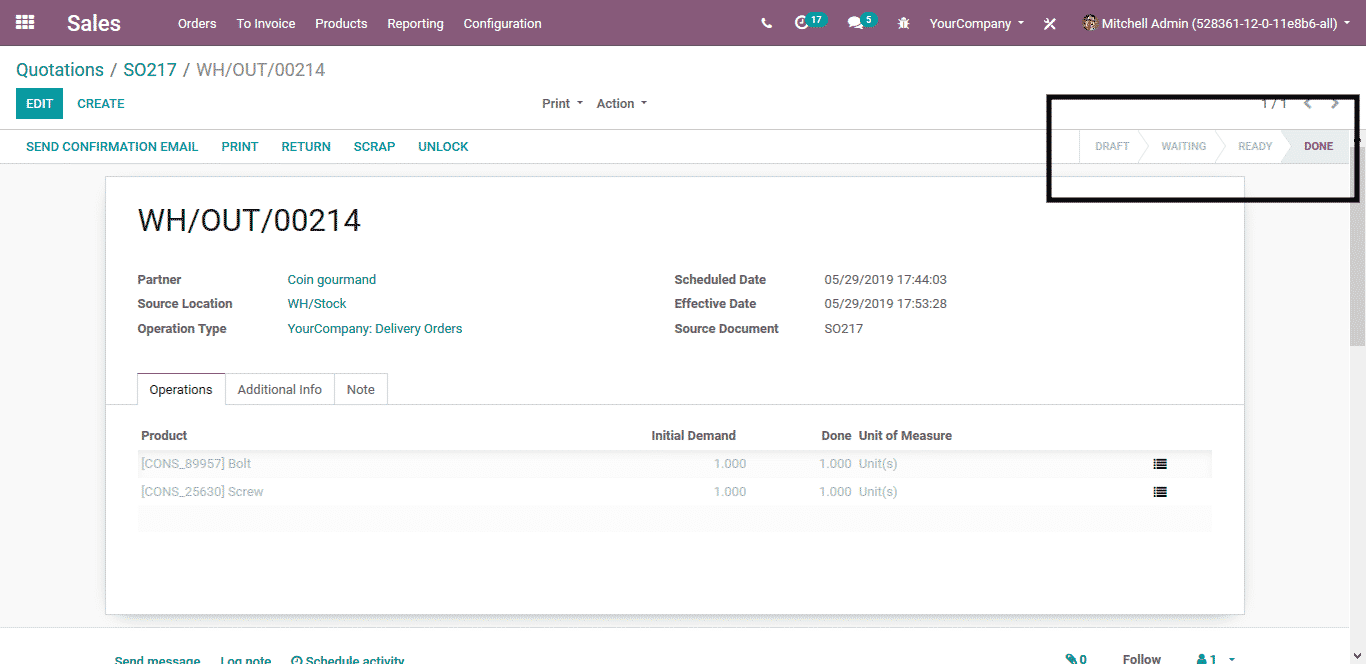
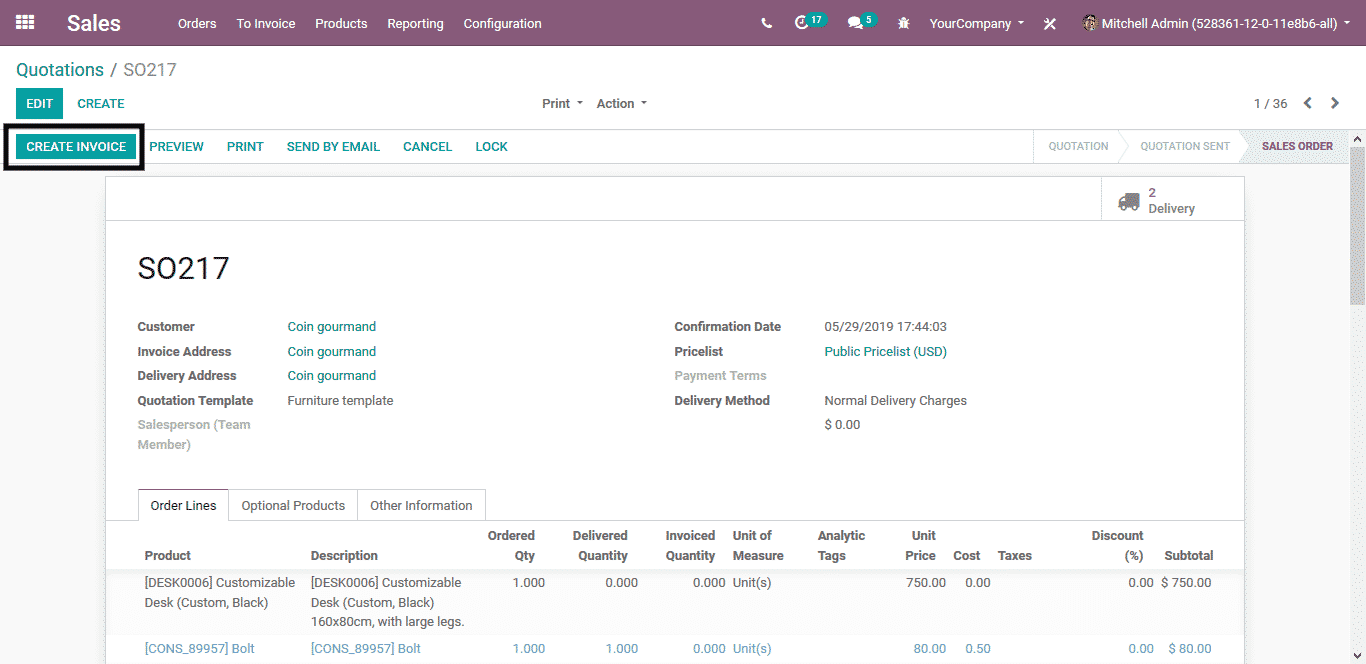
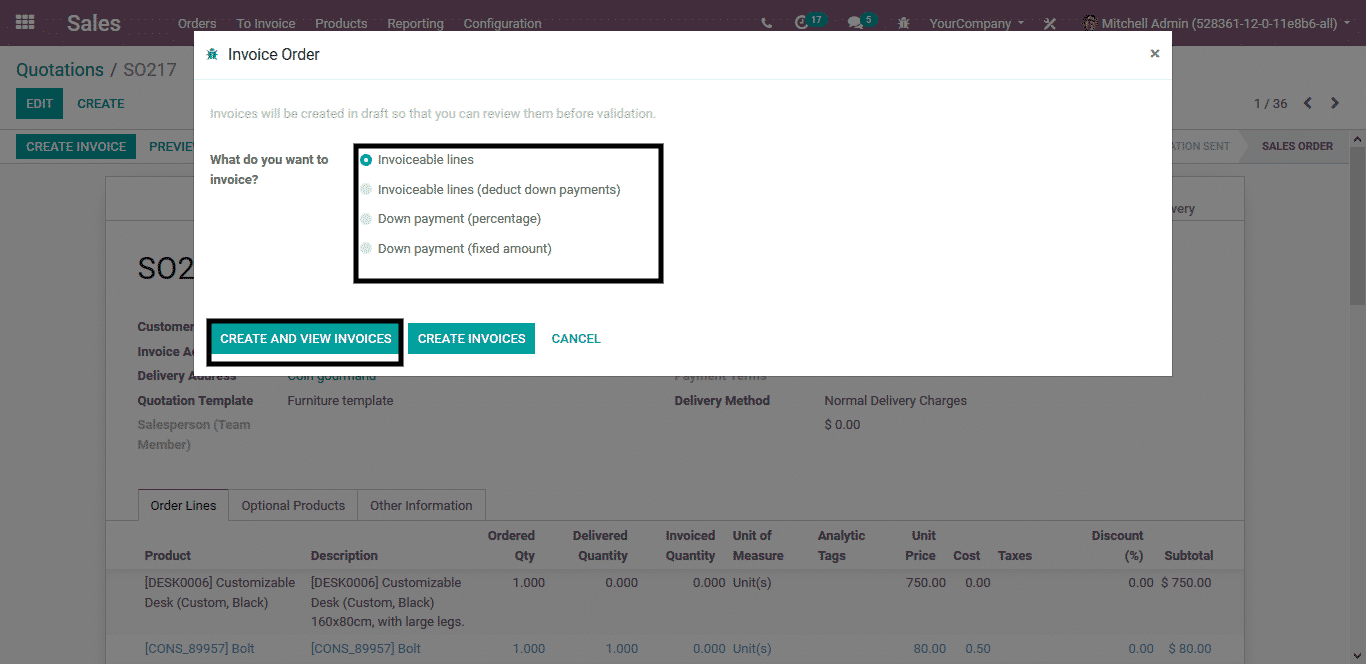
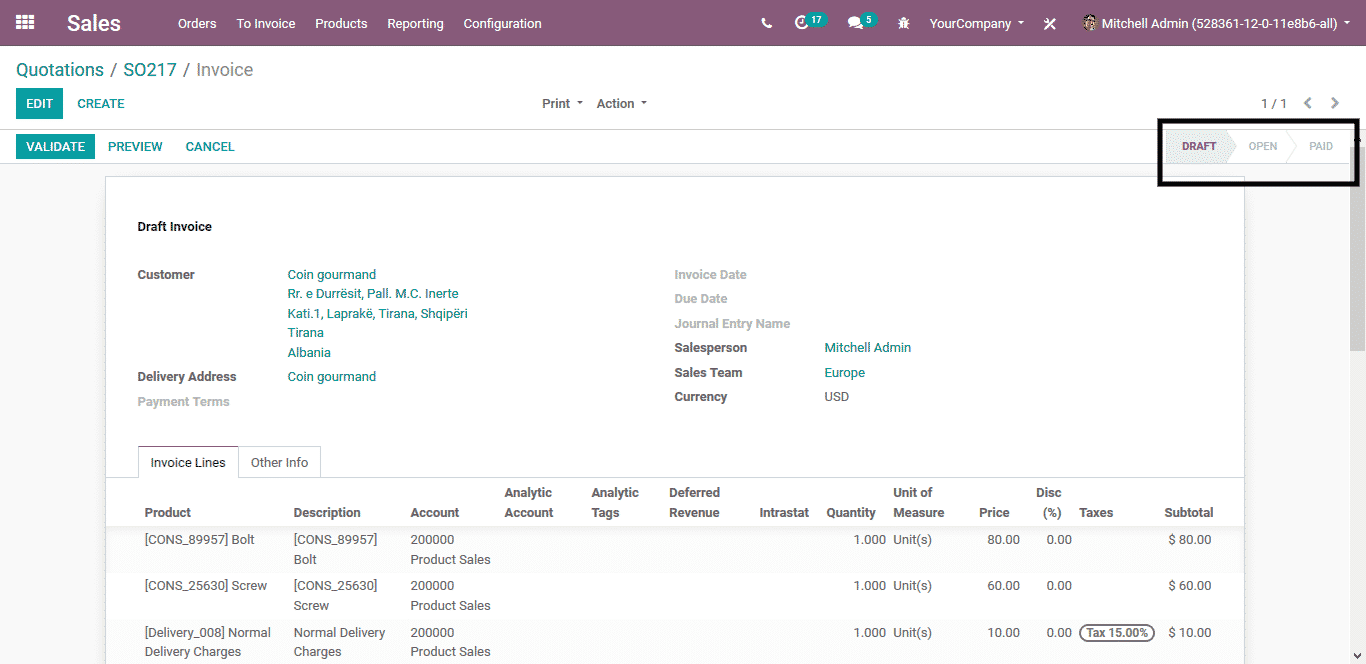
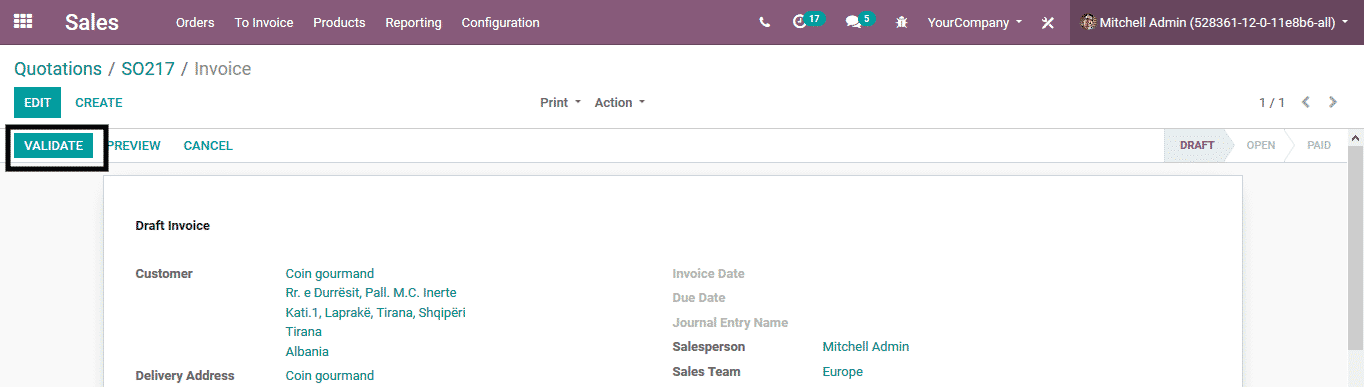
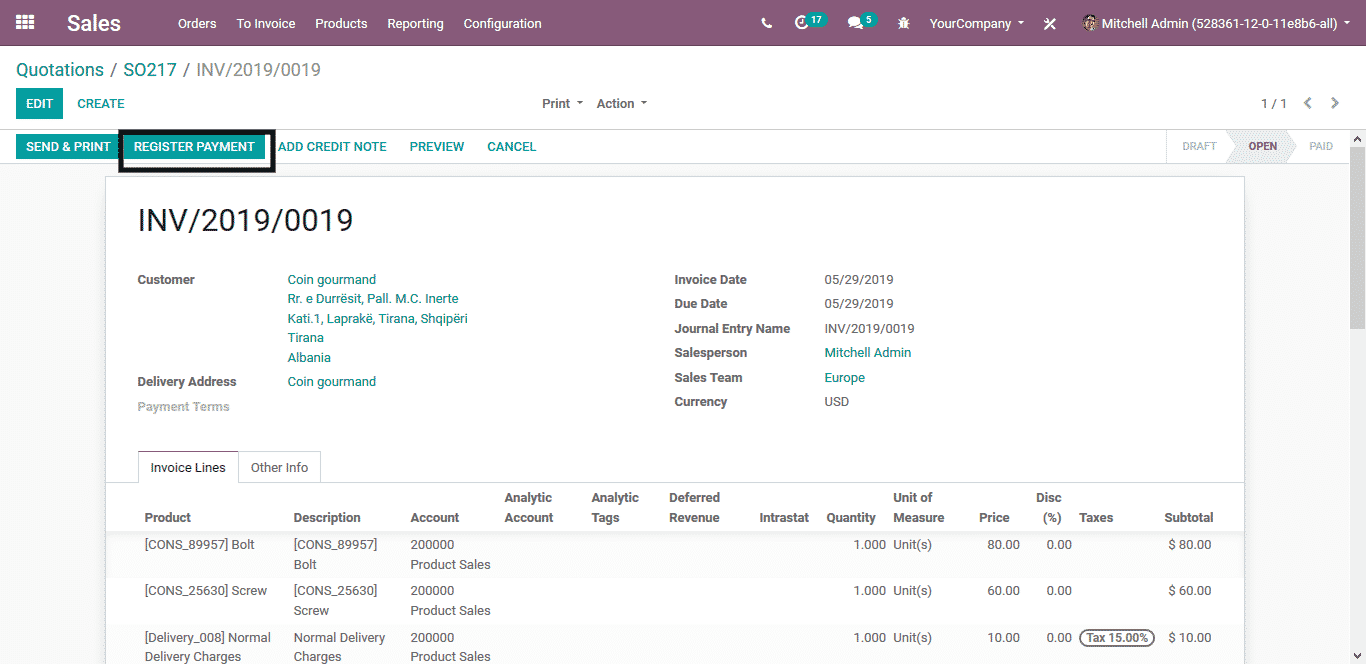
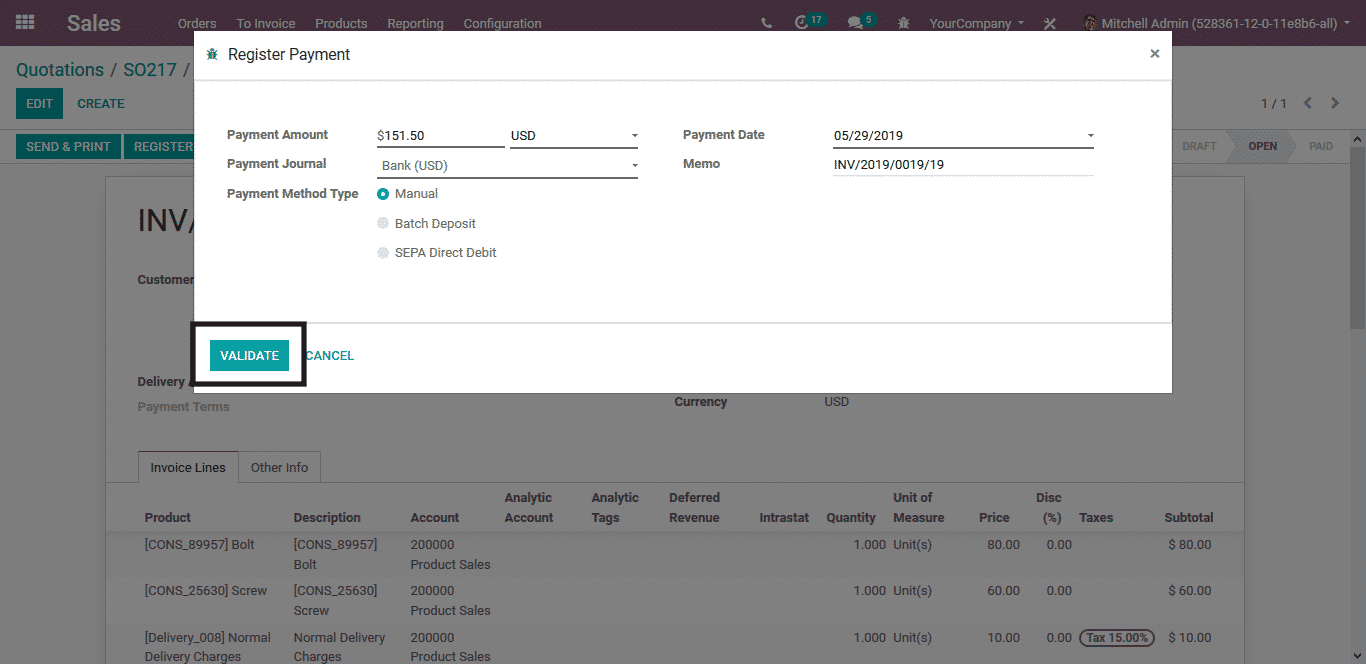
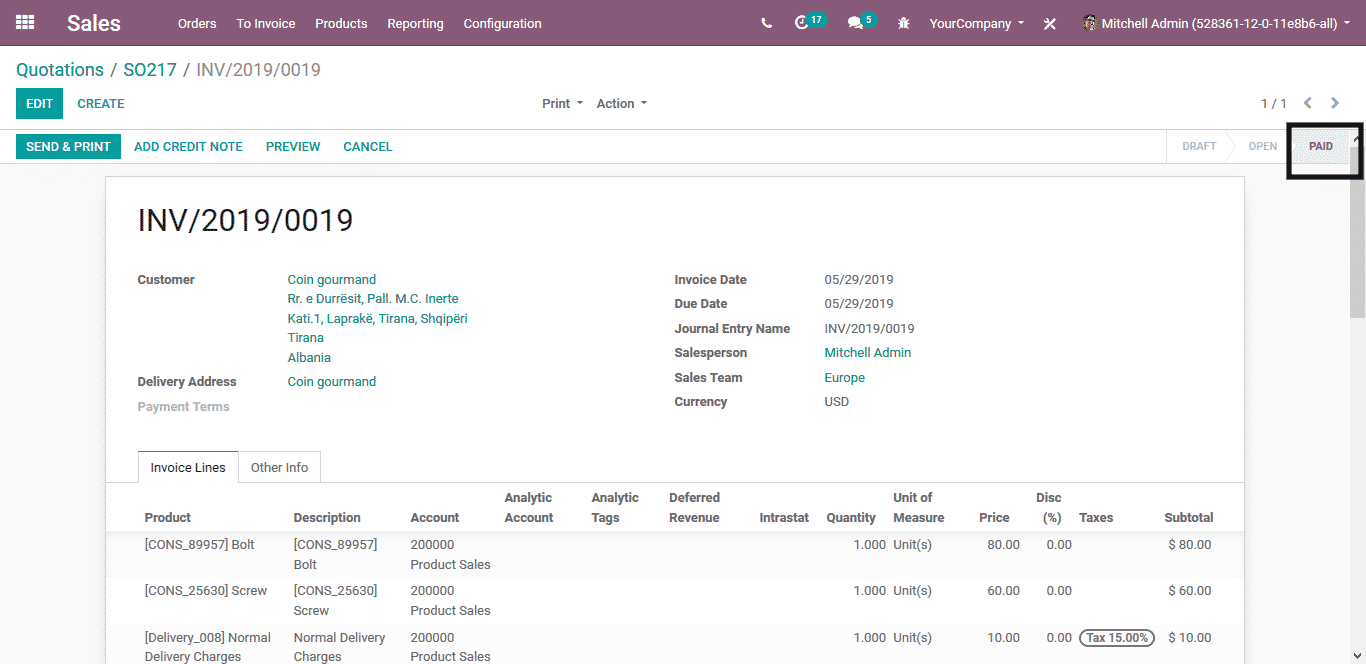
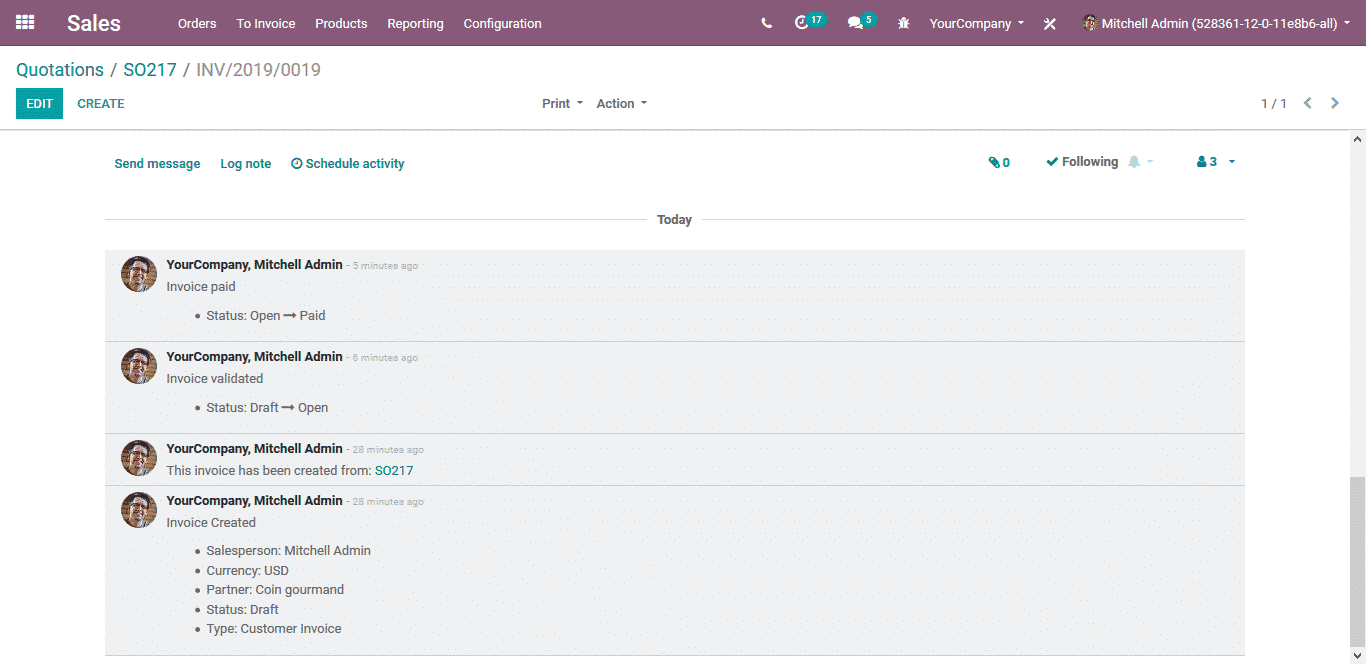
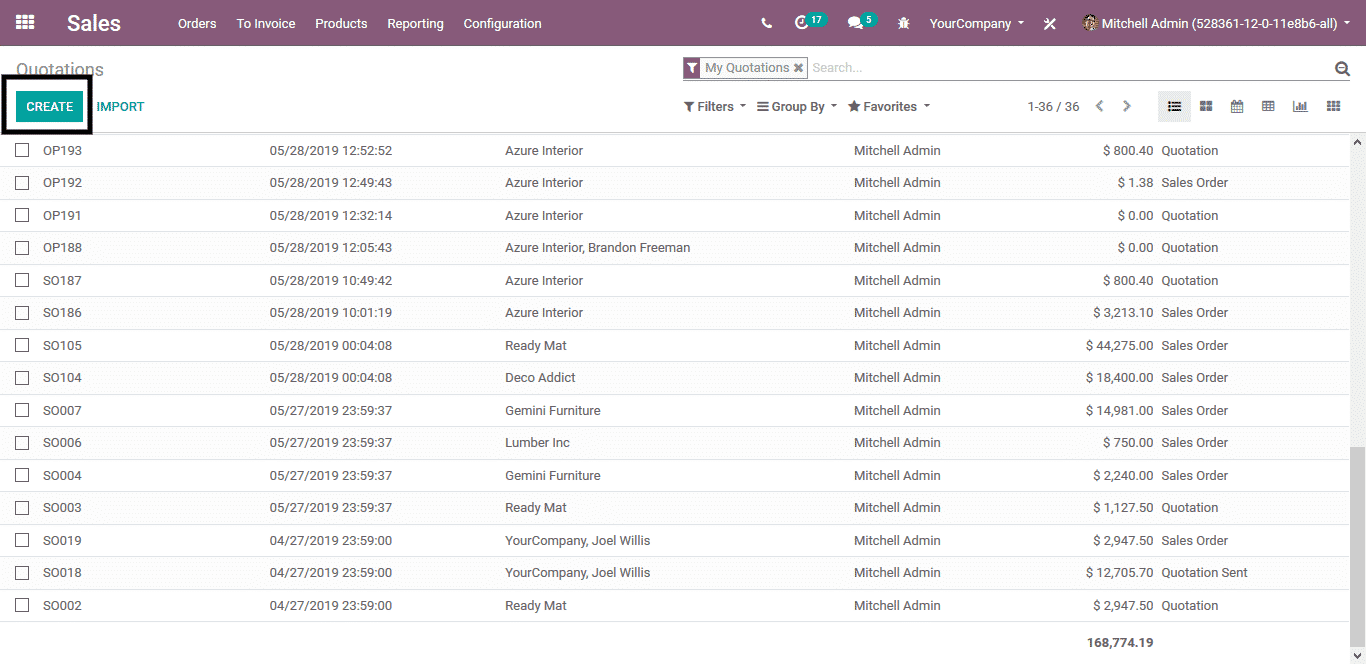
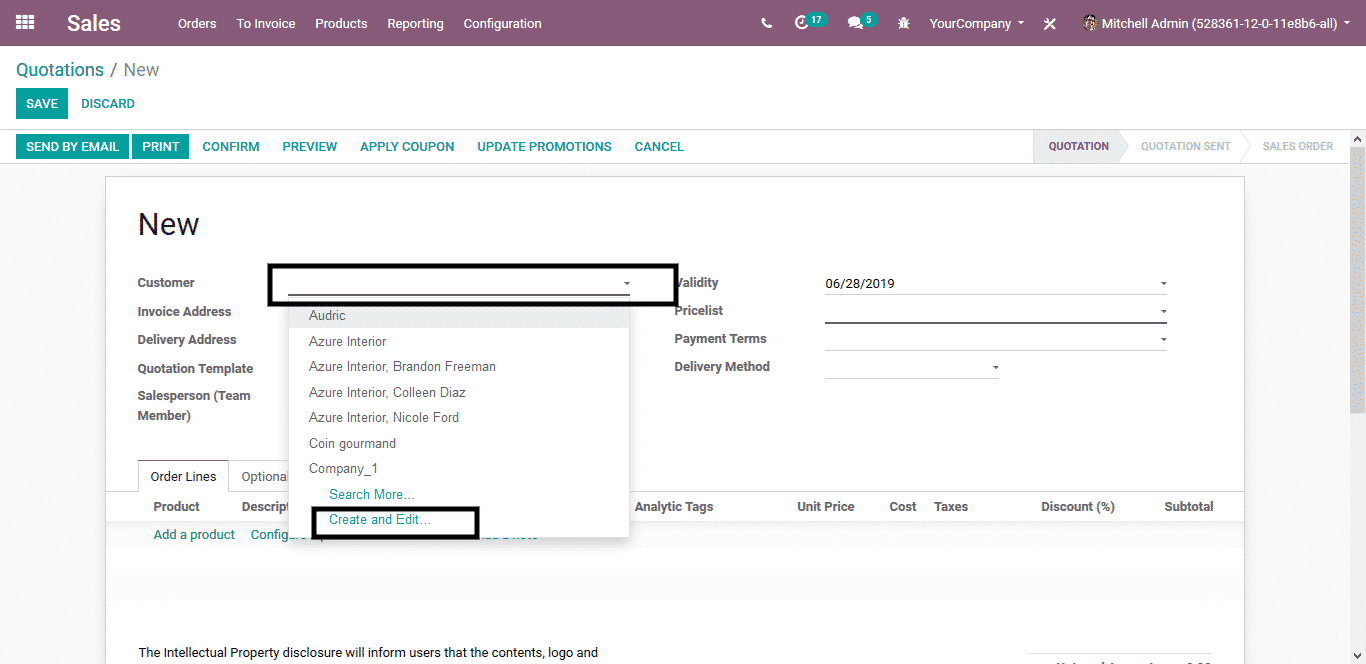
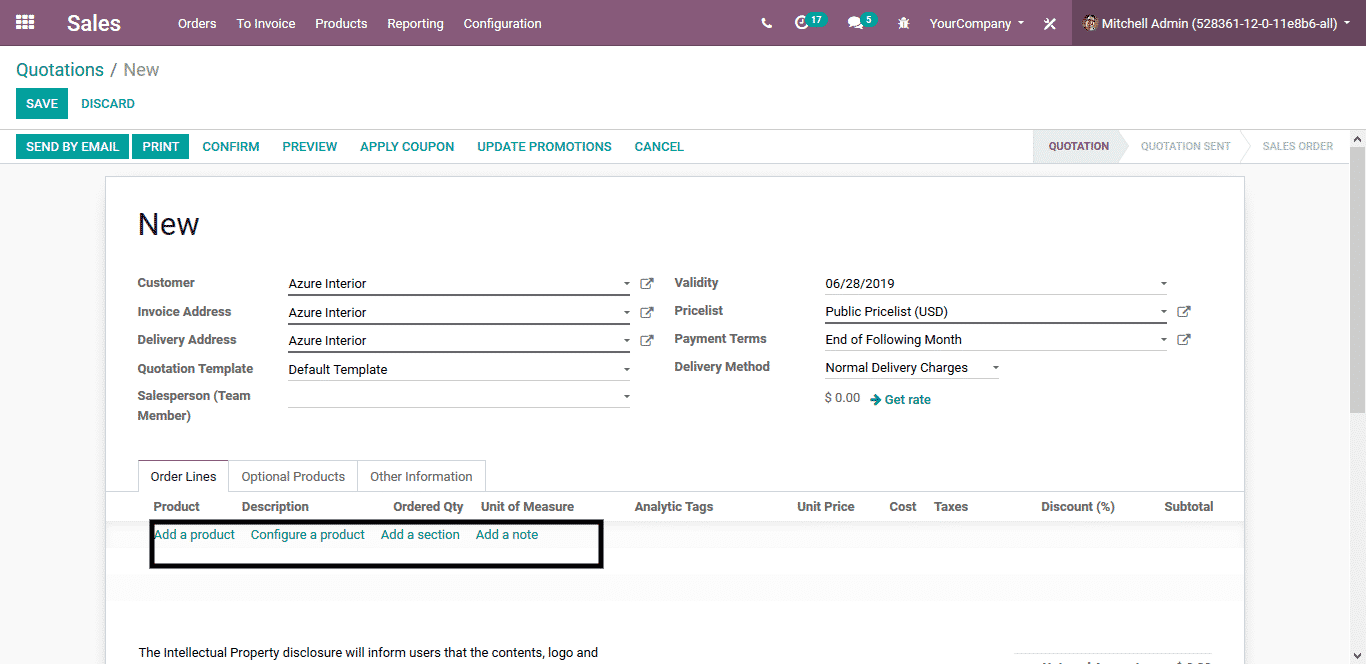
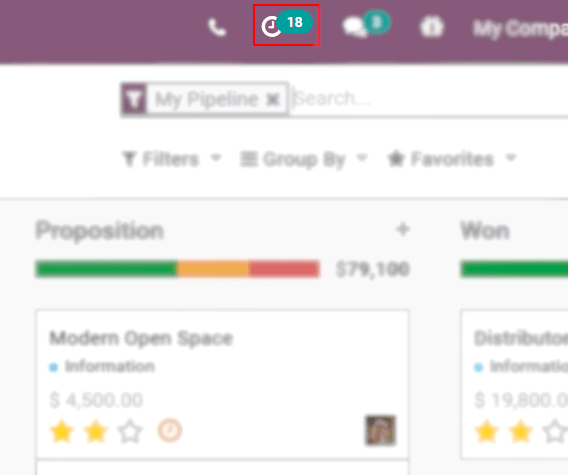
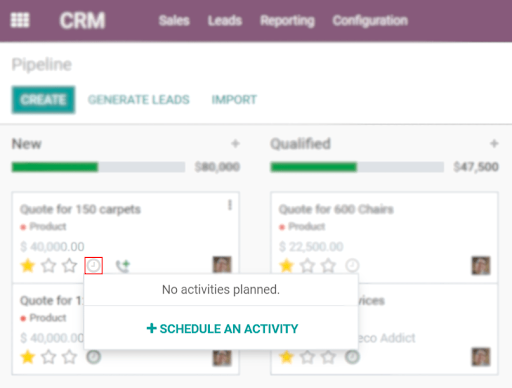
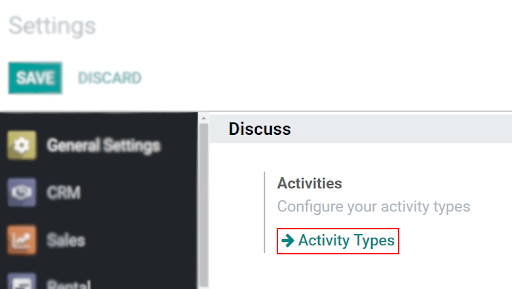
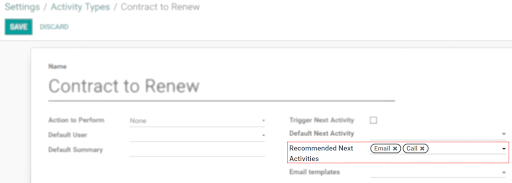

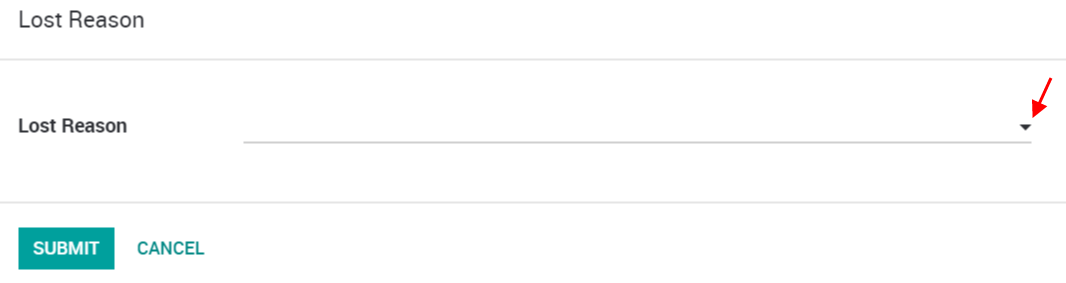


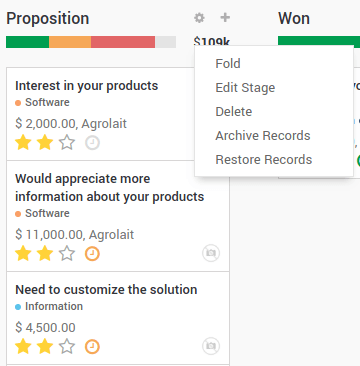
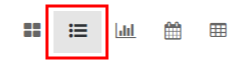
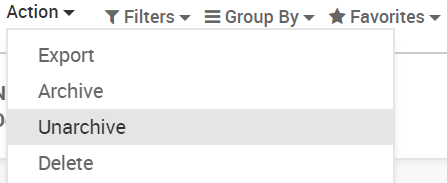
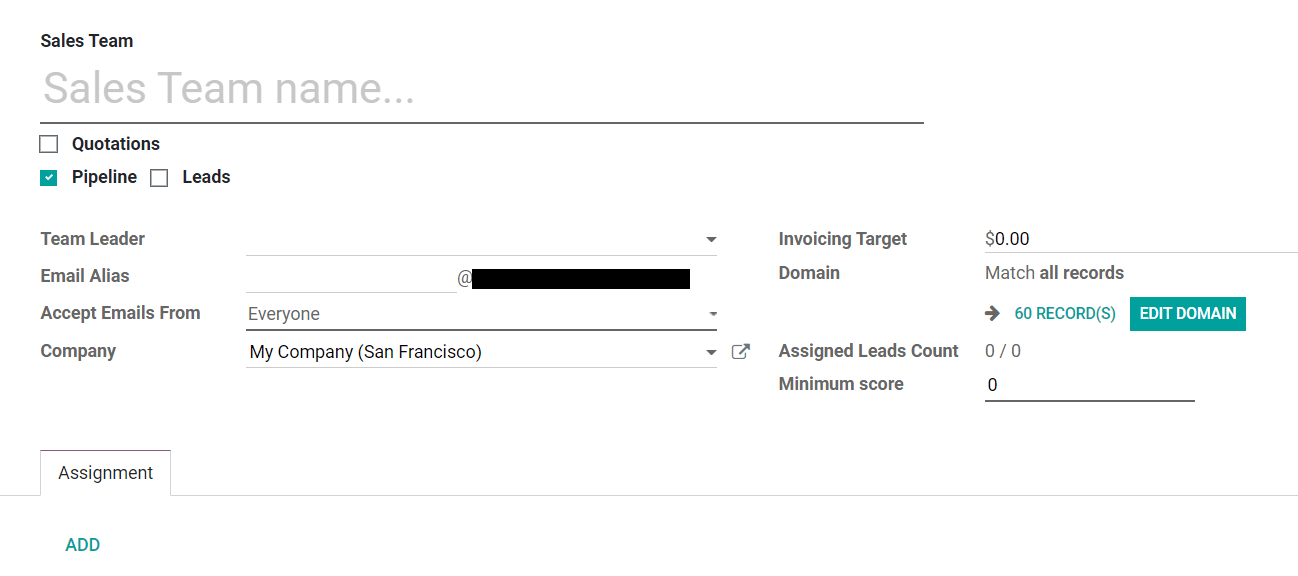
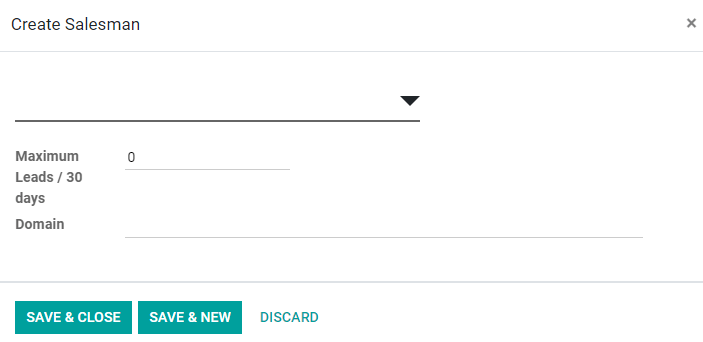
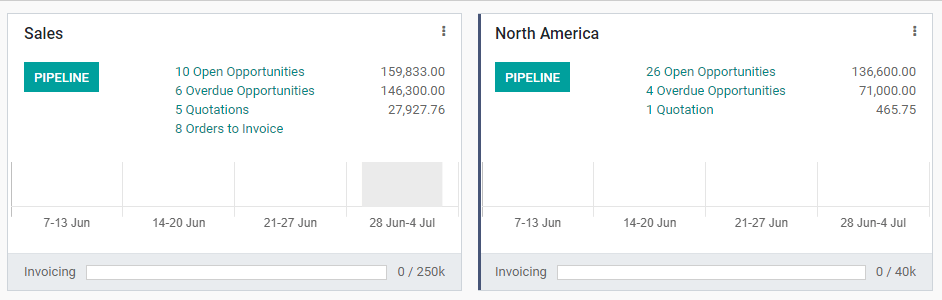 i
i