Odoo Quality Management is defined as a formalized system that documents processes, procedures and responsibilities for achieving quality policies and objectives.
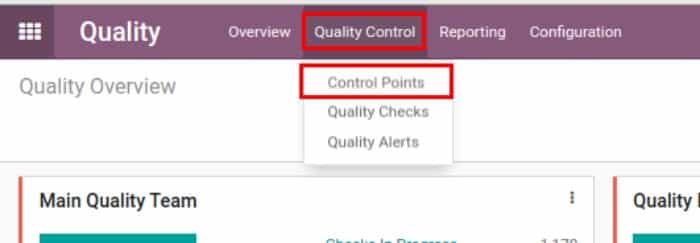
Quality Control Point: This takes place during Delivery order transfer,Receiving order transfer, or during manufacturing procedures of the products.
Path: Odoo Quality Management→ Quality Control → Control Point → Create(If you want to create a new control point).
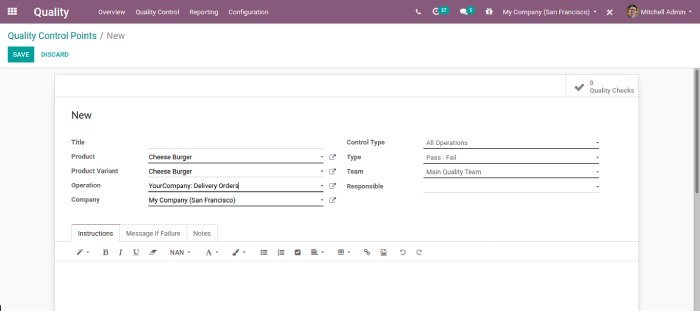
Title: Name of the Control point.
Product: Select the product you want to check quality in odoo quality management.
Product Variant: Add variant if product has any.
Operation: Select the operation you are creating control points for. Example: Select ‘Receipts’ if you want to quality check at the time of receipt of the Product. ‘Delivery’ if you want to quality check the time of delivery of products. ‘Manufacturer’ select if you want to quality check at the time of manufacturing the product.
Control Type: This option mentions at what interval we need to do the quality check. Here we have options of ‘Randomly’ and ‘Periodically’.
Type: Select the type of quality check you want to follow i.e., Text, Take a picture, Pass or Fail, Measure
Once you add all the details save the record.
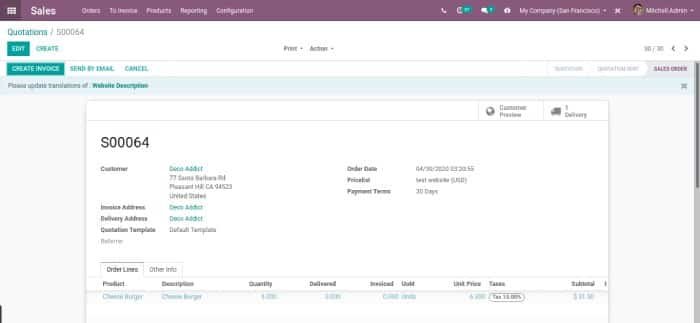
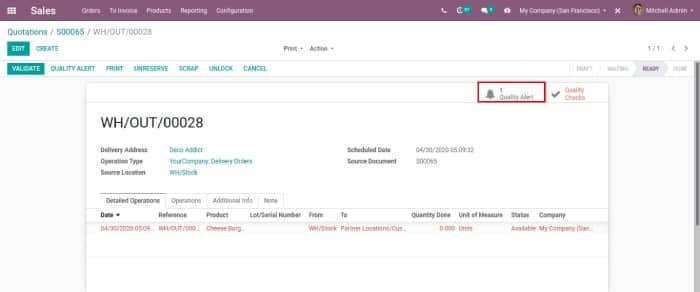
Create a sale order for the product: ‘Cheese Burger’. Click on “Delivery” button.
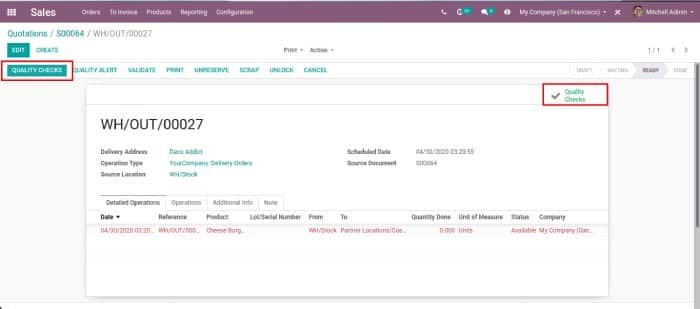
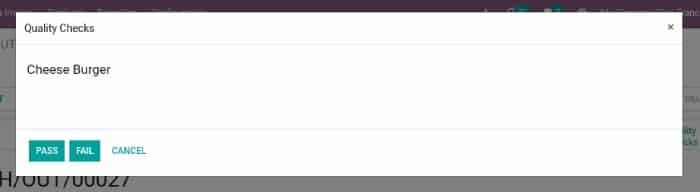
You will see a Quality Checks button that appears to proceed to the quality check you configured before in odoo quality management.
Clicking on Quality Checks button will open the instruction set on the quality control point. You are required to check the value.
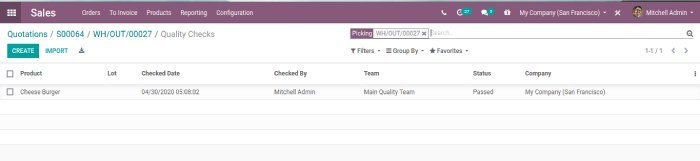
Once the quality check is done, you can find it linked to the corresponding transfer and access it by clicking on the button
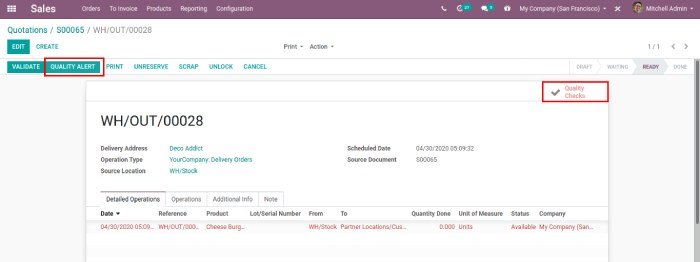
If the quality check fails, the smart button will turn into red color(instead of green color). Odoo quality management will suggest you to create a Quality Alert by highlighting the corresponding button.
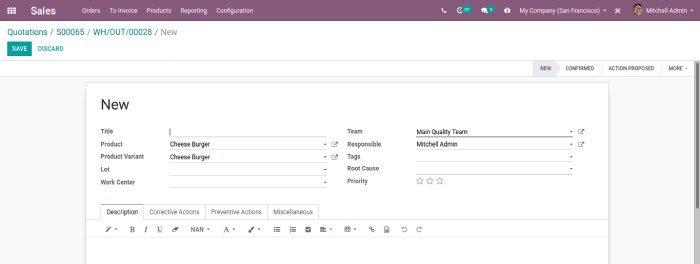
Clicking on the “Quality Alert” button will open the quality alert view.
Title: Name of the alert.
Product: Name of the Product and it’s variant will be auto-filled while clicking on the quality alert of that product
Lot: Lot number of the product
Team: Add the quality check team.
Root Cause: Add the main reason behind the quality check failure.
Description: You can describe the quality issue briefly.
Corrective Actions: You can add the corrective action to be taken to correct the issue.
Preventive Actions: You can add the preventive actions needed to be taken to prevent the issues.
Once you create the Quality Alert it will be displayed from the Quality Alert button on the right side of the transfer. You can do much more in odoo quality management app.
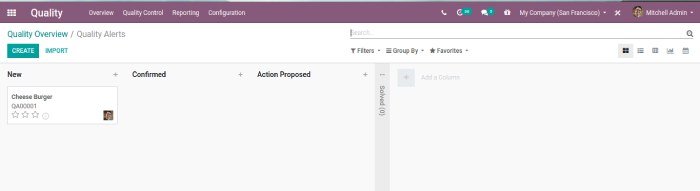
You can also access all your quality Alert under the respective Quality Team in the Quality Overview.
You can see different stages of quality Alert.
When the new alert comes it is in the ‘New’ stage.
When the alert is verified it comes in the ‘Confirmed’ stage.
After taking corrective actions are taken it is moved to the ‘Action Proposed’ stage.
Finally, when the issue is resolved it comes to the ‘Solved’ stage.
You can create and delete the stage too as per your requirement.
Odoo Quality management app is one of the free odoo apps available with Odoo ERP. To get your odoo implementation contact us here
Odoo Manufacturing Module enables the end users to create the manufacturing order of a product and pass them in different stages in a production line and complete production. With the Odoo Manufacturing app one can also customize manufacturing procedures matching your company’s process using Work-center and other routing concepts.
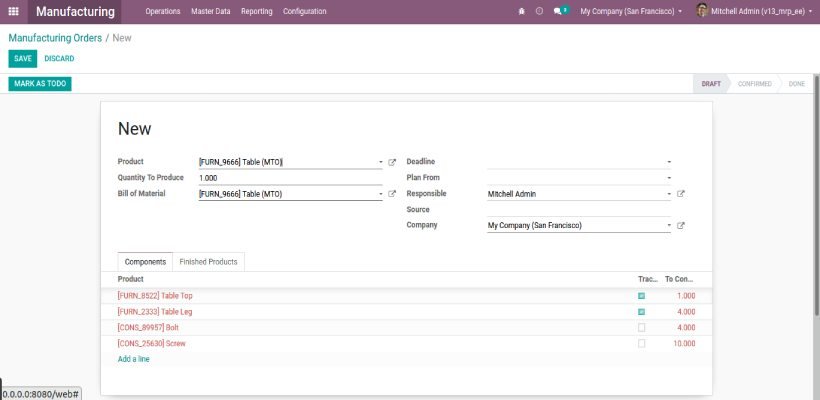
Product: Select a product to manufacture in the Odoo manufacturing ERP module.
Quantity To Produce: Add the total quantity to produce.
Bill Of Material: Add bill of material.
Deadline: Add deadline for production of the order.
Plan From: Add the Planned date for production of the order.
Components: Raw Materials for the production of the product. This Comes from the Bill of Materials.
After adding all the details Click on the ‘Mark as Todo’ button for processing the order.
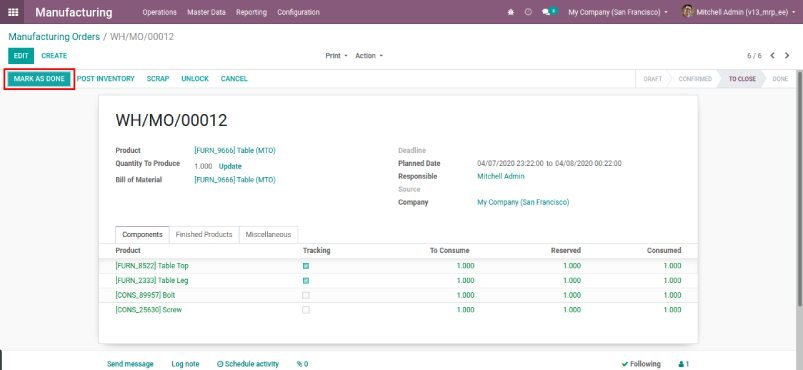
Click on the “Check Availability” button. The quantity available will be updated in Reserve.
Once all quantities are available Click on the “Produce” button.
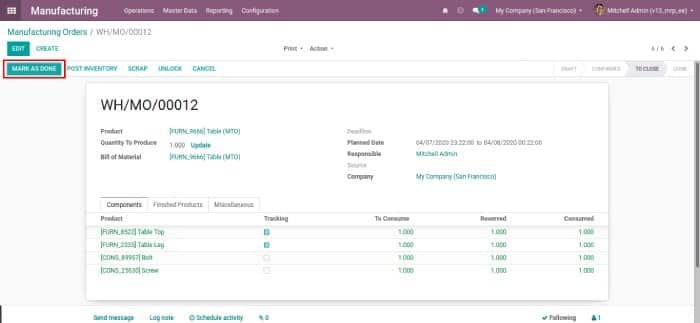
Once you are done with the process for the production click on the “Mark as Done” button.
Production is complete in Odoo manufacturing module.
2) Creating a Manufacturing order by customizing the work order, and setting up the Work Center & Routing.
This is the advanced method for complex production where Work Center, Routing, and Bill Of Materials are used.
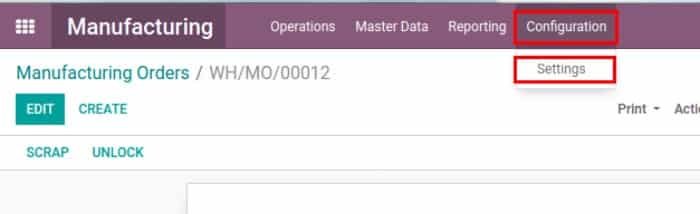
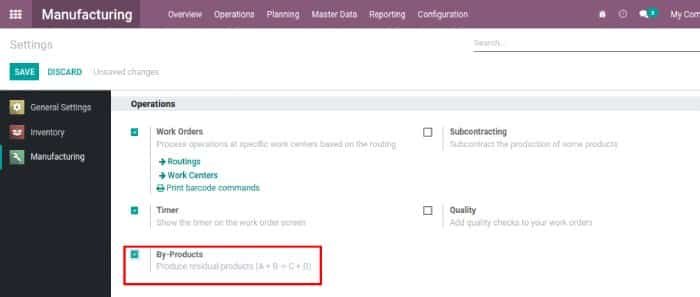
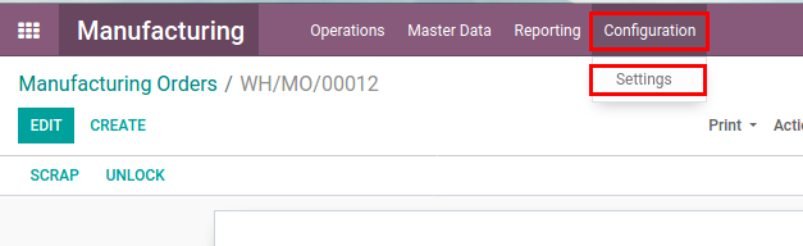
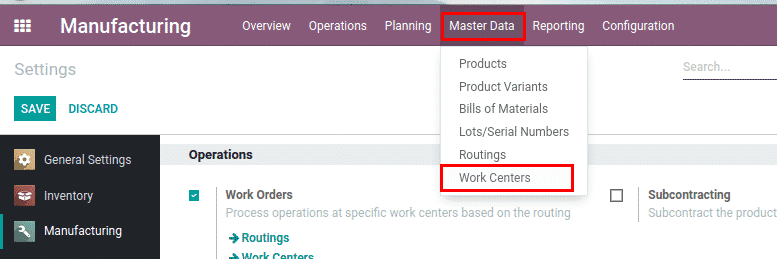
Path: Manufacturing → Configuration → Settings.
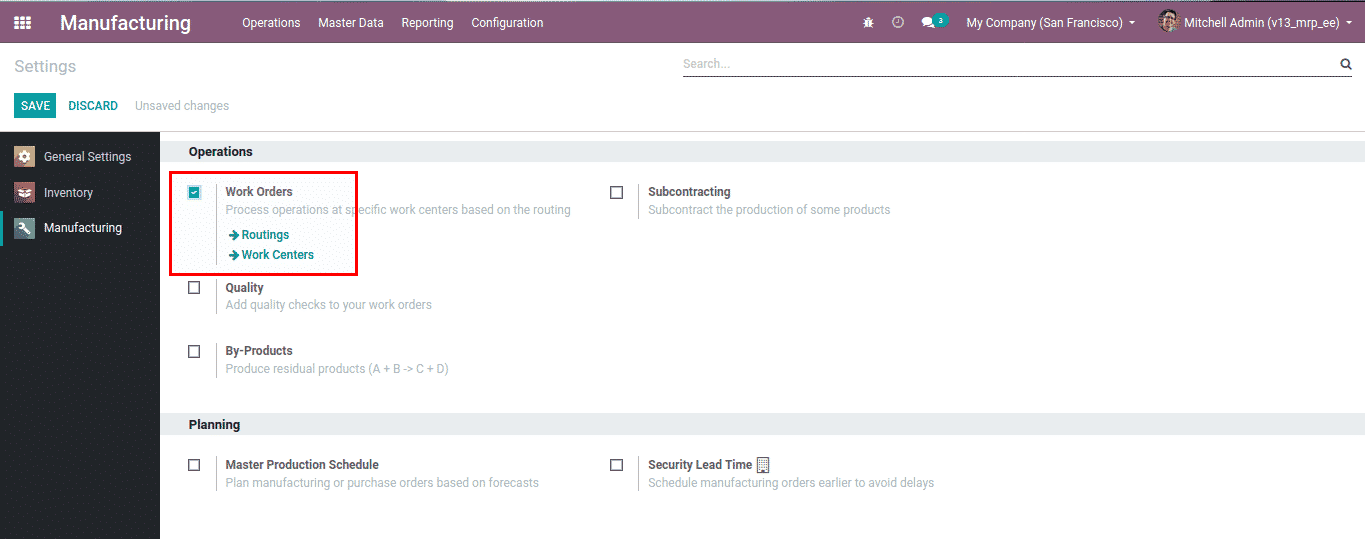
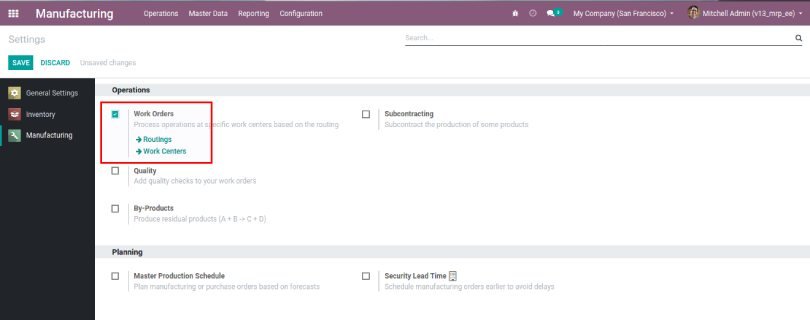
We need to enable the Work Order in the Odoo Manufacturing module settings.
After enabling work orders, we need to set the Work Centers and Routings.
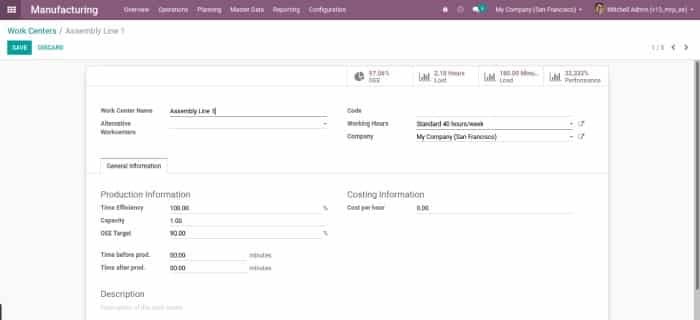
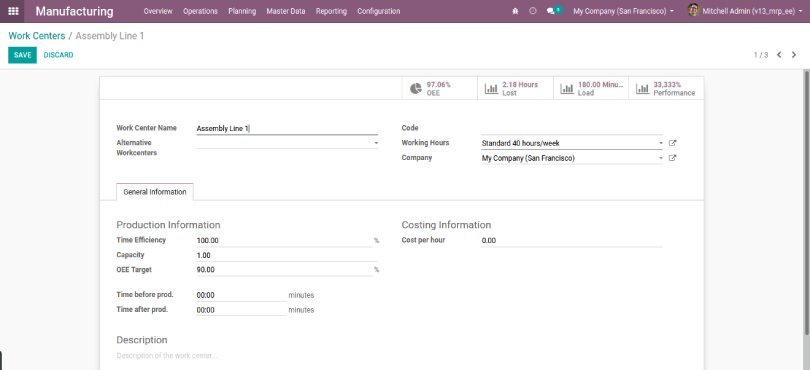
Work Center.
Just as the word describes, it’s the place where the production work is taking place.
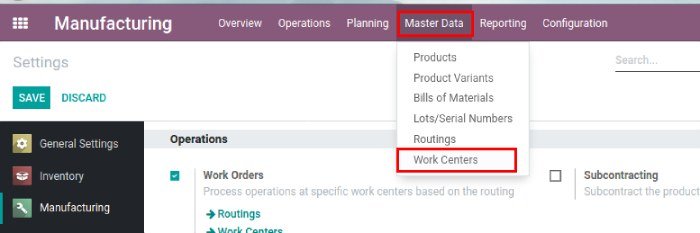
For Creating Workcenter we can click on Workcenters in the settings or
Path: Manufacturing → Master Data → Work Center → Create.
Create work centers and click on “Save” button.
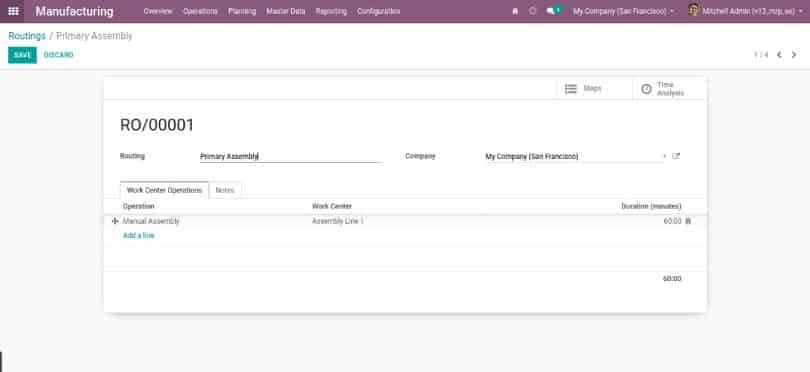
2. Routings.
Routes are the paths through which the production of each product goes. Production is not a simple process, it contains a lot of work centers, routes, and so on. Here we can set the routes for manufacturing.
For Creating Routings we can click on Routings in the settings or
Path: Manufacturing → Master data → Routings → Create.
Fill in all the details, add the work centers for this route, and click on the “Save” button.
Manage production
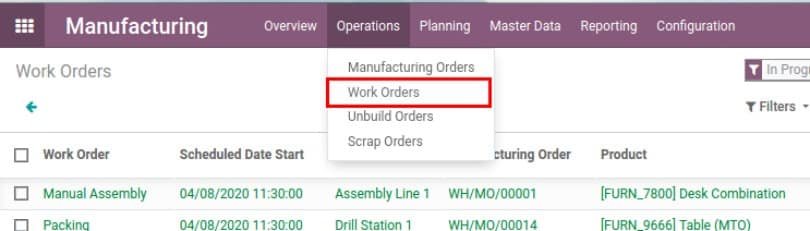
We can start processing work orders in 3 ways.
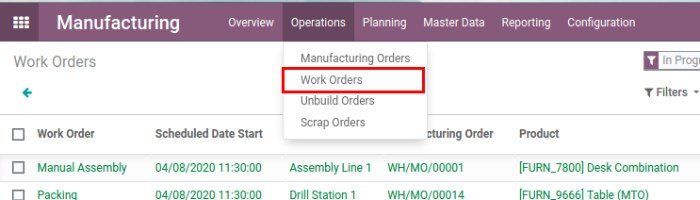
1) By clicking on the work order from the Odoo manufacturing module order.
2) Clicking on Any of the work orders.
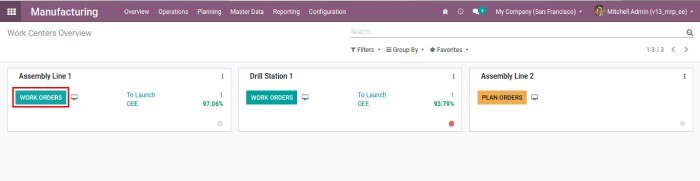
3) You can open any of the ongoing work orders from the work center Overview.
Path: Manufacturing → Operation → Work Orders.
Path: Manufacturing → Overview → Click on the Work Orders button.
You can see all the work orders.
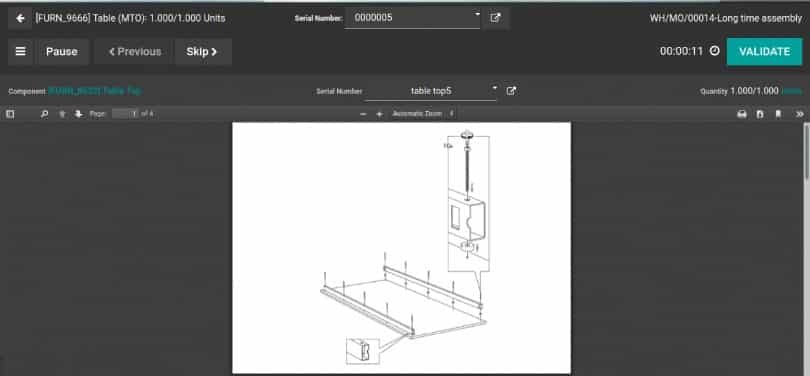
One can get hold of each work order and complete the production. The production of the product will go through the route that we set for its production.
Here we shall click “validate” after completing each stage.
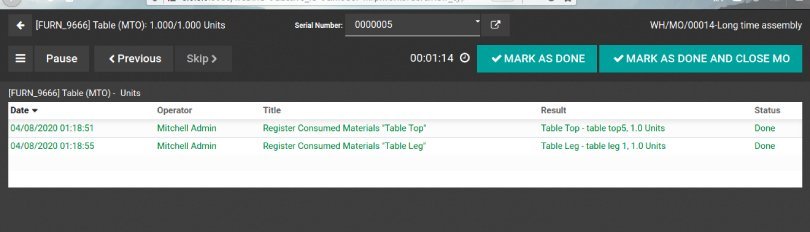
When the entire production is finished we shall click “Mark as done” or “ Mark as done and close MO”. Then the production is completed.
When we complete each production the product will be added to the inventory. The inventory will be updated automatically. All this is possible in a few clicks in the Odoo manufacturing app.
Bill Of Material
Bill of materials, BOM are the components we add for the production of a particular product. Every product is manufactured with unique raw materials.
Therefore, for the manufacturing of a product, we need to take the corresponding bill of materials.
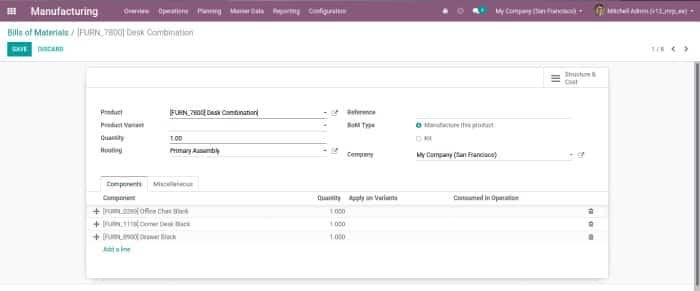
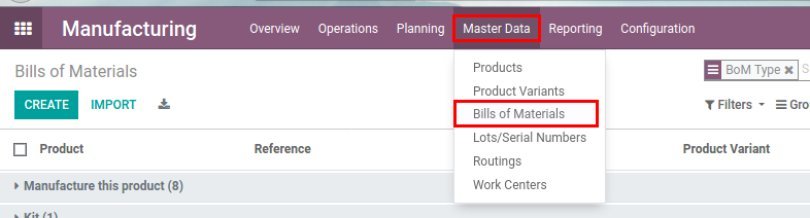
Path: Manufacturing → Master Data → Bill Of Material → Create.
Here we shall see how to create a BOM and how to add the components. BOM is very well explained and easy to process in the Odoo manufacturing module. Odoo Bom is covered in one of the Odoo apps.
Product: Add a product for which you need to create a Bill Of Materials.
Product Variants: Add variants if needed.
Quantity: Add quantity.
Routing: Select the Route of production for the product.
Reference: Add Reference.
BOM TYPE: Select the type of the BOM as required for the production of the product either ‘Manufacture this product’ or ‘Kit’.
You can add the raw materials required for the product in the Component under the Components tab.
Select the work center operations for the raw material in Consumed in Operations.
If there are By-products in your manufacturing order then you need to enable it in Manufacturing Settings.
Once By-Products are enabled you can see a By-products tab next to Component.
Add the products, and quantity & select the operations. under By-Product if there are any for the production of the product.
After adding all the details click on the “Save” button. It will save your details in Odoo manufacturing module.
Unbuild Orders
Unbuild is yet another innovative feature in Odoo 13 manufacturing ERP. Here we can unbuild a manufactured product in case of damage caused to any of its parts so that we need not scrap the full product. We can unbuild the product and take the good parts from it.
Fill in the necessary fields and click the “Unbuild” button.
Scrap Orders
At any stage of the production line, we can scrap the product. In all the production stages we can find the tab of scrap. When we click on the scrap we can immediately transfer it to scrap.
Most companies who are looking to implement ERP systems for business processes often already have the software to support orders, inventory, or customers. Before getting their Odoo implementations, one of our clients, had a similar software called Hubsoft. Hubsoft is a tool built for companies to manage their sales representatives, orders, inventory availability, digital assets and customer relationship. So, while implementing Odoo, we wanted to make sure that the data transfer from Hubsoft to Odoo is seamless for our customer. We created a bi-directional Odoo Hubsoft connector between the two tools to enable easy data import and export to and from Odoo Hubsoft integration.
We made sure that the entire process leads to a seamless Odoo Hubsoft integration. We created this Odoo Hubsoft integration in a way that our client did not even have to step out of Odoo’s interface to get any information from Hubsoft.
So, what can this Odoo connector do?
Here are some features of the Odoo HubSoft Connector we created:
Imports Hubsoft customers along with store and buyer details to Odoo
Synchronizes products between Hubsoft and Odoo
Enables businesses to integrate their dealer sales pipelines with Odoo
Exports invoices from Odoo to Hubsoft in real time
Exports delivery orders from sales orders to Hubsoft in real time
Imports RMA from Hubsoft to Odoo
Updates RMA status from Odoo to Hubsoft in real time
Exports Refund/Credit Memo from Odoo to Hubsoft in real time
Updates ATS Inventory from Odoo to Hubsoft in real time
Updates WIP inventory based on Receipts from Odoo to Hubsoft
What are the configurations you can alter in Odoo Hubsoft integration?
Here are some configurations that you can enable in this Odoo Hubsoft connector:
Exchanging data – If users want to import and export data automatically from Hubsoft to Odoo or vice versa they can set in the configuration settings and do this easily via scheduler.
Sales channels – Our integration can allow users to select a sales channel which can be passed in sales orders.
Customer information– The integration allows users to import or export their customers from Hubsoft to Odoo or the other way round. It also allows them to choose the timeline for the data transfer by giving them an option of transferring data till the current date.
Automated data upgradation – As the user updates return orders, delivery, invoices, or other options in Odoo, our integration can sync these products between Odoo & Hubsoft. With this integration records will be updated automatically in Hubsoft as soon as they are performed in Odoo.
Error log – In case any record fails to import or export, users can see all the errors which are logged into one screen.
What were the results?
Efficient management of purchase and procurement orders in Odoo: Using Odoo Hubsoft connector, Super73 can now manage sales orders, procurement, and purchase operations efficiently. Businesses can manage and track the stock for their products in Hubsoft or Odoo. Additionally, they can also run easy and advanced inventory operations with Odoo.
Maintain extensive customer database in Odoo: Our Odoo Hubsoft integration enables businesses to transfer customer records and other relevant details from Hubsoft to Odoo and maintain an extensive customer database.
Eliminate duplication of work: Since updates between Hubsoft and Odoo are synchronized, users can easily update data in one of the software and it will automatically get updated in the other. This helps avoid duplication of work, in turn saving the employee’s time.
Effective inventory management: Odoo Hubsoft integration enables businesses to manage their inventory easily and efficiently. Businesses can track the inventory details like quantity and availability by using Odoo as their backend ERP.
How can we help?
We offer many Odoo services for your company, including:
Odoo Consultation
For us at Bista, your needs are paramount. We understand your pain points as well as goals. And based on this information, we design solutions tailored to your needs.
Odoo Implementation
Nothing is more important to us than your needs. Once we start our projects, we make sure we adhere to timelines and get your implementation up and running within your desired budget.
Odoo Customization
We tailor Odoo for your distinct business needs and customized every bit to suit your needs.
Odoo Integration
We understand that you may be relying on some other software that want to continue using. We can seamlessly integrate these with Odoo for you.
Odoo Support
We are always here to support you. No matter what time of the day, our consultants are there for you 24×7.
Reach out to us and get your free consultation now.
Odoo provides efficient stocking methods to organize your warehouse and enable smart double inventory systems. But what happens if someone makes an incorrect entry in your inventory management system? We created an Odoo module that understands your data, identifies anomalies, and helps you prevent damage. This module uses Machine Learning anomaly detection technology.
Human beings are always prone to errors; however, if this happens with your inventory, it can cause unprecedented disruptions in your supply chain. Often, it means that an unusual occurrence has taken place. This could be a human data-entry error, a tagging error, or even corporate espionage. Ultimately, this can cause major changes in your balance sheet and reflect poorly on your finances and balance sheets. If your inventory balance is incorrect, it could affect the cost of goods sold and profits, having dramatic effects on your business performance.
So, what are some common mistakes that your employees could make?
Miscounting of physical inventory
Incorrect assigning of costs to inventory
Error in identification of inventory items
Oversights in measuring Inventory in transit
Mistakes in dealing with consignment inventory
Errors in cut-off procedures followed during the inventory count
What does this module do?
This module understands your inventory data patterns and uses machine learning anomaly detection to automatically identify anomalies in your data. This machine learning driven anomaly detection combs through vast amounts of data to identify and alert you for any rare items, events, or observations. Once identified, it reports these unexpected dips or spikes to you immediately.
Prevention is better than cure. A lot of times, employees could make errors mentioned above. We designed an Odoo module that safeguards you against all these errors.
Understands your data – The module understands your inventory data patterns and registers them in the system to keep a robust track of the usual quantities or amounts that you generally operate your inventory with.
Identifies anomalies in your data – It uses machine learning for anomaly detection in your data. It identifies any entry that breaks this pattern and falls out of the purview of your usual transactions, procedures, and quantities.
Helps you prevent damage – Finally, it combs through vast amounts of your data to identify and alert you for any rare items, events, or observations. Once identified, it reports these unexpected dips or spikes to you immediately.
Take a look at this detailed explained Machine learning anomaly detection video:
How does it work?
We train data with the existing set of the transaction for regularly used products and their locations.
After this, we use the test data, which is a matrix of current stock moves. This data is used to find a pattern of transactions from the trained data to be compared to.
After this, we use the tested data, which is a matrix of current stock moves. This data is used to find a pattern of transactions from the trained data to be compared to.
When can you use it?
From warehouses in manufacturing factories to delivered products in retail, this cutting-edge machine learning automation can be used for anomaly detection across all industries. If your business relies on inventory or raw materials, this module can help you avoid errors in stock inventory.
Manufacturing factories and warehouses
Delivered products
Inventory or raw materials that are received
In-stock inventory
How can we help?
Over the years Bista has been helping businesses reshape their digital processes. One of the key practices that we take pride in is our Machine Learning developers who can seamlessly integrate your ERP system with intelligent technologies like Artificial Intelligence and Machine Learning for your business.
Odoo project management is a time saving tool that can give us a visual overview of all our ongoing projects. This helps us to manage people, tasks, due dates, manage multiple projects, daily timesheets, etc. Odoo project management provides functionalities to manage multiple projects. Odoo project management provides graphical charts, Gantt charts etc to analyze the progress of specific tasks and projects.
Below we have explained how Odoo Project Management work and what features it includes;
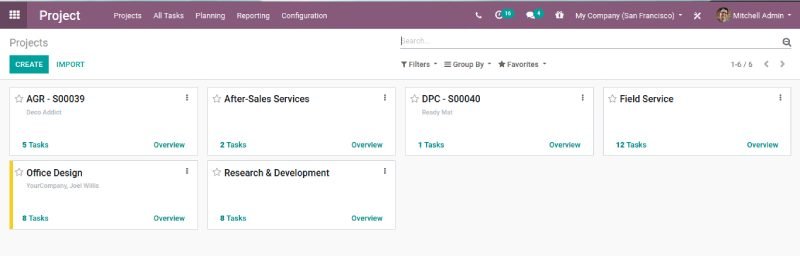
Project Dashboard
Once you get into the project you can see a Kanban view of projects. You can get the complete overview of project and tasks related to the project.
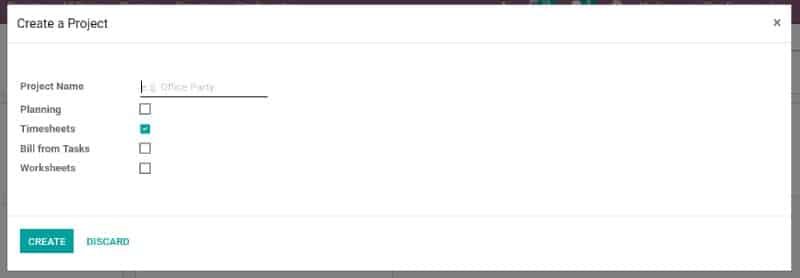
Click on the create button to create a new project. This will open a popup screen as shown in the next image.
Project Name: Add name of the project.
Planning: Select this if you want to enable planning for the tasks of the project.
Timesheets: Select this to enable a timesheet on the project.
Bill from Tasks: Select this if you want to enable bill from the tasks.
Worksheets: Selecting this will enable customizable worksheets on tasks.
Click on the ‘Create’ button.
Task Stages
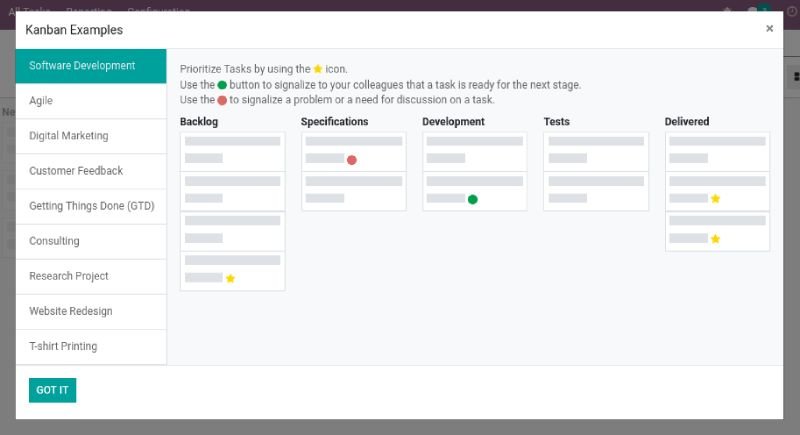
Clicking on the ‘Create’ button will redirect you to the task page. You can add a certain column to your project. They will be the stages for your project task.
Odoo apps help you with some different sets of examples for your project for instance-Software Development, Agile, Consulting,Website Redesign etc. Click on see examples.
Click on the “Got It” button to close the pop-up screen.
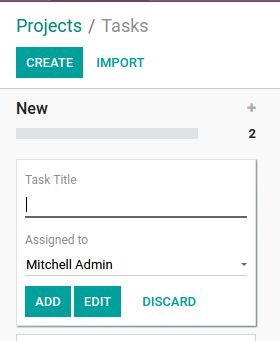
Once you add the columns for your stages, you can create tasks for your project by clicking on the ‘Create’ button.
Task Title : Add the title for the task .
Assigned to: Select the user you want to assign the task.
Click on the Add button to create more tasks.
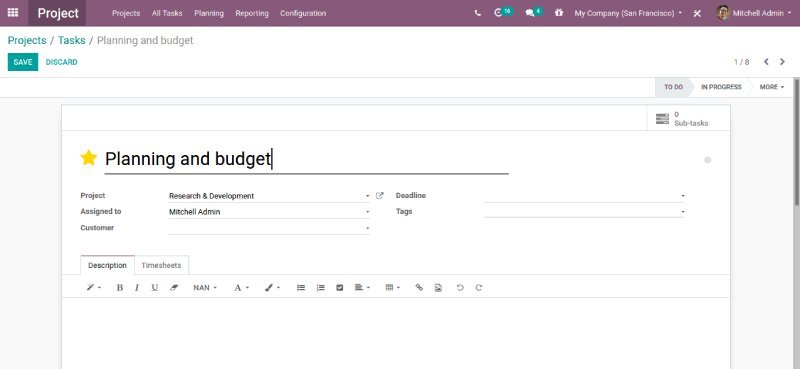
Click on the Edit button to edit the task details. This will open a form view of the task.
You can modify the details.
Deadline: Add the deadline date of the task if required.
Tags: This helps you to find the task.
Description: Add the description of the task.
Once you complete the changes save the task.
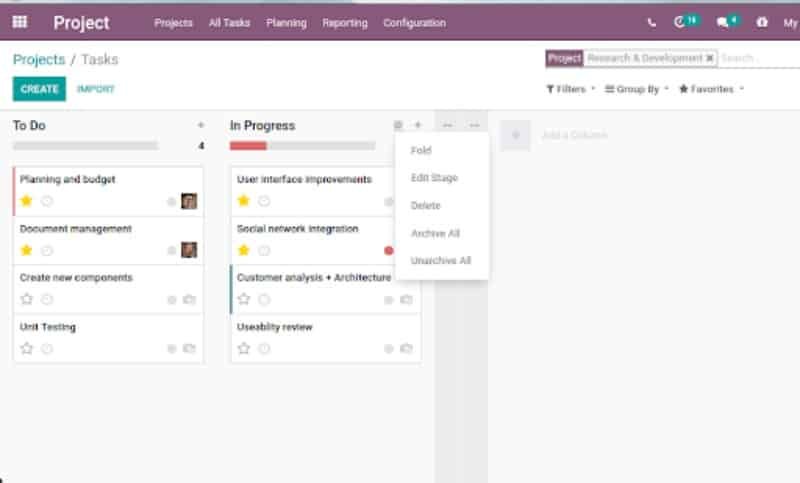
Rearrange Task Stages
If you want to fold/unfold the stage from the dashboard as per your requirements. You can delete stage columns. You can rearrange the stage by simply drag and drop the column as per your requirements. You can even archive/unarchive the tasks
Now regarding the tasks, If any task is important you can mark it as important by clicking on the star icon.
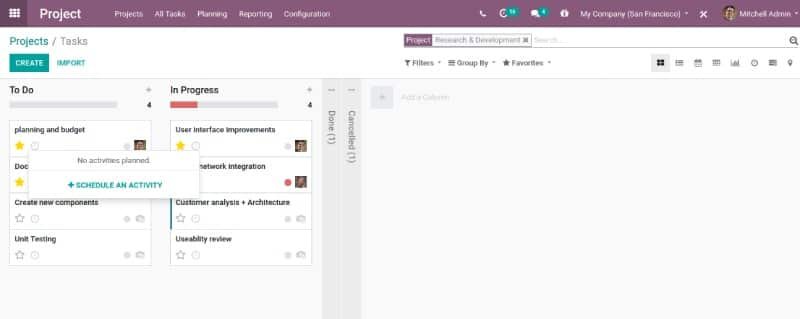
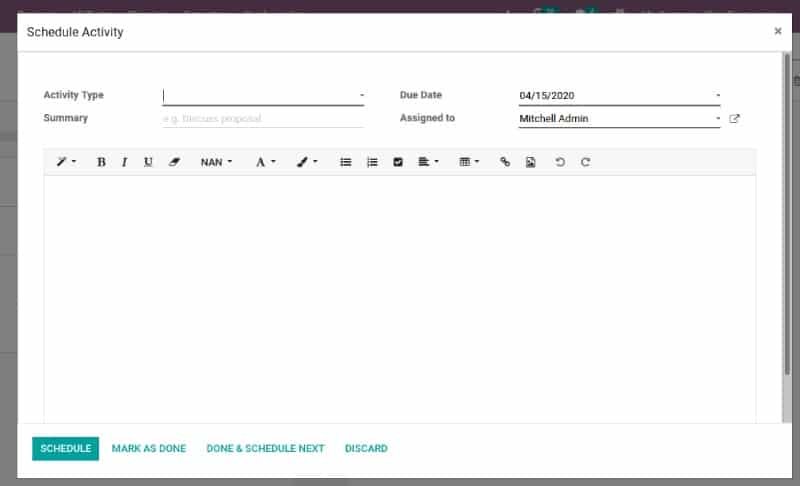
One can see the planning/activities of each task. Once can schedule new activities for the task.
Click on the ‘Schedule’ button to mark the changes.
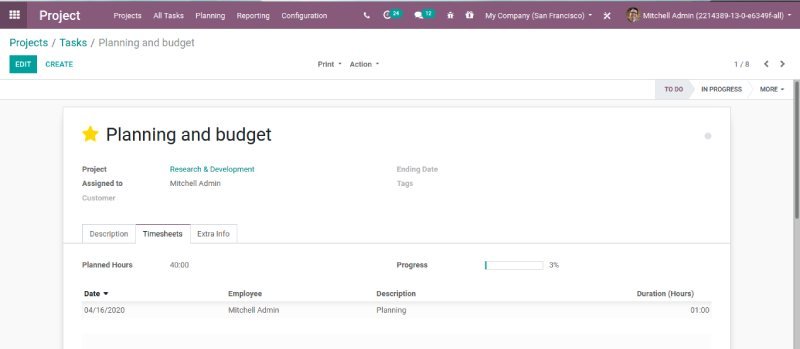
Plan and Track Employee Task
One can keep a track of their employee tasks. Enable the Manage time estimation on tasks, it creates a progress bar in the form view of your tasks. When the employee adds working hours for the task the progress bar gets updated based on the initial planned hours.
Sharing Of Project and Task.
You can share your projects/tasks, you allow external user to be with you on the same page. This helps avoid misunderstanding, allowing you to become a more coordinated company as you get the correct information to the right person.
Sharing a Project
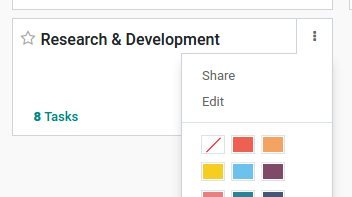
You can share projects in two ways.
Path: Projects → Dashboard → Manage → Share.
Path: Project → Click on the ‘Share’ button.
This will open a popup screen. Choose an existing Recipient(s) or you can create
The Recipient will receive an invitation email to access a document. Once a user opens it, it will redirect to the project setting and can access it’s tasks.
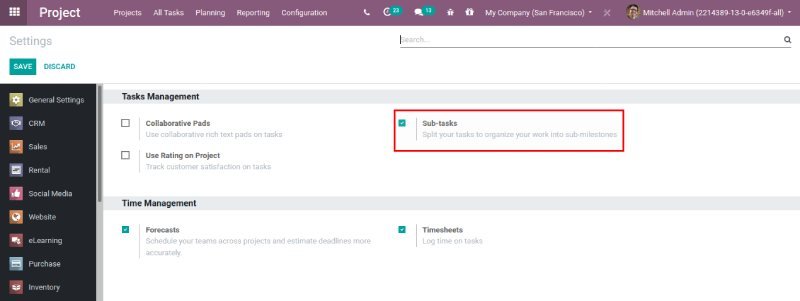
Subtasks
You need to enable the Subtasks from the settings.
Path: Projects → Configuration → Settings.
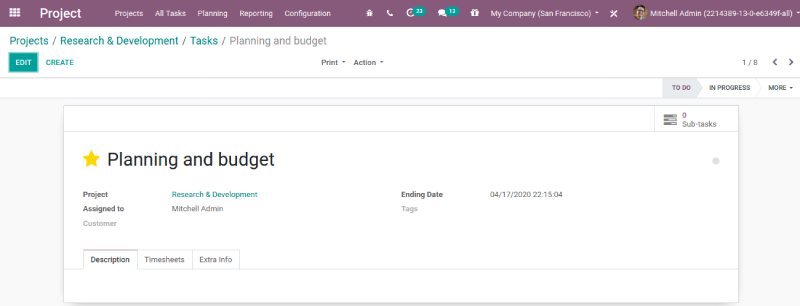
Once you enable the sub-tasks from settings, go to the project and select the task you want to share.
You can see the Subtasks smart button on the task view.
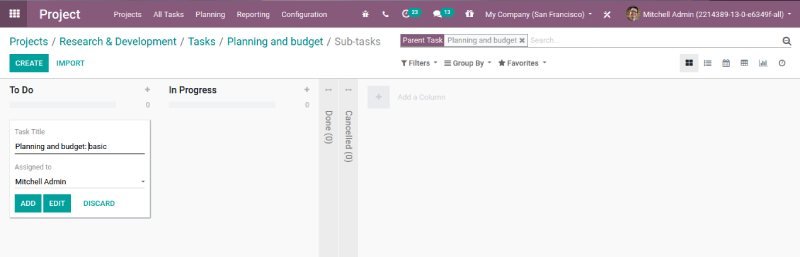
Clicking on the sub task button will navigate you to a new task page where you can create a sub task for the parent task.You can find the task title and the person to assign the sub task. Later you can click on the Add button. You can modify the subtask by clicking on the ‘Edit’ button.
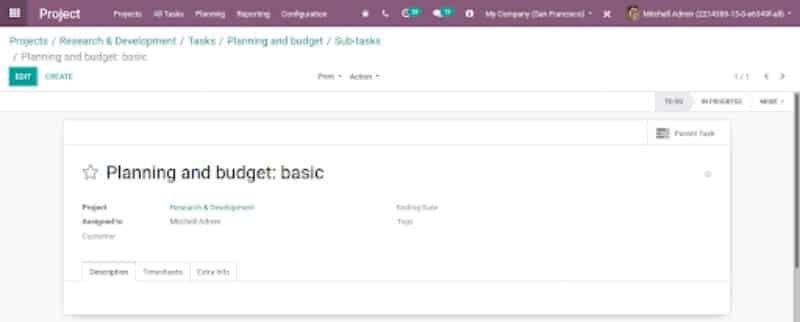
You can access the parent task related to the sub task from the view.
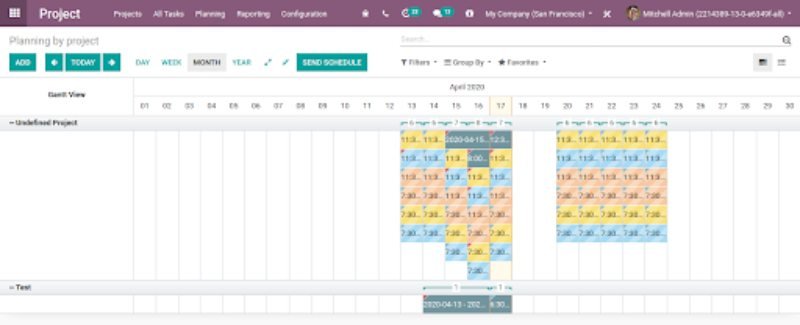
Planning Tasks
Under the planning feature of Odoo, one gets access to the Gannt chart enabling better planning and organizing of the workload and human resources.
Path: Project → Planning.
One can either plan by project or plan by employee.
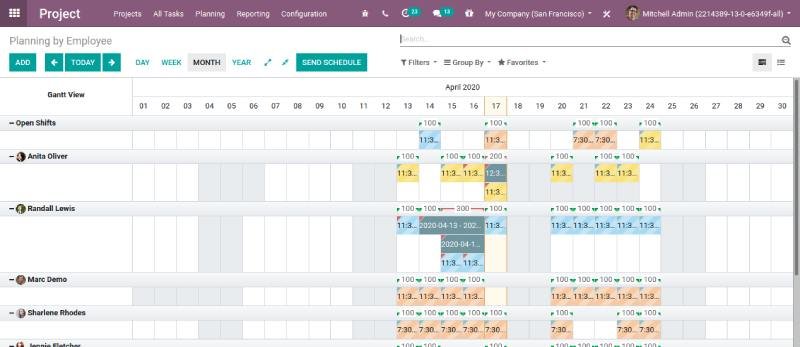
Clicking planning by employee, you get the following Gantt Chart.
One can easily see from here in the Gannt chart, which people are assigned or who is involved in a particular assignment.
Alternatively, one can do them from here. One can seamlessly allocate the resource effectively.
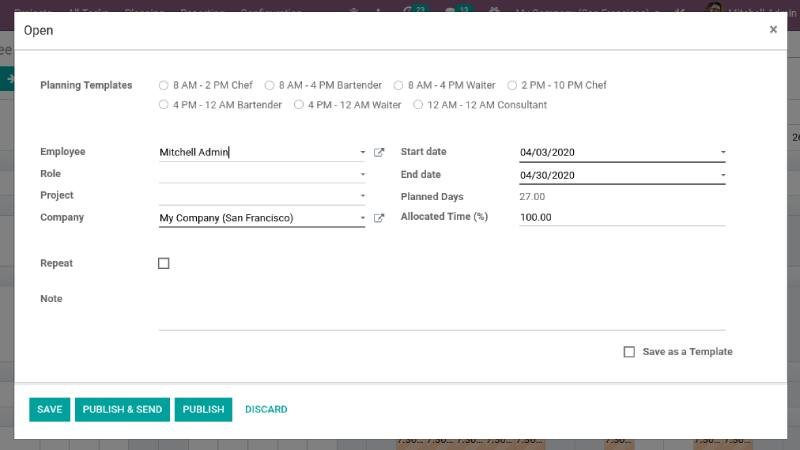
Allocated Time(%): This allows you to define the percentage of time you want your employee to work on the specific task during the shift.
The total calculation shows how many hours out of the total shift time (End date – Start date) are spent by the employee on that task.
Clicking on planning by Project will show the total number of employees allocated per project.
Invoice Spend on Task.
When it’s time to bill your client for the finished projects/tasks, you can choose to shorten processes and save time by pulling the billable time you have tracked into sales orders, and invoices, directly from the project/task.
First, you need to enable the timesheet feature.
Path: Project → Configuration → Settings and enable Timesheet.
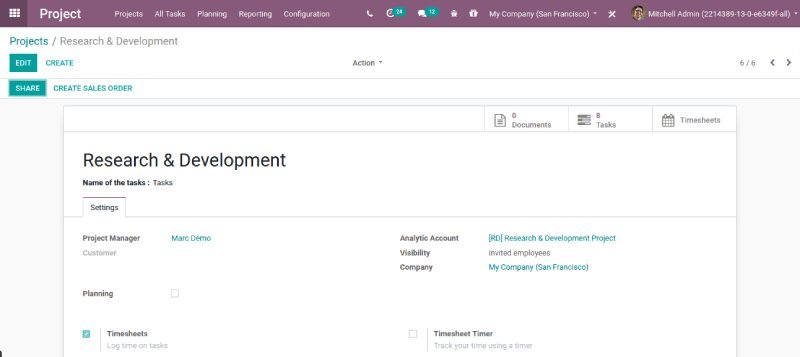
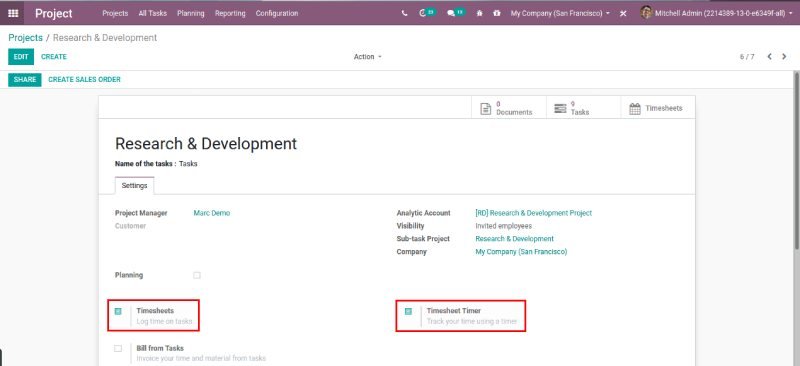
Create a sale order and invoice from a project.
Path: Project → Configuration → Projects, choose the corresponding one and enable ‘Timesheet’ & ‘Timesheet Timer’.
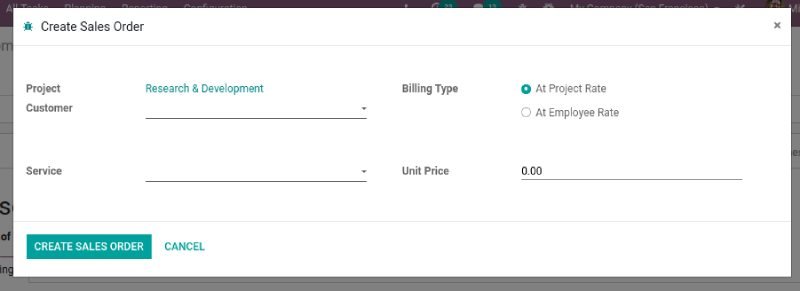
Click on ‘Create Sales Order’ and continue to create the invoice.
Billing Type: You need to select the type of billing as per your requirement ‘At Project Rate’: all timesheets are billed at the same rate, or by ‘At Employee Rate’: timesheet will be billed with individual rate of the employee.
The project rate allows you to invoice a whole project, for a specific service, at a specific rate at once. Example: Implementation of a system.
The employee rate billing lets you invoice a project broken down into different services, at different rates. Example: Different rate for junior & senior consultants.
Odoo Inventory Management is intended to scale from a few thousand operations to many various transactions. It helps businesses manage their product or asset inventory without any hurdles. Odoo inventory management is the best double-entry integrated inventory & tracking system for warehouse management. With the Odoo inventory management module, you can manage your warehouse, vendors, purchase flows, etc.
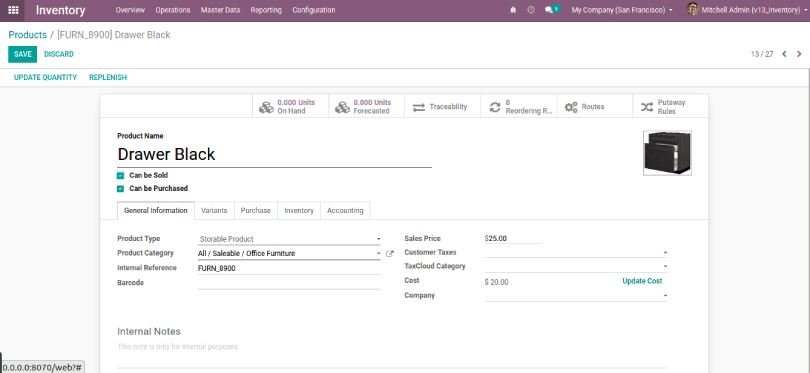
The first step in inventory is creating a product.
Path: Inventory → Master Data → Products → Create.
Product Name: Enter the name of your product.
Product Type: In case you set the product type as ‘Storable,’ then you can track the stock of the product and know how many units are in stock and the forecasted number of units. If you want to include a product on receipts/deliveries but don’t need to track its stock, then you can select the type ‘Consumable. ’ This will help you to set up Products in Odoo inventory management,
Configuration
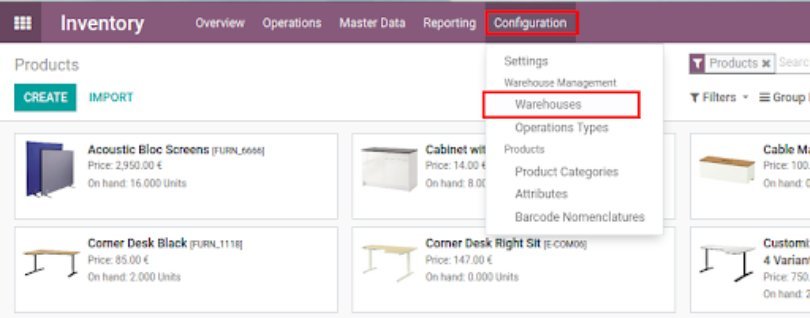
Warehouses: The warehouse is the actual place in which the items are stocked. You can set up multiple warehouses. We can have a warehouse for a company and we can keep different locations in the same.
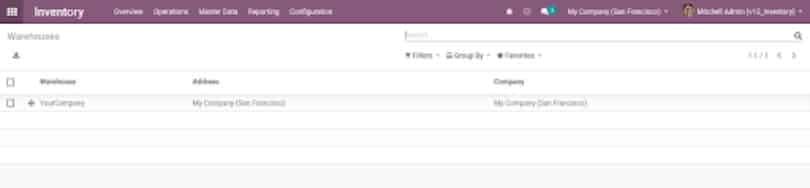
When you click on the menu you will see a list of Warehouse. Here we have only one warehouse. You can add any warehouse to Odoo inventory.
If you want to create a new warehouse, you should enable the Multi-Warehouse settings. Note that the Multi-Location settings will be automatically enabled at the same time, and click on the save button. Which will help you to save multiple warehouses inside the Odoo inventory module.
After enabling the multi-warehouse settings, you can create a Warehouse.
Warehouse: Add your warehouse name.
Short Name: You should also choose a short name for your warehouse, which is 5 characters long and is used on the different warehouse documents.
Address: You can select an existing company, or you can create a new one. Therefore, the address of your warehouse will be the same as the one of the companies you selected. After the creation of a new warehouse, you can go back to the Dashboard/Odoo Inventory Overview.
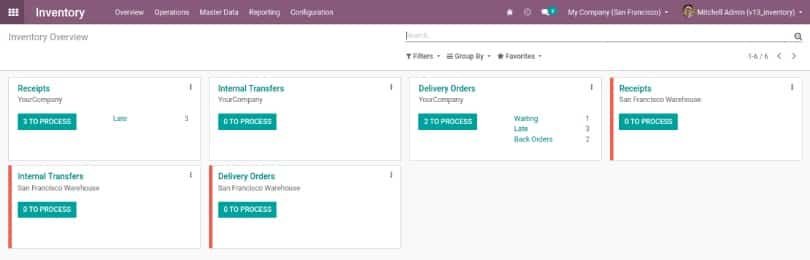
Path: Inventory → Overview.
You will see the new operation types automatically created due to the creation of a new Warehouse.
Location: Location is the specific place within the warehouse. It can be a sublocation of your warehouse as a shelf, a floor, etc. Therefore, a location is part of one warehouse, and it can not be linked to multiple warehouses. One can create multiple locations and sublocations such as shelves, racks, etc.
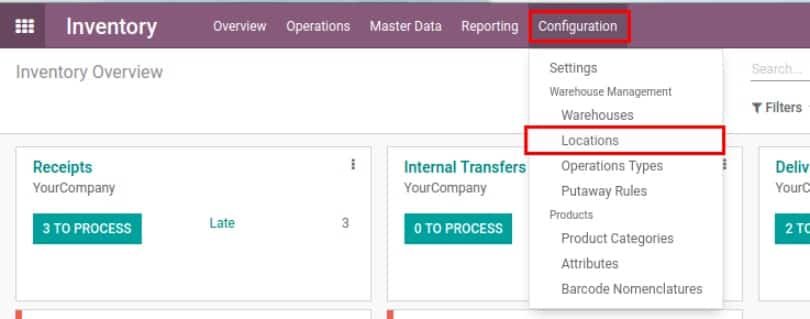
Path: Inventory → Configuration → Location.
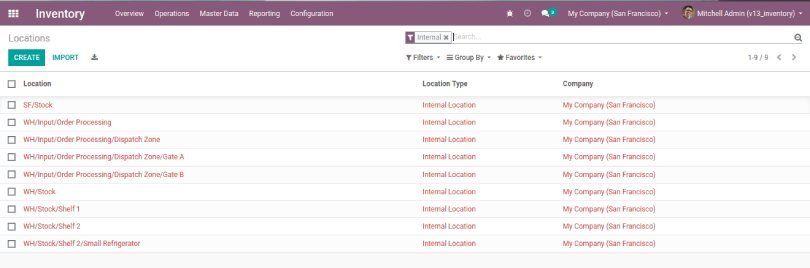
Once you click on the Location menu, you can see the list of locations, as shown in the image below.
Locations are very important to configure as we need to make sure of the inventory where it has been stored and where it went.
We have created some of the locations, and we need to configure all the locations from where we are getting the stock(Vendor Location), which is already configured, and where we are sending the stock(Customer Location), which is also configured.
However, we can create more locations for Customers and Vendors if we want. Similarly, we have locations for scrap or Inventory loss.
These are virtual locations and do not exist in our proximity. We can also create internal locations where we are sending the goods internally. If it is consumed, it should be a production/customer location; otherwise, the stock will be shown as still existing in stock.
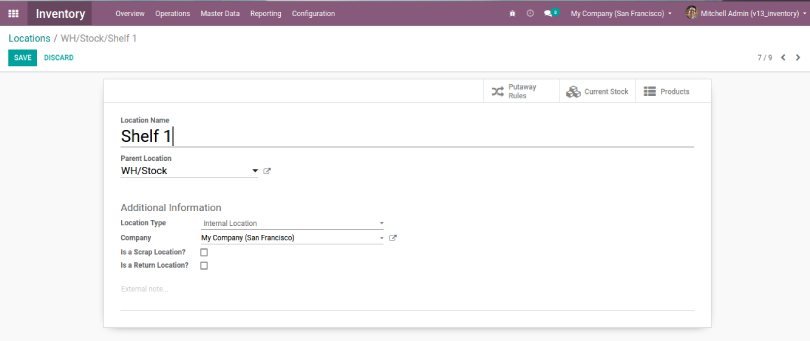
When you click on any of the locations in the list, you can see the following form.
Location Name: Name of the location.
Parent Location: If you are keeping in your stock, then make sure to add the main stock location, as shown in the above image. If you are creating a location for scrap,
customer, production then it’s not required to add stock as the parent location.
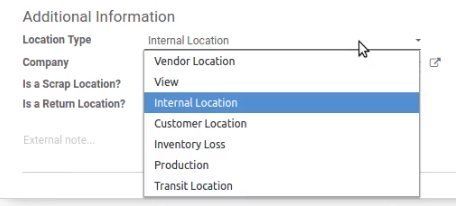
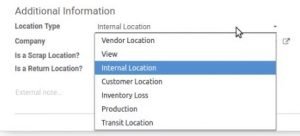
Location Type: There are multiple types available, as shown in the next image.
Vendor Location is used for the Supplier’s Location. This location is treated as our virtual location from where we receive the products in our stock.
The view is always a parent location. When we have a hierarchy of locations, it is always advisable that you keep the parent location to view the location as the transaction of the goods will happen to the children, which do not have any further subordinate locations.
An internal Location is a location that is available internally in our stock. We can have multiple locations where we can keep our stock. Here, we will maintain a hierarchy, as discussed before, so that we will get an accurate inventory value for the stock that we have.
Customer Location is the location of customers where actually we are delivering the goods from our stock. This is also a virtual location that we just imagine using when we are selling the goods.
Inventory Loss is the location that is used when we have scrap products or lost products or when we adjust the inventory of books with real-time inventory. The adjustment moves have this type of location.
Production is the location where actually the products are actually being consumed for manufacturing or any other reason. A restaurant or kitchen can be treated as a production location when the goods are being consumed.
Transit Location is the location that is used only for transit. For e.g., a Quality check location or Packing Location or when you use Pick Pack Ship the locations can be used as transit locations.
You can select the right type that matches the location that you’re trying to create.
There are two checkboxes: Is a Scrap Location? And Is a Return Location? As the name describes, check whether it’s a scrap location and return location or not.
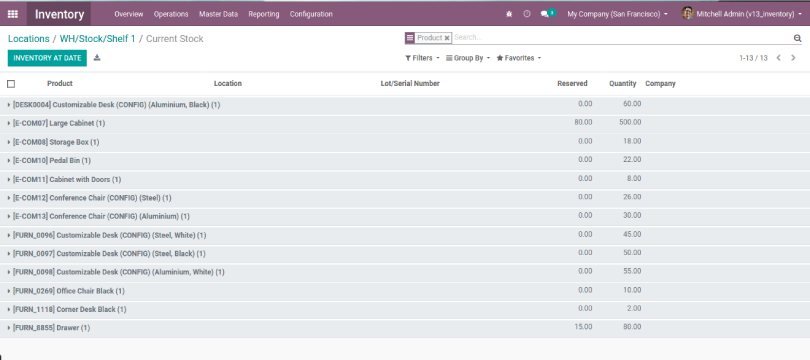
There are 3 smart buttons. Current Stock: Clicking on this will give you a list of products which is the current stock available at this location, as shown in the next image.
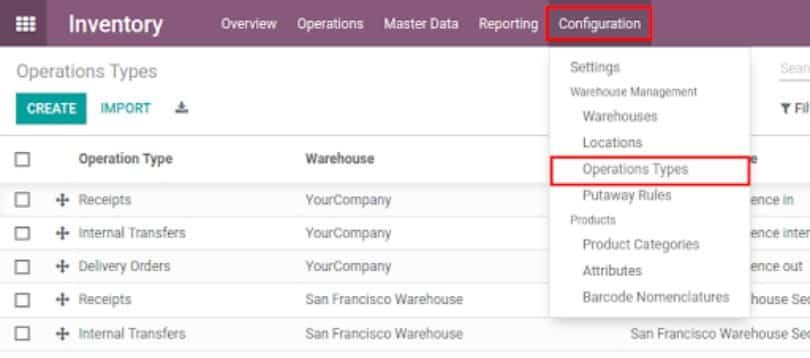
Operation Types: Operation types are the types of operation that are used in terms of transferring goods from one location to another.
There are mainly 3 types of operation: 1. Receipt, 2. Delivery, and 3. Internal Transfer.
You will see a list of operation types. Click on any of the types or click on Create to create a new type.
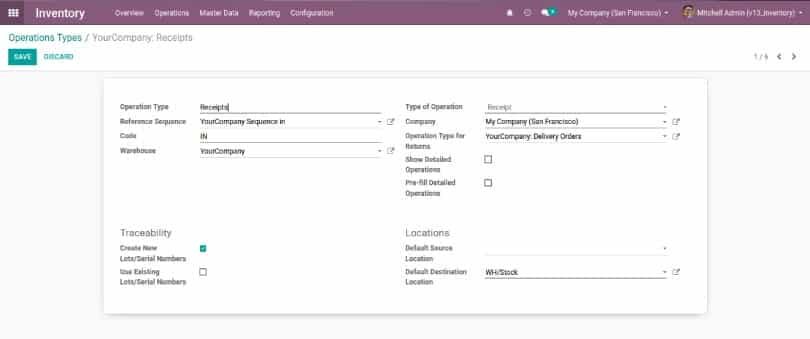
Operation Type: Name of the operation type.
Type of Operation: Select whether the type is Receipts, Delivery, or Internal Transfer.
Operation Type for Return: If we have the operation type and we want a specific type for return, then we can select this.
Create New Lots/Serial Numbers: If we want to create a new lot/serial number during the transaction of the operation type, then select this checkbox.
Use Existing Lots/Serial Numbers: If we want to use the existing lot/serial number during the transaction of the operation type, then select this checkbox.
Now there are default locations Default Source Location and Default Destination Location which need to be configured on the Operation Types. If the Type is Internal, you can change the location on the operations, but for Incoming, it will be possible to change the destination location, and for Outgoing, it will be possible to change the source location.
If you choose Vendor type, it is mandatory to select the destination location. Usually, we keep it as a stock location. For Customer type, it is not mandatory, but we should configure the location. For the internal type, both locations are mandatory to be configured. The screen itself will force you to do so when you select a specific type.
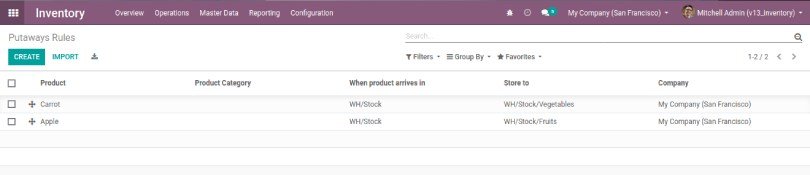
Putaway Rules: Putaway is the process of taking products off the receiving shipments and directly putting them into the most appropriate location.
Example: In a retail store storing vegetables and fruits, we have to store vegetables in vegetable locations and fruits in fruit locations, and they are in the same warehouse stock. That’s where putaway rules intervene to avoid storing products wrongly.
The putaway rules can be defined either per product or per product category.
Path: Inventory → Configuration → Putaway Rules.
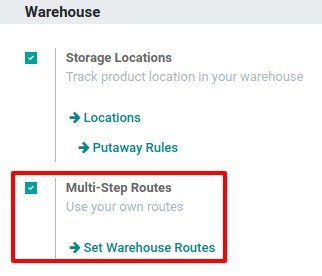
Configuration: Enabling the Multi-Step Routes will enable the storage location automatically.
Path: Inventory → Configuration → Settings.
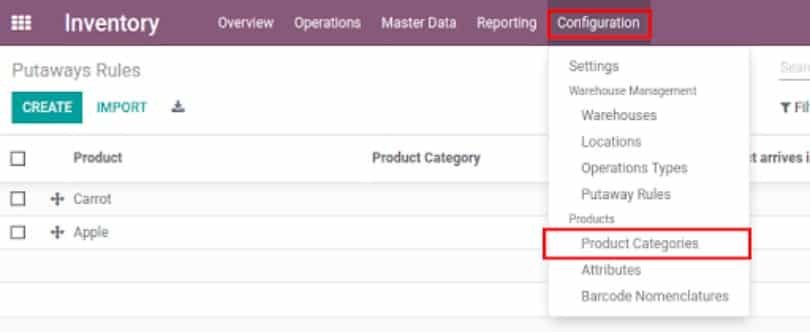
Product Categories: As the name describes, categories are used to categorize or classify the products in different sections. You can create or configure it as per your requirements.
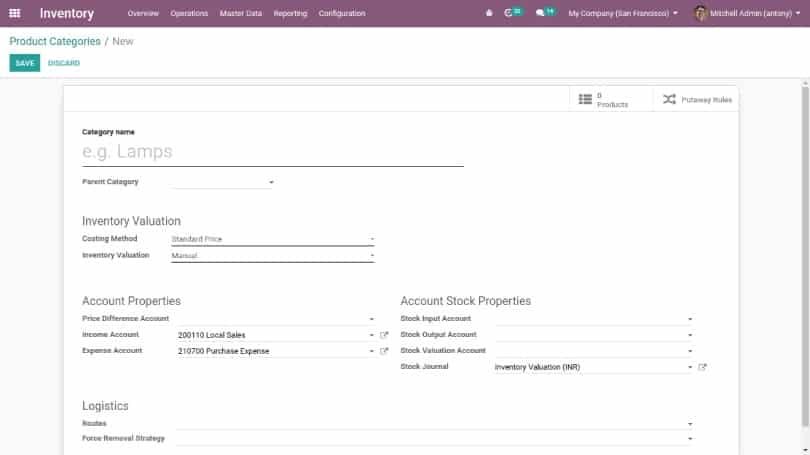
This will open a list of product categories. Click on create for creating a new category. Category Name: This is the name of the category that you can give as per your requirement.
Parent Category: is the parent category of this category.
Routes: Here, we shall mention the removal strategy that is used while there is no source location given for the category.
Here we have 3 types of removal strategy in odoo inventory management.
FIFO: First In First Out.
FEFO: First Expiry First Out.
LIFO: Last In First Out.
Costing method: here we have 3 types of costing methods,
Standard price: products are valued at their standard cost given on the product
First In First Out: products are valued based on First entered in and first leave.
Average Cost: Valuation based on weighted average cost.
Receive Product in stock:
After creating a product, you can receive the products by following steps.
Path: Inventory → Operation → Transfer → Create.
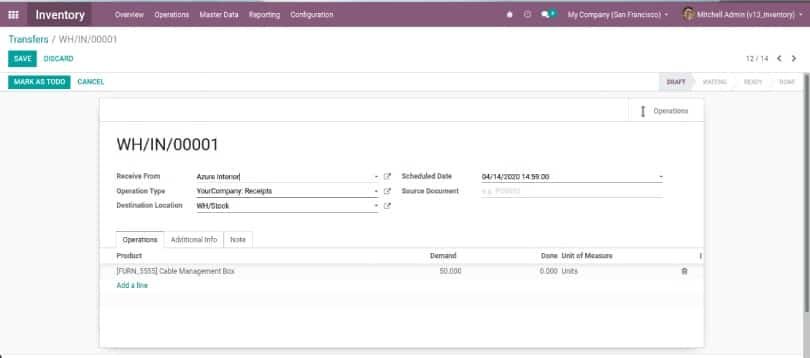
This will open the form view of the transfer.
Operation Type: Select the type of Receipts for receiving products.
Received From: Select the vendor from which you are receiving the product.
Destination Location: Select the destination location of your product.
Scheduled Date: Add the date scheduled for receiving the product.
In the operation, you need to add the details of the product name and quantity in ‘Demand’ for receiving the products.
Once all details are completed, click on the ‘Mark As Todo’ button.
Click on the Validate button to complete the Incoming transfer.
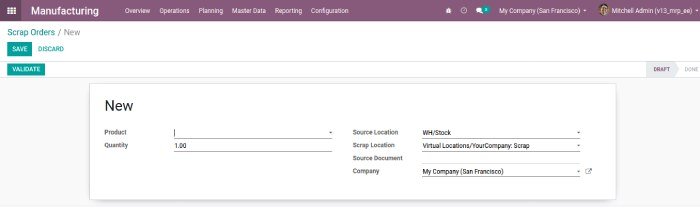
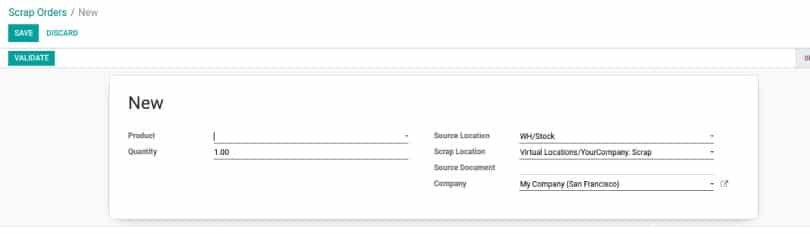
Scrap Order:
At any stage of the production line, we can scrap the product. In all the production stages, we can find the tab of scrap. When we click on the scrap, we can immediately transfer it to scrap.
We can also create scrap manually from,
Path: Inventory → Operations → Scrap Orders → Create Product: Select a product that is scrapped.
Quantity: Add quantity.
Source Location: Add the location from where the product was scrapped.
Scrap Location: Select the scrapped location.
Once all the details are filled, you can click on the “Validate” button.
Reporting: Now we will see reporting available for Inventory Management.
Inventory Report: This is the report that shows the current inventory or inventory on a specific date. The calculation of the inventory is done based on the movements till the current date.
Path: Inventory → Reporting → Inventory Report
If you want to print the report till some specific date, then click on the button ‘Inventory At Date. ’ This will open a pop-up. Select the date and click on the confirm button. This will show you the report.
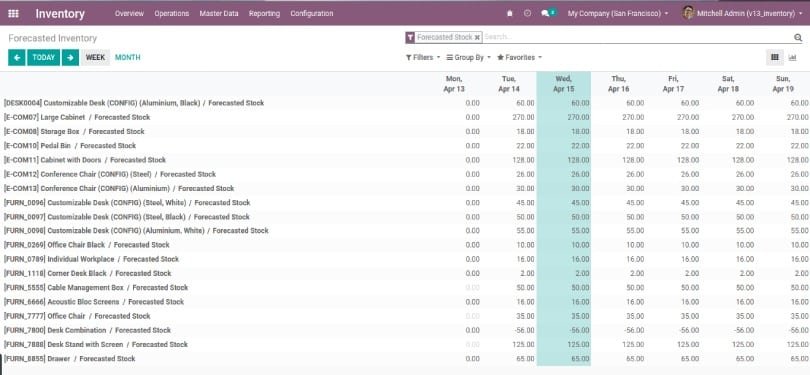
Forecasted Inventory: Odoo inventory Forecast is the way towards ascertaining the stock expected to satisfy future client orders dependent on how much product you anticipate to sell over a particular time frame. With Odoo 13, inventory forecasting is all easier. One can quickly retrieve the forecasted inventory with the help of new graph and grid views.
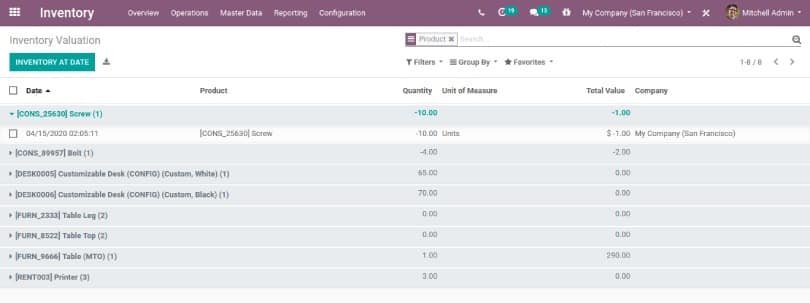
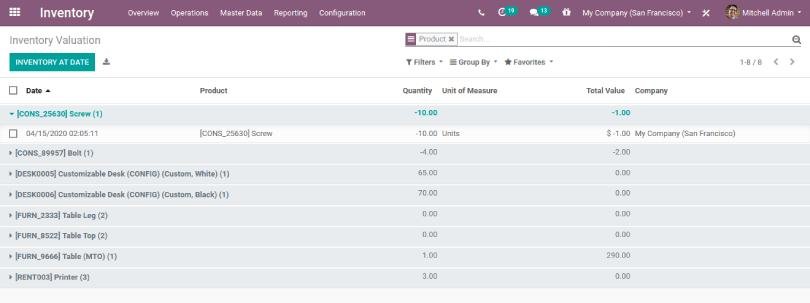
Inventory Valuation: Odoo’s inventory Valuation Report shows the value of the available product. The value is calculated based on the Cost Price, which is configured on the product
Here, first is the Product, then the quantity available along with UoM, and finally, the Value is the total value of the product available. As mentioned before, Value is the multiplication of the quantity of the product and the cost price configured on the product.
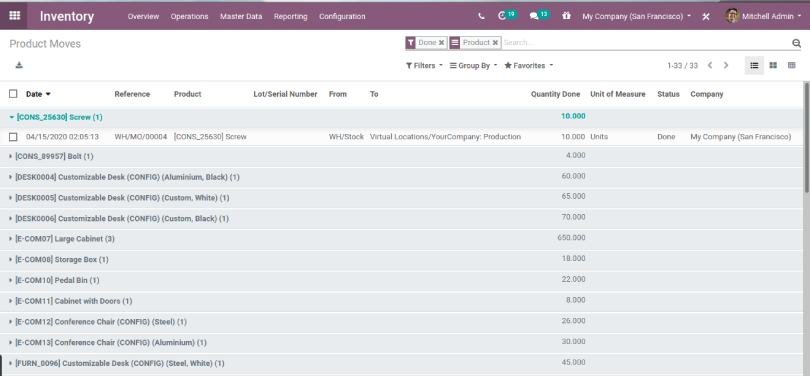
Product Moves: Now, when you want to see the product movements from one location to another location, you can see it by clicking on Inventory → Reporting → Product Moves.
Now, when you click on this menu, you will be redirected to the list of product moves, as shown in the next image. On this move, you can use the filters and group by to view the product movements as per your requirements.
Transforming your manufacturing business with Odoo MRP
Leading a manufacturing company involves many critical decisions. Unlike other industries, manufacturing businesses can be extremely expansive and diverse. This makes it imperative for business leaders to have technologies that enable them to plan, record, track, and control every aspect of their business. With Odoo manufacturing or MRP, you can have quality assurance, maintenance, and product lifecycle fully integrated into one system. It allows you to accurately capture data in real-time from your workforce and equipment using the API. Odoo MRP can also customize your manufacturing processes in alignment with your company-specific business processes using a work center and other routing concepts.
So, let’s have a look at some ways in which Odoo MRP can help you stay ahead of the curve.
Product manufacturing order
Here’s how you can create a product by manufacturing an order in Odoo MRP. There are usually two ways to do this. The first is simply without routing & work center and the other is by customizing the work order, and setting up a work center & routing. Here’s the first one:
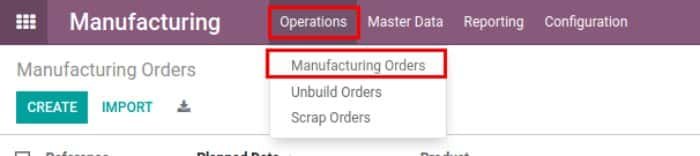
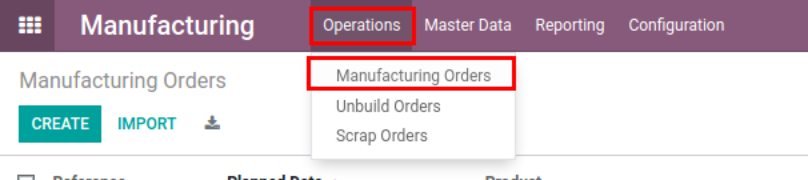
Go to manufacturing → Operations → Manufacturing orders
After this, click on the ‘create’ button and fill in the below categories:
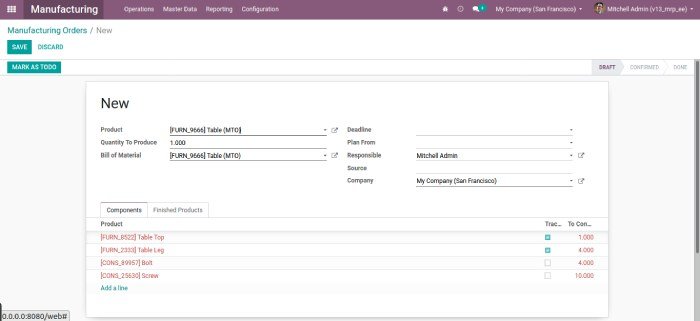
Product: Select a product to manufacture.
Quantity to Produce: Add the total quantity to produce.
Bill of Material: Add bill of material.
Deadline: Add deadline for production of the order.
Plan From: Add Planned date for the production of the order.
Components: Raw Material for production of the product. This Comes from the Bill of Material.
After adding all the details click on the ‘mark as to-do’ button for processing the order.
Click on the “Check Availability” button and you will be able to see the quantity available in reserve.
Once all quantities are available click on the ‘Produce’ button.
Once done, click on ‘mark as done’.
Once this is done, your production process is completed.
Now let’s have a look at another way of creating manufacturing orders in Odoo MRP. This time, we do it by customizing the work order, setting up the work center & routing. This is the advanced method for complex production where work center, routing, and bill of materials are used.
First, go to Manufacturing → Configuration → Settings.
After this, we need to enable the work order in the manufacturing settings.
After enabling work orders, we move to setting up the work centers and routings.
1. Work Center.
To create a work center, click on work centers in the settings or go to manufacturing → master data → work center → create.
Create work centers and click on the “Save” button.
2. Routings.
Routes are the paths through which the production of each product passes. Production is not a simple process, it contains a lot of work centers, routes, and so on. In this step, we set the routes for manufacturing.
For creating routings we can click on routings in the settings or Manufacturing → Master data → Routings → Create.
Fill in all the details, add the work centers for this route, and click on the “Save” button.
Manage production
We can start processing work orders in 3 ways.
1) By clicking on the work order from the manufacturing order.
2) Clicking on any of the work orders by following this Manufacturing → Operation → Work Orders.
3) You can open any of the ongoing work orders from the work center overview.
Path: Manufacturing → Overview → Click on the Work Orders button.
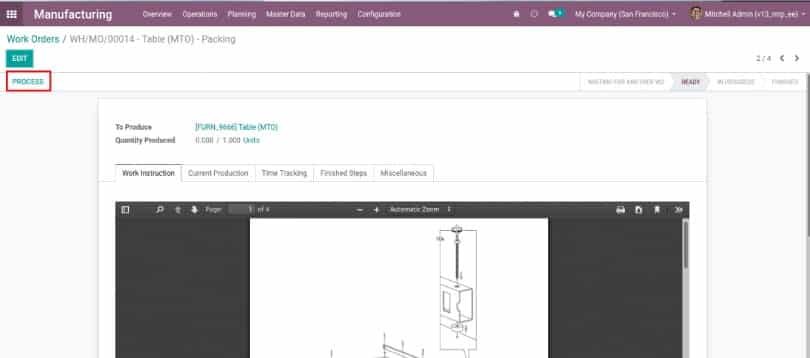
You can see all the work orders. One can get hold of each work order and complete the production. The production of the product will go through the route that we set for its production.
Click on ‘process’ to start production. You will then enter the production interface. Click on ‘validate’ after completing each stage.
When the entire production is finished click on ‘mark as done’ or ‘mark as done and close MO’. After this, the production is completed.
When we complete each production, the product will be added to the inventory. The inventory will be updated automatically.
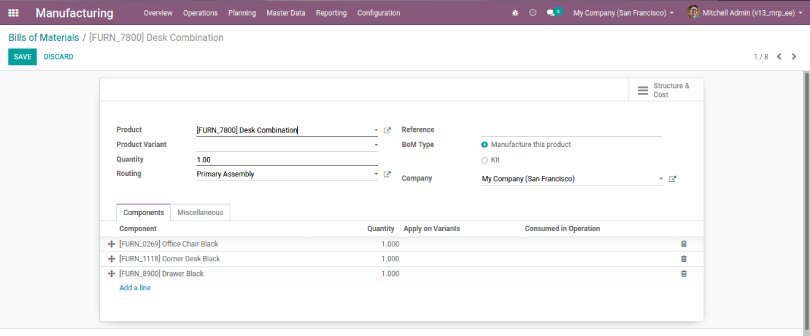
Bill of Material
Bill of materials, BOM are the components we add for the production of a particular product. Every product is manufactured with unique raw materials. Therefore, for the manufacturing of a product, we need to take the corresponding bill of materials. Let’s see how this is done.
Go to Manufacturing → Master Data → Bill Of Material → Create.
Here we shall see how to create a BOM and how to add the components. Product: Add a product for which you need to create a Bill Of Materials.
Product Variants: Add variants if needed.
Quantity: Add quantity.
Routing: Select the Route of production for the product.
Reference: Add Reference.
BOM TYPE: Select the type of the BOM as required for the production of the product either ‘Manufacture this product’ or ‘Kit’.
You can add the raw materials required for the product in the Component under the Components tab. Select the work center operations for the raw material in Consumed in Operations.
If there are by-products in your manufacturing order, you will need to enable them in manufacturing settings.
Once the by-products are enabled you can see a by-products tab next to the component.
Add the products, and quantity & select the operations. Under by-product enter the details (if there were any to produce the product).
After adding all the details click on the ‘save’ button.
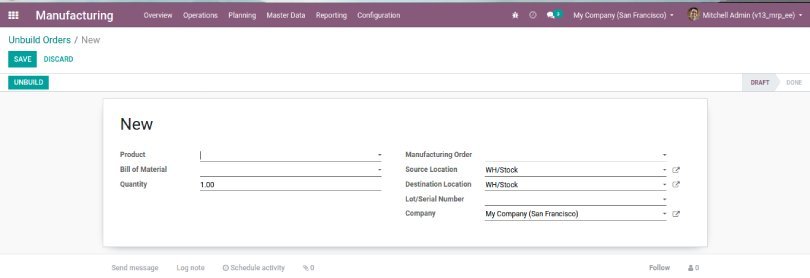
Unbuild Orders Unbuilding is yet another innovative feature in the Odoo 17 manufacturing app. Here we can unbuild a manufactured product in case of damage caused to any of its parts. This way we won’t be scrapping the entire product and we can unbuild the product to utilize all the good components of it.
To do this, go to manufacturing → operation → unbuild orders → create.
Fill the necessary fields and click the ‘unbuild’ button.
Scrap Orders
The Odoo MRP app allows you to scrap the product at any stage of the production line. When you click on scrap you can immediately transfer the product to scrap and see it in the scrap order tab.
We can also create scrap manually by going to manufacturing → operations → scrap orders → create
Here fill up the below details
Product: Select a product that is scrapped.
Quantity: Add quantity.
Source Location: Add the location from where the product was scrapped.
Scrap Location: Select the scrapped location.
Once all the fields have been filled you can click on the ‘validate’ button.
Planning, processing, and costing are the foundation stones of a robust manufacturing business. Odoo MRP can make this process simpler for manufacturers across. With more than 200 developers across the globe with vast experience in Odoo apps, we at Bista Solutions understand your unique manufacturing needs. Reach outto us and schedule your free consultation now!
As automation advances, it will usher in a flux of disruptors and trends, altering the way organizations operate. On one hand, this progression promises economic growth, higher productivity, and greater efficiency. While on the other hand, these new technologies raise concerns and questions about the broader impact on jobs, wages, skills, and even the nature of work. Key decision-makers believe that Robotics Process Automation (RPA) is one such technology that has unlimited benefits leading to a more efficient and productive work environment by eliminating repetition and duplication of work. A Forrester and UiPath surveyed around 270 decision-makers who were responsible for operations at their firms. All these leaders from different lines of business highlighted that organizations are planning to use RPA to meet key business priorities. RPA benefits are vast and still being explored across industries.
One of the key RPA benefits is that is bolsters human-agent productivity. It is spearheading automation across enterprises by increasing process automation and helping deliver differentiated experiences. Another key RPA benefit is that is uncovering new revenue streams by eroding repetitive work, ushering the need for super agents, and reskilling and upskilling the workforce. Forrester predicts that the RPA services market will reach $7.7 billion, and eventually balloon to $12 billion by 2023.
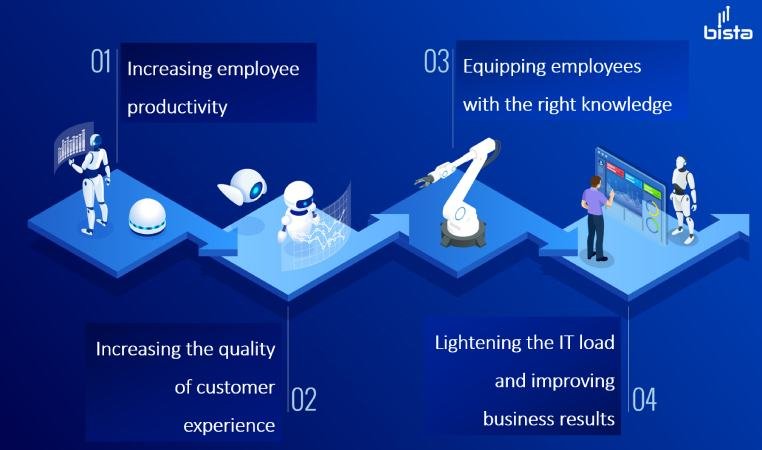
So, what are these RPA benefits that are transforming businesses across?
Increasing employee productivity – Employee satisfaction is one of the key emotions that help maintain employee retention. Conducting menial and repetitive tasks can have adversely negative affects on employees and their happiness and output. This in turn, affects the organization’s capacity for growth. Carrying out more meaningful work is something that increases productivity, engagement, and performance levels, at the same time increasing job satisfaction.
So, a key RPA benefit is that it demonstrates an organization’s commitment to its employees by helping them evolve, learn, and acquire knowledge around RPA, further, creating a more loyal and appreciative workforce. By training employees, allowing access to vocational courses, or even encouraging them to pursue newer digital qualifications, they can overcome fears around automation and embrace it as a productivity-boosting asset.
Increasing the quality of customer experience – Businesses are increasingly prioritizing customer experience. By leveraging RPA, organizations are better able to serve their customers by creating personalized experiences. This can be done with customer-facing chatbots and emerging channels such as mobile apps or social media.
So, when organizations automate the repetitive, rule-based tasks enables employees to channel their energies on higher-value activities that require advanced skills. It further improves employee engagement and translates to happier, more satisfied customers.
Equipping employees with the right knowledge – Customer service representatives across the business need access to account details while dealing with client. Most of the time, they need to access multiple systems to get what they need. One of the key RPA benefit is that it can make information readily available for your representatives and equip them well.
Lightening the IT load and improving business results- If businesses enable employees to perform repetitive and administrative tasks, they are reinforcing the IT team’s role in enabling workforce productivity. Few of the best RPA benefits include automating repetitive tasks that are usually prone to errors (such as resetting the password or fixing help desk issues) can be completed relatively faster with more accurately. This means that employees can then turn to higher-value tasks that improve business metrics.
The non-invasive characteristic of RPA is perhaps its greatest strength. According to a Forrester report that quotes the director of IT operations, saying that, “One of the biggest advantages of using a virtual workforce or an RPA robot is that it does not require you to replace your existing systems. Instead, RPA can leverage your existing systems the same way a human employee can.”
This application of RPA is not just limited to one business unit, it can be applied to multiple repetitive tasks across business departments like marketing, HR, IT, So this is how RPA can help you reduce manual labour and also save your time.
As an increased number of decision-makers believe that RPAwill lead to more productive and efficient working environments, we at Bista are constantly helping businesses to lead this change. With a strong team of developers who can drive this change seamlessly, we can help you understand how RPA can transform your business.
Reach outto us and book a free consultation session now.
One of the most important functionalities for a manufacturing business is to manage the lifecycle of a product from its inception to the delivery or disposal. By recording all their product related data in a unified system like Odoo – manufacturers have access to the different versions of their products at any point in time. This data can also be shared with different departments to facilitate accurate financial planning. With Odoo PLM you can maintain BOM & track product life cycle based on engineering change orders.
The Odoo PLM feature can be used to manage entire product data, maintain bill of materials (BOM) revisions and track product lifecycle based on engineering change orders, and product files.
Odoo PLM optimizes enterprise social networks to help you communicate efficiently with various departments of your organization. It enables easy approvals and real-time discussions on documents.
Odoo PLM also helps to create ECO (Engineering Change Orders) to do the following:
Make BoM revisions.
Make MO route revisions.
Update BOM component attachment.
Generate multi-level approvals from higher authorities for any revision (BoM or Route) before making changes in MO
Manage BoM and routing versions.
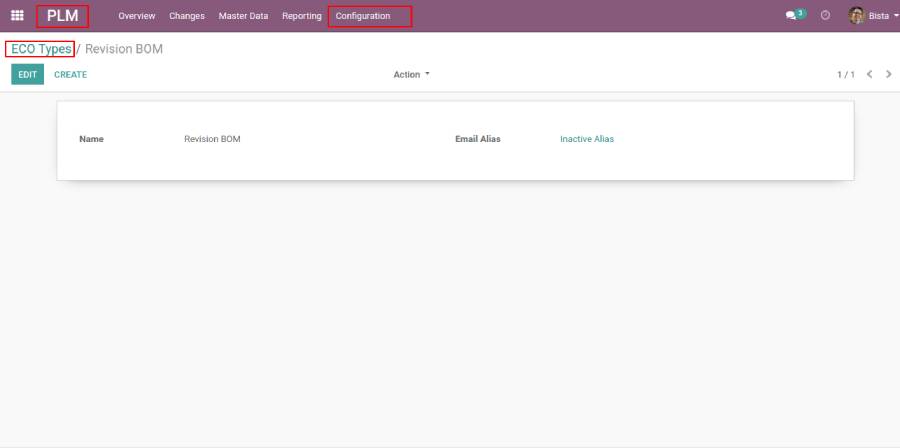
Configured ECO Type
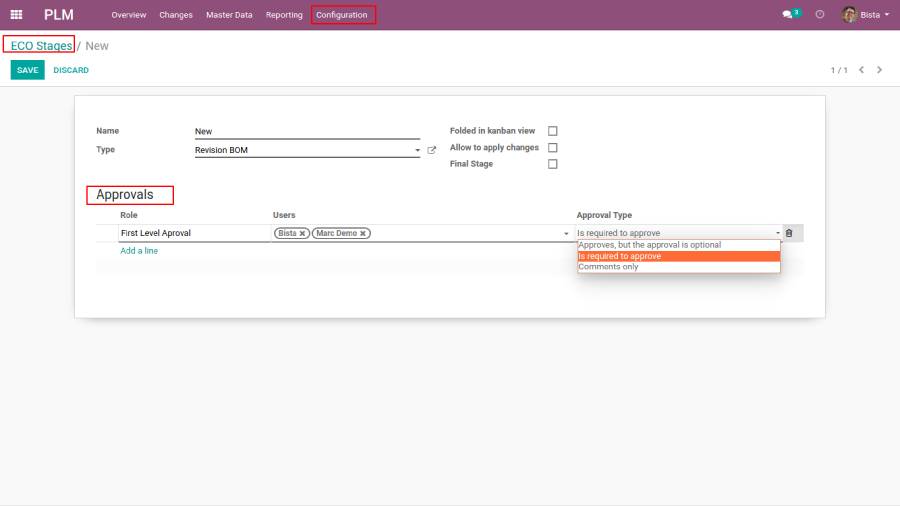
Configured ECO Stages
These are the four stages that you can use to configure multiple approvals.
New: For creating new engineering change orders.
In progress: For the ECOs which are in progress.
Validate: As per configured the stages this will be the final stage to apply changes based on ECO apply on selection.
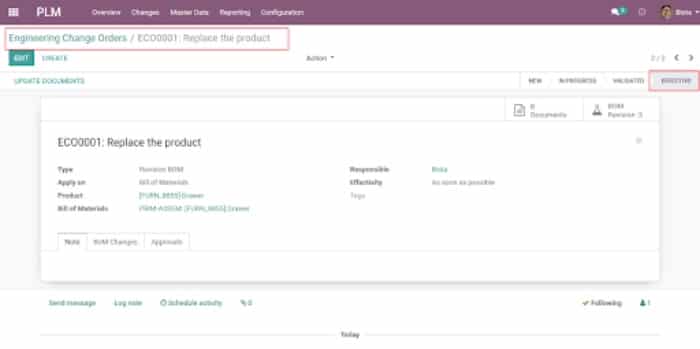
Effective: This stage is used for confirmed ECOs. Here one can apply changes and this stage will be marked as the final stage in the stage settings, also select allow to apply changes for applying ECO changes in odoo plm app
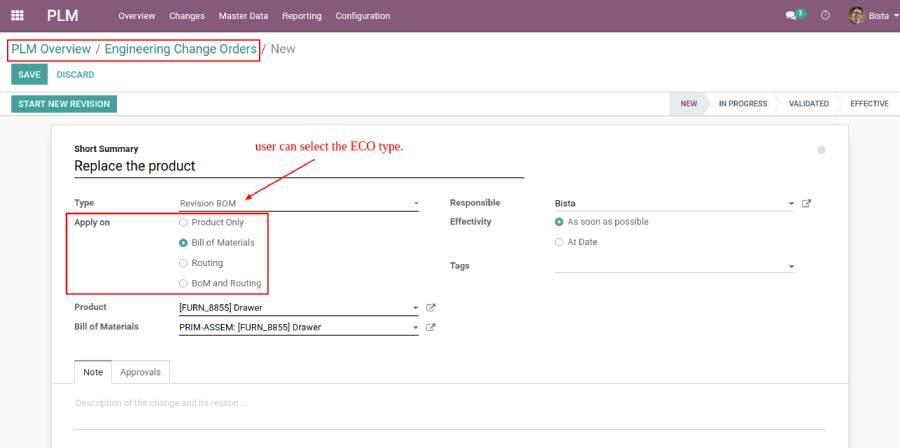
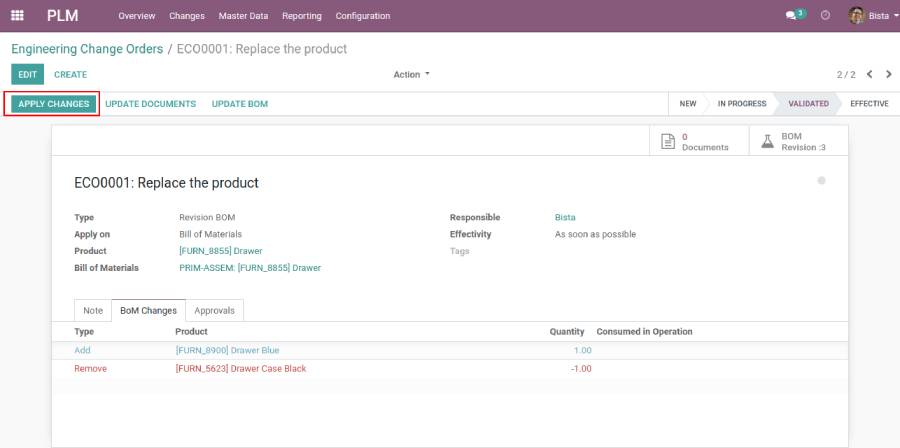
Generate Engineering Change Order(ECO)
You can select ECO type and apply based on that column. Once the record is generated click on the “Start New Revision” button for further process.
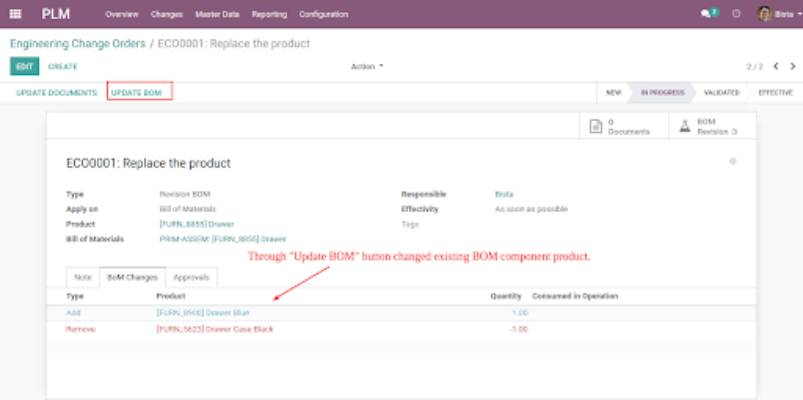
Update BOM
You can even update your BOM using the Update BOM button. Once saved, it will reflect on the ECO form.
After getting the approval, the user applies the corresponding changes.
The effective stage is the final stage. After getting the approval, you can drag the ECO to the final stage and apply the corresponding changes.
Companies with an ERP system usually need to find ways to organize their most important business unit – the product record. When aligned, ERP and PLM systems can give business leaders complete control over their manufacturing processes.
Building your manufacturing process with an effective PLM system like Odoo PLM will minimize organizational inefficiencies and transition costs. It can also drastically help to optimize the capabilities of each system across the entire business. There are few odoo apps available for manufacturing business like Odoo PLM, Odoo MRP, Odoo Quality management etc.
Are your employees conducting repetitive tasks? Are you looking for ways to increase their efficiency and save their time?
If so, this video is the answer for you. Robotic Process Automation or RPA is software that executes routine transactions and makes data-driven decisions by replacing repetitive human activities. As software, RPA mimics and automates business processes and tasks exactly as if they are being carried out by humans – at the same time removing the scope for human error. Serving as a faster and reoriented workforce, RPA can be built around repetitive computer-based tasks, decision-based tasks, or tasks that require accessing more than one system to complete a process and conduct an information search.
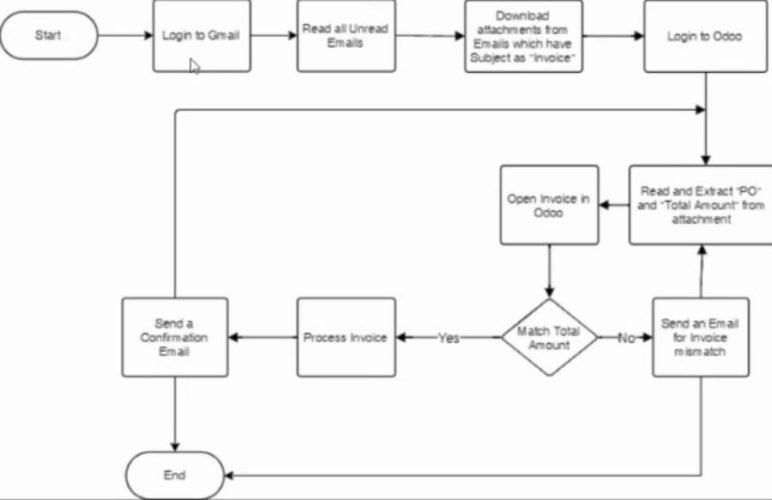
In the video below we have shown how you can automate multiple supply invoices using UiPath.
Instead of manually processing each invoice, we used uiPath to the following process which could drastically help you reduce repetitive tasks and also save your time.
This intelligent software first logs into your Gmail and then reads all your unread emails.
After this, it downloads all the attachments in the email which has the word ‘invoice’ in it.
It then logs into Odoo and reads and extracts the Purchase order number and the total amount from the attachment.
It will then search for the purchase order number and match it to the total number.
Once that verification has been made, the invoice will be processed.
And the software will send a confirmation email.
If the invoice doesn’t match, it’ll still you an email stating that the invoice cannot be processed due to a mismatch.
This loop continues till the system reads all the attachments.
When you execute this entire flow, you will be able to see how fast this process can be conducted and how the system uses its intelligence and this entire process gets automated. The software matches the PO numbers for all the attachments in your email to check for matches and process the invoice so they can be ready for you in your inbox. Even if the invoice does not match so it will send an email with the information about the mismatch.
This application of RPA is not just limited to one business unit, it can be applied to multiple repetitive tasks across business verticals like marketing, HR, and IT, So this is how RPA can help you reduce manual labor and also save your time. As an increased number of decision-makers believe that RPA will lead to more productive and efficient working environments, we at Bista are constantly helping businesses to lead this change. With a strong team of developers who can drive this change seamlessly, we can help you understand how RPA can transform your business. Contact usto book a free consultation session.
Cookie Consent
To provide the best experiences, we use technologies like cookies to store and/or access device information. Consenting to these technologies will allow us to process data such as browsing behavior or unique IDs on this site. Not consenting or withdrawing consent, may adversely affect certain features and functions.
Functional
Always active
To provide the best experiences, we use technologies like cookies to store and/or access device information. Consenting to these technologies will allow us to process data such as browsing behavior or unique IDs on this site. Not consenting or withdrawing consent, may adversely affect certain features and functions.
Preferences
The technical storage or access is necessary for the legitimate purpose of storing preferences that are not requested by the subscriber or user.
Statistics
The technical storage or access that is used exclusively for statistical purposes.The technical storage or access that is used exclusively for anonymous statistical purposes. Without a subpoena, voluntary compliance on the part of your Internet Service Provider, or additional records from a third party, information stored or retrieved for this purpose alone cannot usually be used to identify you.
Marketing
The technical storage or access is required to create user profiles to send advertising, or to track the user on a website or across several websites for similar marketing purposes.
“The level of consistency and dedication Bista has shown towards our project is the driving force behind the project and all that is to come! We, at Reliance, are so thankful to have you as our partners in this endeavor. We’ve grown together and learned a lot from each other over the last few months. I am sure that will only continue as we progress on our journey of innovation together.”
– Sahej Singh – Business Intelligence & Strategy Manager
SilencerCo
“I wanted to let you know how much I appreciate your team for all the help and custom work that they have done on our behalf. Priyesh and Pratik, and the entire offshore team have been really responsive to our operational needs. Thank you again for the hard work.”
– Camille Thompson – Data Manager
Reinhausen Middle East FZE
“Since [we’ve started] working with the team of Mr. Pradeep […] we’re receiving quality replies on time and we’re really enjoying working with him and his team. As the collaboration is going so well, we have started to use Odoo for more […] things in our company and we’re continuing with change requests to adapt the system to our needs. I want to thank Mr. Pradeep and his team for [their] ongoing support.”
– Ralf Klinger – Technical Field Service Manager
Selkirk Signs
“Also want to make a quick mention of the support team. We have been working with them for a while now and Pradeep and his team members […] have done a commendable job in making sure our tickets are handled in [a] timely manner and they are very easy to work with and very approachable.”
– Subhrajeet Sabhapandit IT Manager
FGD Glass Solutions
“Just wanted to drop a quick line to say thank you for all your efforts in supporting us in our needs for Odoo v12 Enterprise. You have been prompt in responding to our many support requests. Pradeep and Mansy are always eager to help and informative with instruction when needed. As a business owner, I’m happy we selected your firm to be our Odoo ERP support provider. Looking forward to growing over the coming years with your support.”
– Derek Lindeborg – Owner
Control System Labs
“Now that we have completed the launch of our new Odoo website, I wanted to take a moment to thank you and [the Bista] team for all the hard work it has taken to get us here. After many months of planning and development, we are now using Odoo for many of our critical business processes: Accounting, Recruitment, Expenses, RMAs, Customer Portal, Credit Card Processing, as well as storing our Product and Partner Master Data. This would not have been possible without your team’s dedication and expertise. Our team is very excited to tackle the last and most important Repair Operations module in the upcoming weeks. We are confident that you will continue to provide excellent service, and we look forward to achieving this major milestone together! Thank you!”
– Gary Fredricks – President
Atlas Arms Manufacturing LLC.
“One of the biggest things for us is lot tracking through our entire manufacturing process from sourcing raw materials, to subcontractors, to in-house manufacturing, and sales to end users and commercial loaders. Because some of our products are restricted in certain locales, we needed to be able to block purchase in those cases. We are also big fans of open source software. [We found Bista] through originally a duckduckgo search, but after speaking with them, and another one of their customers who is well known in our industry, we felt confident they could deliver what we needed for a fair price in a reasonable time (which they have done). [Bista] feels more like a partner than a regular vendor, very responsive to questions and concerns even though the project has been put in production. Their bid was reasonable to start, but still came in under budget and under hours, which can be difficult to do. [Overall experience working with Bista was] excellent and comfortable. I can’t count the hours of misery that Bista has saved me from.”
– Michael Riettini – (Managing Member and COO) Kerrville, TX
“Bista was one of Odoo’s largest implementation partners, so we were introduced through Odoo. They had a good reputation and we had talked extensively with other people that had worked with Bista, so we felt comfortable starting out with them. And we’ve now been working with them for over two years, so we’re quite happy with our decision. We work directly with all the development team. We considered them part of our teams; all of our daily meetings, all of our discussions, [they] were an integral part of that. Even though we had to change quite a few things midway through the project, because we work so closely, because they understood our poor business process and what we were trying to do, we were able to adapt and still deliver on-time, at the same budget. […] I think [Bista] has been a great partner. It’s one of the reasons we’ve been working with them for multiple years now, even after the initial project finished. I think they have a great talent pool to work with and they’ve been very accommodating. So wherever we have to change things, or get additional resources, or find additional expertise, they’ve always been on point to help with that.
“We chose Bista because they had some expertise in manufacturing and they also had some expertise in the accounting side and making sure that our financials were spot on at the end of every quarter. We were right on budget, we were within the 9-month period from ERP planning to go-live, and so I really couldn’t ask for more.”
“Bista has helped us implement Odoo and make changes to it where generic options did not work. So [they are] an excellent partner that’s available 24 hours a day as we need them to make changes, [and] to help us work with our people and train them. So, Odoo is a very generic system that’s like a shell and you put together the pieces of a puzzle to make a new system that meets the needs for manufacturing, for finance, for inventory, etc. Bista helped us manage all of the changes that are needed for that, do the training and they also support us when we have problems. We have four primary people from Bista, but they get us more when we need them. But the four people have been with me for eight months now and we meet every day; and we talk about issues, we talk about things we don’t understand, they explain to us more about the system every day. […] They’re very good about working the hours that we need them to be. Bista accommodates the difference in time. Bista has been very good about being available whenever we need them and doing the support after the implementation. We recommend them highly and we [are] still working with them. And honestly, I would not be working with them at all if I did not like them or if they weren’t providing a service that’s effective for me. They have been doing both very well so that’s just not an issue at all.”
– Bob James – (Head of Enterprise Applications) Fairfield, California
“In terms of what stood out about Bista was definitely the responsiveness from the point that we made first contact. So, they were very quick to respond to my query […] because I was on a very tight deadline. I wanted it up and running within a month. I wanted to go live and then fix problems as we go. […] it was a lot of trial and error which was very helpful from Bista’s side that [they were] really quick and responsive. They had a team dedicated that okay we’re gonna take care of what’s happening and let me have people working around the clock even. I think the biggest change has been inventory accuracy. I got everything that I wanted out of it. Bin locations, traceability, lot tracking, automation, certain degrees route optimization… everything that I wanted to be a part of for the warehouse management side has been part of the warehouse management side. So, with that core being intact, rest of it just follows where your profit and loss and everything else is in place. [With Bista’s help] inventory accuracy [is] above 90 [when it] was probably around 60 to 70 before.”
“After deciding that Bista was the right partner for us, we actually had a member of their team come down to our warehouse and work side-by-side with us to perform a gap analysis and make sure that it was a good fit for us. We found that after bringing Priyesh down to our warehouse to work with us, we were blown away by his focus and understanding of all of our business needs. We got a lot of confidence in both what he could provide as well as other members of his team. They were able to get things done in an extremely timely manner and have a very thorough understanding. We started the project out with some trials of smaller project and were extremely satisfied with the results. They were unparalleled to any other technology partner we have used in the past. Whether it was from Dynamics, or Odoo directly, or other 3rd party partners as well. [Bista] showed that they could comprehend the project needs, as well as go above expectations. And as well as make any kind of adjustments along the way to make sure we were happy with the end results. Their understanding of core business processes and developments and needs is unmatched and unparalleled in their industry. Through working with Bista, we’ve gotten both quantifiable results as well as qualitative results.We’ve been able to increase our sales double, while lowering our back-order fulfillment rate. Bista has allowed us to have more accurate purchasing information, better inventory control, more efficient sales, as well as provided better tracking of all of our CRM Sales tracking. At the end of the day, Bista has a great understanding of our business, and they were able to deliver projects timely, cost-effectively, and accurately. And that is support that we were unable to find anywhere else. They have surpassed our expectations and delivered better results than any other technology company we have ever worked with.”
– Michael Sturury – General Manager, Maqabim Distributors
““Odoo recommended Bista as the potential implementation partner. The implementation was interesting because it forced us to take a step back and really understand our current flow of information, and how we could actually improve that flow and eliminate some of duplicate entries and actually improve efficiency. Bista came on-site and spent the week with us and went through in detail every one of our business processes, generated a flow chart of our current state, and then worked with us to develop the flow chart of our future state which would be the ideal state. I was a little hesitant on the zoom meetings for an implementation but working with Rajiv and his team really, really has been a great experience. They’re so detail-oriented and they are so set on making sure that our requirements are met in every way.” .”
“Our experience with the Bista implementation team was really nothing but positive. These guys were available on the weekends, they were available after hours, you know it wasn’t just go live and walk away, right? They were they were there for us, they’re still there for us and I think we’ll sign a support contract with them. You know, I had pretty high expectations and they met and exceeded, in some instances, all those all my expectations [and] overall did a great job. I would certainly recommend them to anybody who’s looking for an Odoo implementation – look at Bista they’re professional, they’re fast, they’re responsive, they know what they’re doing. So, you know, 10 out of 10, highly recommend.”
“We decided to work with Bista because they demonstrated understanding of cannabis business and they demonstrated client-oriented approach. Some implementation results like sales and pos modules exceeded our expectations. The implementation of Odoo with the help of Bista helped us to get very useful and detailed information regarding our operations. The most important result which I think cannot be quantified is that we have complete information about at least our sales […] which manager [is at which] of our offline shops, how much product he sold, I can check the price…to take some managerial decisions according to this information. Regarding accounting, I think [the] Odoo [implementation] is saving us up to 10 hours per month on preparation of reports. I would, hundred percent, recommend the Bista team to other cannabis companies as a reliable partner in IT system development and support.”
“We selected Bista, originally, because we were really looking for a partner that we felt comfortable, [and] knew what they were doing. TIE is a, you know, by far, in a way, not experts in Odoo. We are not experts in ERP implementations. We are not experts in pretty much everything that Bista is. So, what we were looking for is an expert in those areas that could help lead our project in a way that we would end up being very successful in the platform itself but also getting there. Bista was really presented as a partner not just a vendor to us, and really their advisory in the way that they say ‘hey, here’s your problem… here’s what a good solution would be…or this is what we’ve seen in the past… or here’s a module that you might not be aware of’. When we selected Bista it was really those, you know, key pieces. Then after working with Bista those areas definitely shined big time, especially the technical expertise area, but also the team itself was very high performing. I don’t think there was a single member of any team that I did not enjoy working with as well as be very impressed with their capabilities – whether it be technical or non-technical. The quality of the project and the quality of the system itself has been enhanced greatly since Bista’s involvement in our project.”
“My experience with Bista has been great. Each time I’ve called and talked to Priyesh, who is our rep, [he’s] been very quick to return calls, get back in line, and figure out what’s going on and responding to our issues […]. He’s got a good team of people behind him both here in the U.S. and in India who can do big programming jobs if we need a whole new structure or an only report or a module needs to be adjusted for us. From a financial perspective, I had no issues. [Our implementation was] within budget and on plan. We’ve been very satisfied especially with the response and the timeliness of the response. I couldn’t recommend the company more with Bista and how they took Odoo and got it to work for us. It’s been a tremendous improvement in our business. It’s been a very positive experience. I would highly recommend the software, and I would highly recommend Bista.”
– Dennis McCarthy – CFO (Detroit, USA)
Book A Free 30 Min ERP Consultation
Book A Free 30 Min ERP Consultation load
About Shahid Bandarkar
Mr. Bandarkar has 10+ years of quota carrying technology sales and account management experience
Mr. Bandarkar holds a Master’s Degree in Project Management.
About Faisal Basar
Mr. Basar Successful entrepreneur in the technology domain.
Mr. Basar having Proven track record of building a company from ground-up to multi-million dollars in revenue.
Mr. Basar had 20+ Years in the technology industry & Expertise in identifying new technologies and building teams to deliver those solutions.
About Andre Temnorod
Andre Temnorod has been a leader in the internet technology and telecommunications space for 20 years. Present and previous roles have included:
Founder and CEO, CloudRoute
Founder, Broadvox
CEO, Nexbell Communications
CTO, Unicent Technologies
Mr. Temnorod is also one of the foremost experts in VoIP technology and has been featured on many panels and professional forums.
About Thomas Sparkvik
Thomas Sparrvik is a successful entrepreneur and global business executive. Present and previous roles have included:
CEO, Parpro Corporation
CEO & Vice-Chairman, Kontron
Additionally, Mr. Sparrvik is a Board member in five companies. He holds an MBA from the Warwick Business School and an MSC in Electrical Engineering from Lund University.