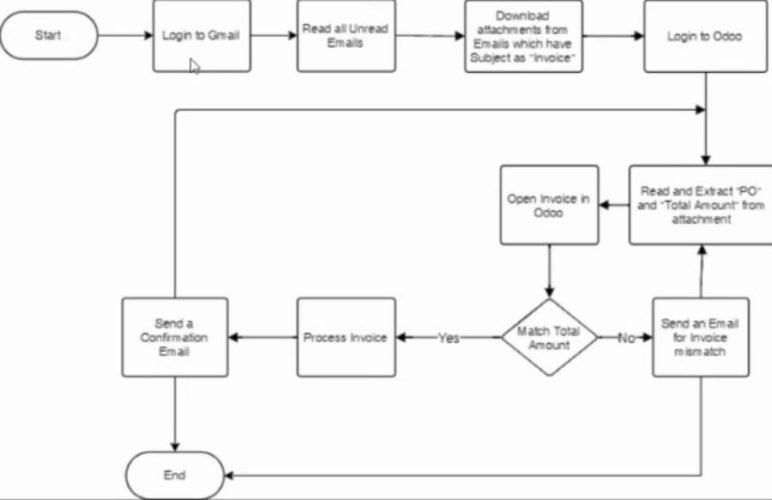
Odoo Project Management explained with demo screens

Odoo-Project-Management is the best Odoo module

Odoo project management is a time saving tool that can give us a visual overview of all our ongoing projects. This helps us to manage people, tasks, due dates, manage multiple projects, daily timesheets, etc. Odoo project management provides functionalities to manage multiple projects. Odoo project management provides graphical charts, Gantt charts etc to analyze the progress of specific tasks and projects.

Odoo project management

Below we have explained how Odoo Project Management work and what features it includes; 

Project Dashboard

Once you get into the project you can see a Kanban view of projects. You can get the complete overview of project and tasks related to the project.Odoo Project Management module

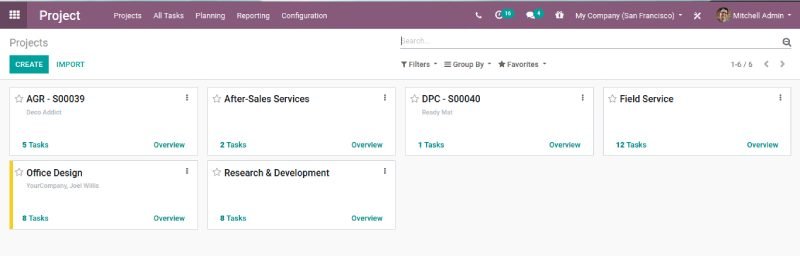
Click on the create button to create a new project. This will open a popup screen as shown in the next image.

Odoo Project Management module

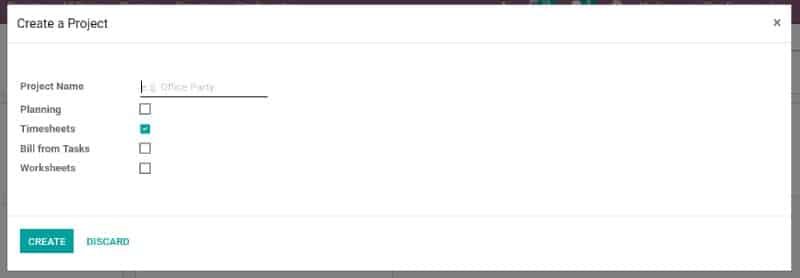
Project Name: Add name of the project.

Planning: Select this if you want to enable planning for the tasks of the project.

Timesheets: Select this to enable a timesheet on the project.

Bill from Tasks: Select this if you want to enable bill from the tasks.

Worksheets: Selecting this will enable customizable worksheets on tasks.

Click on the ‘Create’ button.

Task Stages

Clicking on the ‘Create’ button will redirect you to the task page. You can add a certain column to your project. They will be the stages for your project task.

Odoo Project Management module

Odoo apps help you with some different sets of examples for your project for instance-Software Development, Agile, Consulting,Website Redesign etc. Click on see examples.

Odoo Project Management module

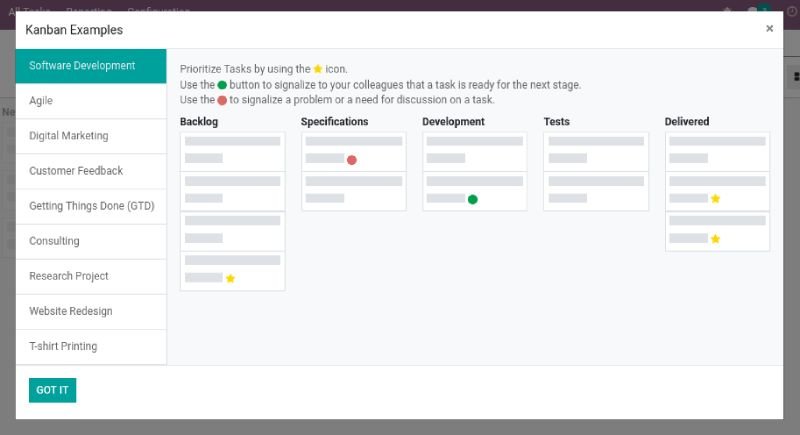
Click on the “Got It” button to close the pop-up screen.

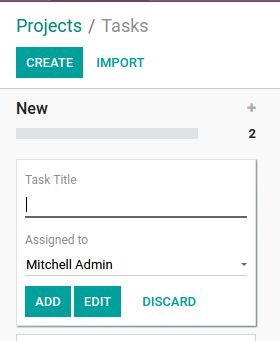
Once you add the columns for your stages, you can create tasks for your project by clicking on the ‘Create’ button.

Task Title : Add the title for the task .

Assigned to: Select the user you want to assign the task.

Click on the Add button to create more tasks.

Odoo Project Management module

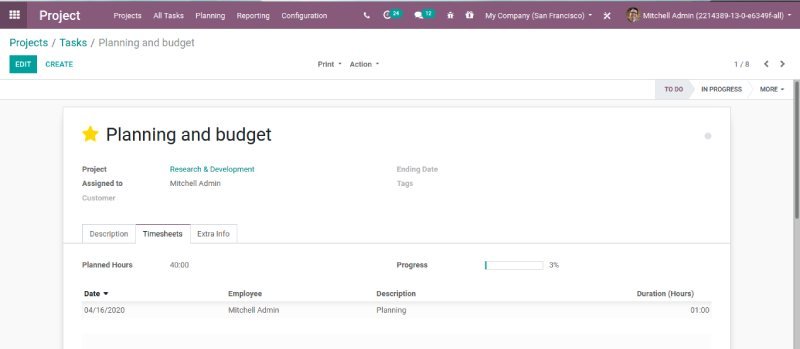
Click on the Edit button to edit the task details. This will open a form view of the task.

Odoo Project Management module

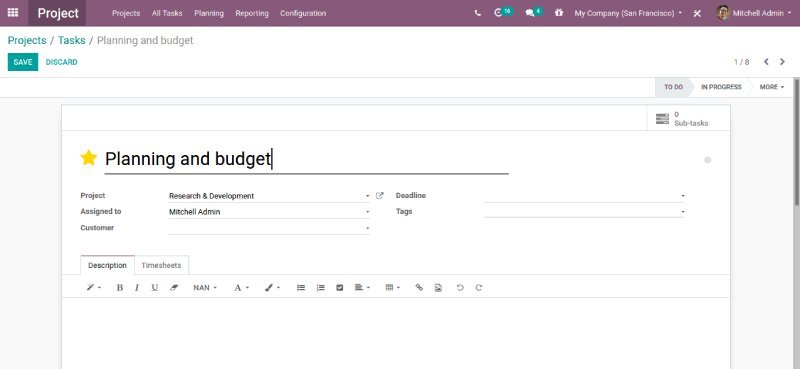
You can modify the details.

Deadline: Add the deadline date  of the task if required.

Tags: This helps you to find the task.

Description: Add the description of the task.

Once you complete the changes save the task.

Rearrange Task Stages

If you want to fold/unfold the stage from the dashboard as per your requirements. You can delete stage columns. You can rearrange the stage by simply drag and drop the column as per your requirements. You can even archive/unarchive the tasks

Odoo Project Management module

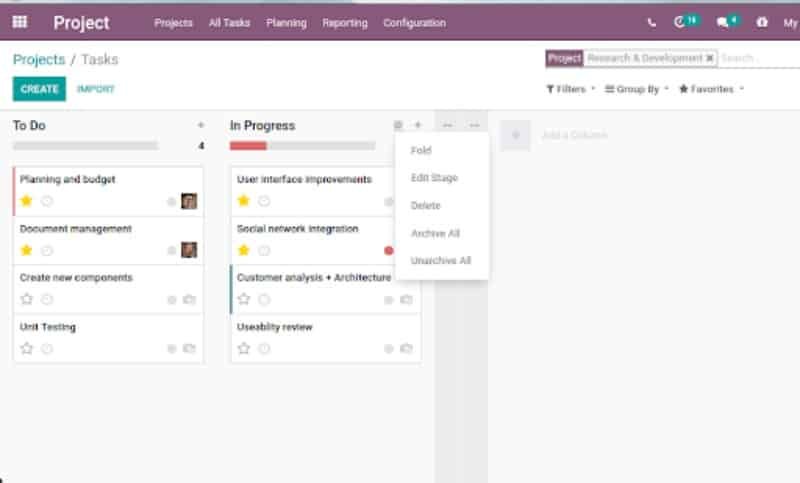
Now regarding the tasks, If any task is important you can mark it as important by clicking on the star icon.

One can see the planning/activities of each task. Once can schedule new activities for the task.

Odoo Project Management module

Odoo Project Management module

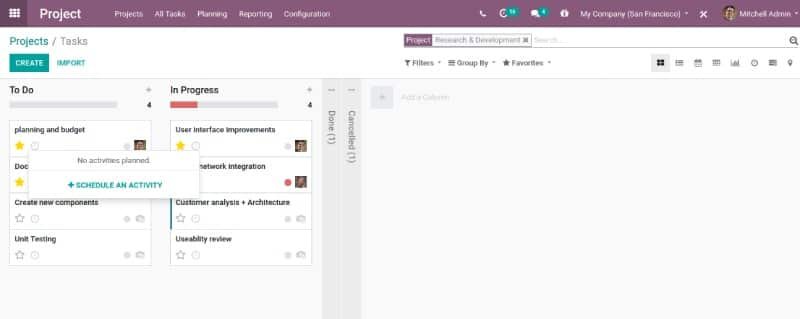
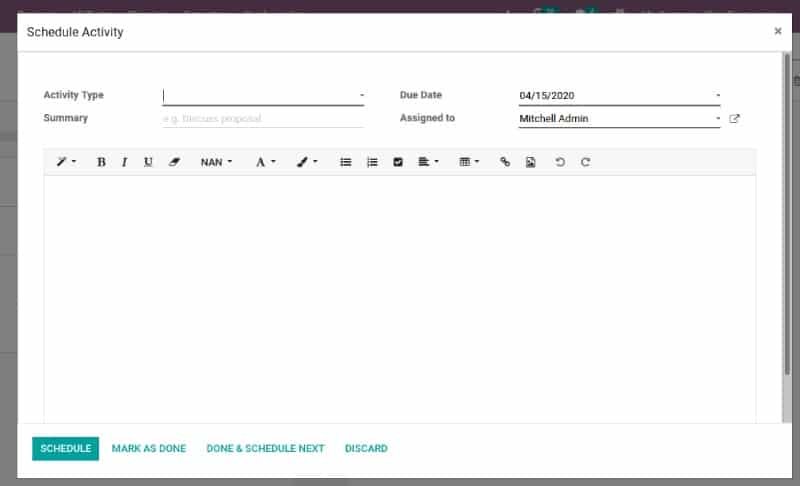
Click on the ‘Schedule’ button to mark the changes.

Plan and Track Employee Task

One can keep a track of their employee tasks. Enable the Manage time estimation on tasks, it creates a progress bar in the form view of your tasks. When the employee adds working hours for the task the progress bar gets updated based on the initial planned hours.

Odoo Project Management module

Sharing Of Project and Task.

You can share your projects/tasks, you allow external user to be with you on the same page. This helps avoid misunderstanding, allowing you to become a more coordinated company as you get the correct information to the right person.

  • Sharing a Project

You can share projects in two ways.

  1. Path: Projects → Dashboard → Manage → Share.

Odoo Project Management module

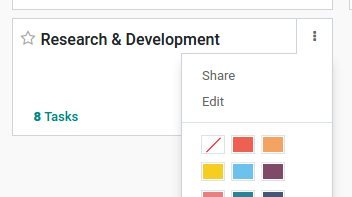
  1. Path: Project → Click on the ‘Share’ button.

This will open a popup screen. Choose an existing Recipient(s) or you can create

Odoo Project Management module

The Recipient will receive an invitation email to access a document. Once a user opens it, it will redirect to the project setting and can access it’s tasks.
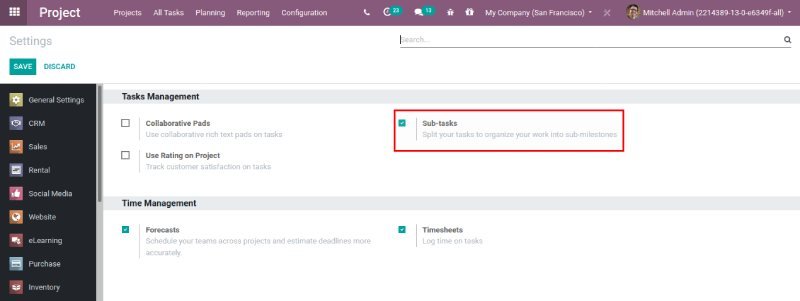
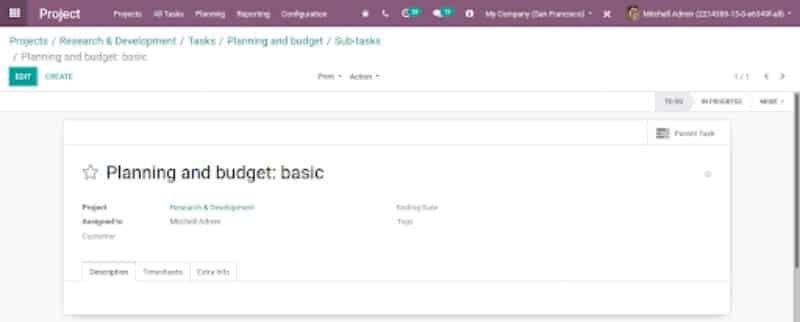
Subtasks

You need to enable the Subtasks from the settings.

Path: Projects → Configuration → Settings.

Odoo Project Management module

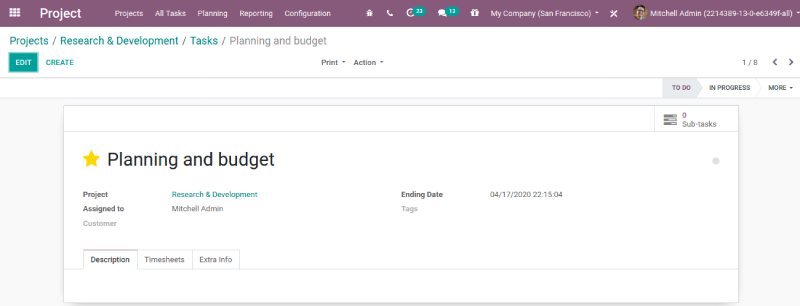
Once you enable the sub-tasks from settings, go to the project and select the task you want to share.

You can see the Subtasks smart button on the task view.

Odoo Project Management module

Clicking on the sub task button will navigate you to a new task page where you can create a sub task for the parent task.You can find the task title and the person to assign the sub task. Later you can click on the Add button. You can modify the subtask by clicking on the ‘Edit’ button.

Odoo Project Management module

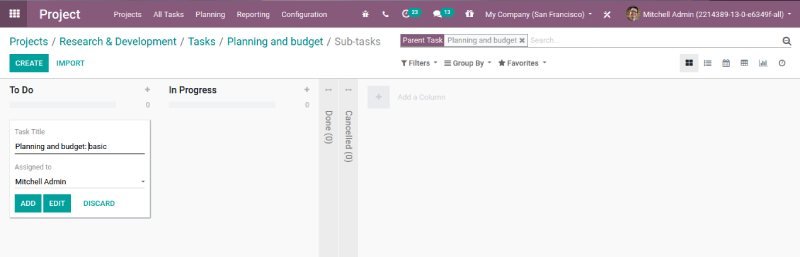
You can access the parent task related to the sub task from the view.

Odoo Project Management module

Planning Tasks

Under the planning feature of Odoo, one gets access to the Gannt chart enabling better planning and organizing of the workload and human resources.

Path: Project → Planning.

One can either plan by project or plan by employee.

Clicking planning by employee, you get the following Gantt Chart.

Odoo Project Management module

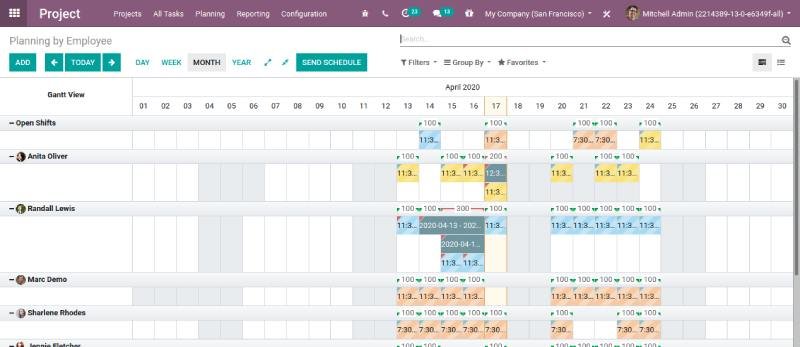
One can easily see from here in the Gannt chart, which people are assigned or who is involved in a particular assignment.

Alternatively, one can do them from here. One can seamlessly allocate the resource effectively.

Odoo Project Management module

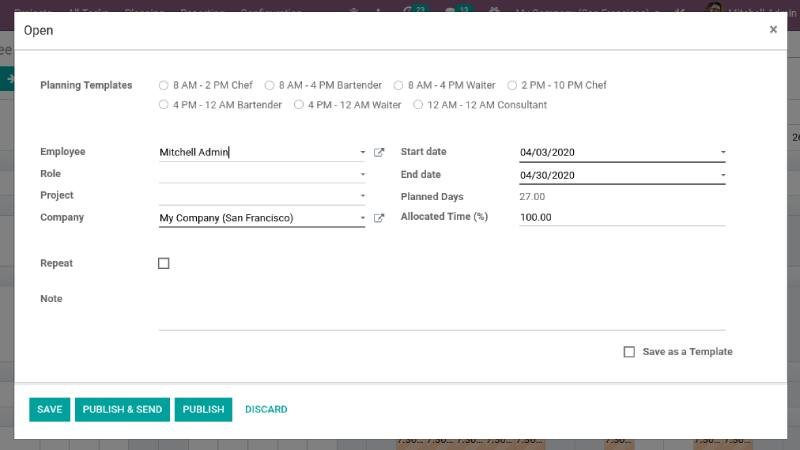
Allocated Time(%): This allows you to define the percentage of time you want your employee to work on the specific task during the shift.

The total calculation shows how many hours out of the total shift time (End date – Start date) are spent by the employee on that task.

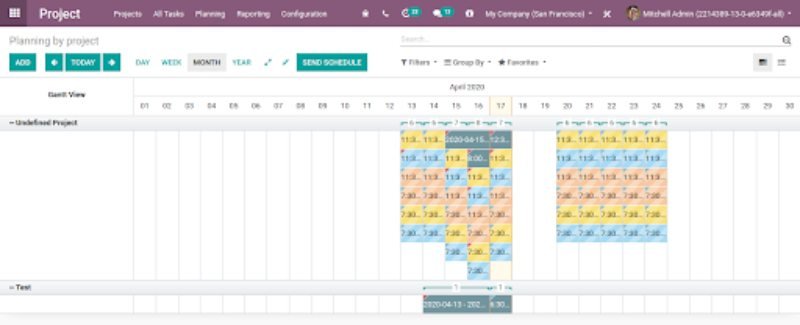
Clicking on planning by Project will show the total number of employees allocated per project.

Odoo Project Management module

Invoice Spend on Task.

When it’s time to bill your client for the finished projects/tasks, you can choose to shorten processes and save time by pulling the billable time you have tracked into sales orders, and invoices, directly from the project/task.

First, you need to enable the timesheet feature.

Path: Project → Configuration → Settings and enable Timesheet.

Create a sale order and invoice from a project.

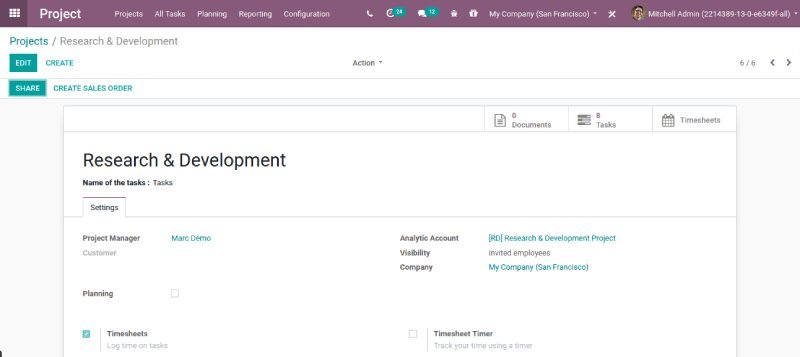
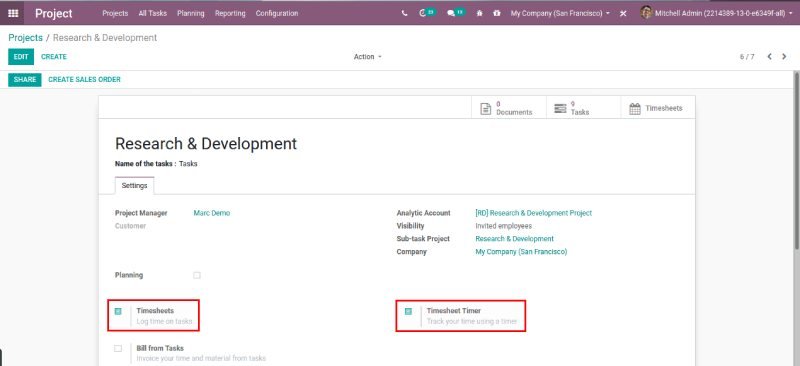
Path: Project → Configuration → Projects, choose the corresponding one and enable ‘Timesheet’ & ‘Timesheet Timer’.

Odoo Project Management module

Click on ‘Create Sales Order’ and continue to create the invoice.

Odoo Project Management

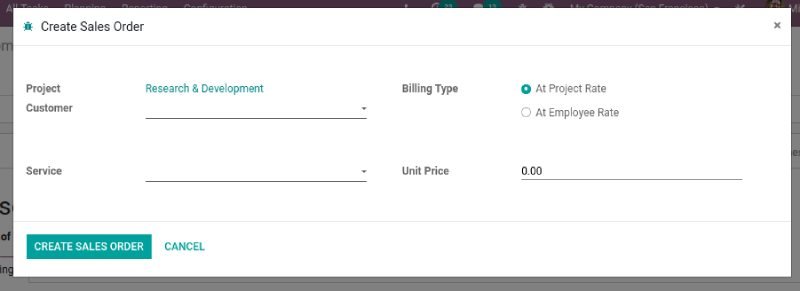
Billing Type: You need to select the type of billing as per your requirement ‘At Project Rate’: all timesheets are billed at the same rate, or by ‘At Employee Rate’: timesheet will be billed with individual rate of the employee.

The project rate allows you to invoice a whole project, for a specific service, at a specific rate at once. Example: Implementation of a system.

The employee rate billing lets you invoice a project broken down into different services, at different rates. Example: Different rate for junior & senior consultants.

Invoice only for approved timesheets.

Path: Timesheets → Configuration → Settings → Invoice Policy.

Odoo-Project-Manatgemen
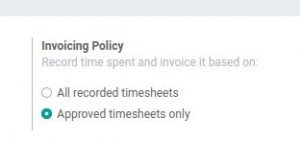
Choose Approved timesheets only. This ensures that the manager is aware of the hours being logged from each employee before the customer gets invoiced

Reach out to us for Odoo implementation.

All you need to know about odoo inventory management module

Odoo Inventory Management is intended to scale from a few thousand operations to many various transactions. It helps businesses manage their product or asset inventory without any hurdles. Odoo inventory management is the best double-entry integrated inventory & tracking system for warehouse management. With the Odoo inventory management module, you can manage your warehouse, vendors, purchase flows, etc.

The first step in inventory is creating a product.

Path: Inventory → Master Data → Products → Create.

odoo inventory
Product Name:  Enter the name of your product.

Product Type: In case you set the product type as ‘Storable,’ then you can track the stock of the product and know how many units are in stock and the forecasted number of units. If you want to include a product on receipts/deliveries but don’t need to track its stock, then you can select the type ‘Consumable. ’  This will help you to set up Products in Odoo inventory management,

Configuration

  • Warehouses: The warehouse is the actual place in which the items are stocked. You can set up multiple warehouses. We can have a warehouse for a company and we can keep different locations in the same.

Path: Inventory → Configuration → Warehouse Management → Warehouses.

odoo inventory management

When you click on the menu you will see a list of Warehouse. Here we have only one warehouse. You can add any warehouse to Odoo inventory.

odoo inventory management
If you want to create a new warehouse, you should enable the Multi-Warehouse settings. Note that the Multi-Location settings will be automatically enabled at the same time, and click on the save button. Which will help you to save multiple warehouses inside the Odoo inventory module.

odoo inventory management
After enabling the multi-warehouse settings, you can create a Warehouse.


Odoo Inventory. Book a demo action

Warehouse: Add your warehouse name.

Short Name: You should also choose a short name for your warehouse, which is 5 characters long and is used on the different warehouse documents.

Address: You can select an existing company, or you can create a new one. Therefore, the address of your warehouse will be the same as the one of the companies you selected. After the creation of a new warehouse, you can go back to the Dashboard/Odoo Inventory Overview.

Path: Inventory → Overview.

You will see the new operation types automatically created due to the creation of a new Warehouse.

odoo inventory management

  • Location: Location is the specific place within the warehouse. It can be a sublocation of your warehouse as a shelf, a floor, etc. Therefore, a location is part of one warehouse, and it can not be linked to multiple warehouses. One can create multiple locations and sublocations such as shelves, racks, etc.

Path: Inventory → Configuration → Location.

odoo inventory management
Once you click on the Location menu, you can see the list of locations, as shown in the image below.

Locations are very important to configure as we need to make sure of the inventory where it has been stored and where it went.

We have created some of the locations, and we need to configure all the locations from where we are getting the stock(Vendor Location), which is already configured, and where we are sending the stock(Customer Location), which is also configured.

However, we can create more locations for Customers and Vendors if we want. Similarly, we have locations for scrap or Inventory loss.

Odoo inventory management
These are virtual locations and do not exist in our proximity. We can also create internal locations where we are sending the goods internally. If it is consumed, it should be a production/customer location; otherwise, the stock will be shown as still existing in stock.

When you click on any of the locations in the list, you can see the following form.

Odoo Inventory Management
Location Name: Name of the location.

Parent Location: If you are keeping in your stock, then make sure to add the main stock location, as shown in the above image. If you are creating a location for scrap,

odoo inventory management
customer, production then it’s not required to add stock as the parent location.

 Location Type: There are multiple types available, as shown in the next image.

Vendor Location is used for the Supplier’s Location. This location is treated as our virtual location from where we receive the products in our stock.

 The view is always a parent location. When we have a hierarchy of locations, it is always advisable that you keep the parent location to view the location as the transaction of the goods will happen to the children, which do not have any further subordinate locations.

An internal Location is a location that is available internally in our stock. We can have multiple locations where we can keep our stock. Here, we will maintain a hierarchy, as discussed before, so that we will get an accurate inventory value for the stock that we have.

Customer Location is the location of customers where actually we are delivering the goods from our stock. This is also a virtual location that we just imagine using when we are selling the goods.

Inventory Loss is the location that is used when we have scrap products or lost products or when we adjust the inventory of books with real-time inventory. The adjustment moves have this type of location.

Production is the location where actually the products are actually being consumed for manufacturing or any other reason. A restaurant or kitchen can be treated as a production location when the goods are being consumed.

Transit Location is the location that is used only for transit. For e.g., a Quality check location or Packing Location or when you use Pick Pack Ship the locations can be used as transit locations.

You can select the right type that matches the location that you’re trying to create.

There are two checkboxes: Is a Scrap Location? And Is a Return Location? As the name describes, check whether it’s a scrap location and return location or not.

There are 3 smart buttons. Current Stock: Clicking on this will give you a list of products which is the current stock available at this location, as shown in the next image.

Odoo inventory management


Odoo Inventory

  • Operation Types: Operation types are the types of operation that are used in terms of transferring goods from one location to another.

There are mainly 3 types of operation: 1. Receipt, 2. Delivery, and 3. Internal Transfer.

Path: Inventory → Configuration → Operation Types.

Odoo inventory management
You will see a list of operation types. Click on any of the types or click on Create to create a new type.

Operation Type: Name of the operation type.

Type of Operation: Select whether the type is Receipts, Delivery, or Internal Transfer.

Operation Type for Return: If we have the operation type and we want a specific type for return, then we can select this.

Odoo inventory management
Create New Lots/Serial Numbers: If we want to create a new lot/serial number during the transaction of the operation type, then select this checkbox.

 Use Existing Lots/Serial Numbers: If we want to use the existing lot/serial number during the transaction of the operation type, then select this checkbox.

Now there are default locations Default Source Location and Default Destination Location which need to be configured on the Operation Types. If the Type is Internal, you can change the location on the operations, but for Incoming, it will be possible to change the destination location, and for Outgoing, it will be possible to change the source location.

If you choose Vendor type, it is mandatory to select the destination location. Usually, we keep it as a stock location. For Customer type, it is not mandatory, but we should configure the location. For the internal type, both locations are mandatory to be configured. The screen itself will force you to do so when you select a specific type. 

  • Putaway Rules: Putaway is the process of taking products off the receiving shipments and directly putting them into the most appropriate location.

Example: In a retail store storing vegetables and fruits, we have to store vegetables in vegetable locations and fruits in fruit locations, and they are in the same warehouse stock. That’s where putaway rules intervene to avoid storing products wrongly.

The putaway rules can be defined either per product or per product category.

Path: Inventory → Configuration → Putaway Rules.

Odoo inventory management

Odoo inventory management

  • Configuration: Enabling the Multi-Step Routes will enable the storage location automatically.

Path: Inventory → Configuration → Settings.

Odoo inventory management

  • Product Categories: As the name describes, categories are used to categorize or classify the products in different sections. You can create or configure it as per your requirements.

Path: Inventory → Configuration → Product Categories.

Odoo inventory management

This will open a list of product categories. Click on create for creating a new category.
Odoo inventory management
Category Name: This is the name of the category that you can give as per your requirement.

Parent Category: is the parent category of this category.

Routes: Here, we shall mention the removal strategy that is used while there is no source location given for the category.

Here we have 3 types of removal strategy in odoo inventory management.

FIFO: First In First Out.

FEFO: First Expiry First Out.

LIFO: Last In First Out.

Costing method: here we have 3 types of costing methods,

Standard price: products are valued at their standard cost given on the product

First In First Out: products are valued based on First entered in and first leave.

Average Cost: Valuation based on weighted average cost.


Odoo CRM 

Receive Product in stock:

After creating a product, you can receive the products by following steps.

Path:  Inventory → Operation → Transfer → Create.

This will open the form view of the transfer.

Operation Type: Select the type of Receipts for receiving products.

Received From: Select the vendor from which you are receiving the product.

Destination Location: Select the destination location of your product.

Scheduled Date:  Add the date scheduled for receiving the product.

In the operation, you need to add the details of the product name and quantity in ‘Demand’ for receiving the products.

Once all details are completed, click on the ‘Mark As Todo’ button.

Click on the Validate button to complete the Incoming transfer.

odoo inventory
Scrap Order:

At any stage of the production line, we can scrap the product. In all the production stages, we can find the tab of scrap. When we click on the scrap, we can immediately transfer it to scrap.

We can also create scrap manually from,

Path: Inventory → Operations → Scrap Orders → Create
Odoo inventory management
Product: Select a product that is scrapped.

Quantity: Add quantity.

Source Location:  Add the location from where the product was scrapped.

Scrap Location: Select the scrapped location.

Once all the details are filled, you can click on the “Validate” button.

Reporting: Now we will see reporting available for Inventory Management.

  • Inventory Report: This is the report that shows the current inventory or inventory on a specific date. The calculation of the inventory is done based on the movements till the current date.

Path: Inventory → Reporting → Inventory Report
odoo inventory
If you want to print the report till some specific date, then click on the button ‘Inventory At Date. ’ This will open a pop-up. Select the date and click on the confirm button. This will show you the report.

  • Forecasted Inventory: Odoo inventory Forecast is the way towards ascertaining the stock expected to satisfy future client orders dependent on how much product you anticipate to sell over a particular time frame. With Odoo 13, inventory forecasting is all easier. One can quickly retrieve the forecasted inventory with the help of new graph and grid views.

Odoo inventory management
Inventory  Valuation: Odoo’s inventory Valuation Report shows the value of the available product. The value is calculated based on the Cost Price, which is configured on the product

odoo inventory

Here, first is the Product, then the quantity available along with UoM, and finally, the Value is the total value of the product available. As mentioned before, Value is the multiplication of the quantity of the product and the cost price configured on the product.

  • Product Moves: Now, when you want to see the product movements from one location to another location, you can see it by clicking on Inventory → Reporting → Product Moves.

Now, when you click on this menu, you will be redirected to the list of product moves, as shown in the next image. On this move, you can use the filters and group by to view the product movements as per your requirements.

Odoo inventory management


Odoo inventory App

For more information, you can reach us using our contact form or at +1 (858) 401-2332.

Transforming you manufacturing business with Odoo MRP

odoo mrp

Transforming your manufacturing business with Odoo MRP

Leading a manufacturing company involves many critical decisions. Unlike other industries, manufacturing businesses can be extremely expansive and diverse. This makes it imperative for business leaders to have technologies that enable them to plan, record, track, and control every aspect of their business. With Odoo manufacturing or MRP, you can have quality assurance, maintenance, and product lifecycle fully integrated into one system. It allows you to accurately capture data in real-time from your workforce and equipment using the API. Odoo MRP can also customize your manufacturing processes in alignment with your company-specific business processes using a work center and other routing concepts.

So, let’s have a look at some ways in which Odoo MRP can help you stay ahead of the curve.

Product manufacturing order

Here’s how you can create a product by manufacturing an order in Odoo MRP. There are usually two ways to do this. The first is simply without routing & work center and the other is by customizing the work order, and setting up a work center & routing. Here’s the first one:

Go to manufacturing → Operations → Manufacturing orders

odoo mrp
After this, click on the ‘create’ button and fill in the below categories:

Product: Select a product to manufacture.

Quantity to Produce: Add the total quantity to produce.

Bill of Material: Add bill of material.

Deadline: Add deadline for production of the order.

Plan From: Add Planned date for the production of the order.

Components: Raw Material for production of the product. This Comes from the Bill of Material.

After adding all the details click on the ‘mark as to-do’ button for processing the order.

Click on the “Check Availability” button and you will be able to see the quantity available in reserve.

Once all quantities are available click on the ‘Produce’ button.

Odoo MRP
Once done, click on ‘mark as done’.

odoo mrp

Once this is done, your production process is completed.

Now let’s have a look at another way of creating manufacturing orders in Odoo MRP. This time, we do it by customizing the work order, setting up the work center & routing. This is the advanced method for complex production where work center, routing, and bill of materials are used.

First, go to Manufacturing → Configuration → Settings.

odoo mrp

odoo mrp
After this, we need to enable the work order in the manufacturing settings.

After enabling work orders, we move to setting up the work centers and routings.

1. Work Center.

To create a work center, click on work centers in the settings or go to manufacturing → master data → work center → create.

odoo mrp

Create work centers and click on the “Save” button.
odoo mrp

2. Routings.

Routes are the paths through which the production of each product passes. Production is not a simple process, it contains a lot of work centers, routes, and so on. In this step, we set the routes for manufacturing.

For creating routings we can click on routings in the settings or Manufacturing → Master data → Routings → Create.

odoo mrp

Fill in all the details, add the work centers for this route, and click on the “Save” button.  

Manage production

We can start processing work orders in 3 ways.

1) By clicking on the work order from the manufacturing order.

2) Clicking on any of the work orders by following this Manufacturing → Operation → Work Orders.

odoo mrp
3) You can open any of the ongoing work orders from the work center overview.

Path: Manufacturing → Overview → Click on the Work Orders button.

Odoo MRP

You can see all the work orders.
One can get hold of each work order and complete the production. The production of the product will go through the route that we set for its production.
odoo mrp

Click on ‘process’ to start production. You will then enter the production interface.
Odoo MRP
Click on ‘validate’ after completing each stage.

odoo mrp

When the entire production is finished click on ‘mark as done’ or ‘mark as done and close MO’. After this, the production is completed.

When we complete each production, the product will be added to the inventory. The inventory will be updated automatically.

Bill of Material

Bill of materials, BOM are the components we add for the production of a particular product. Every product is manufactured with unique raw materials.
Therefore, for the manufacturing of a product, we need to take the corresponding bill of materials. Let’s see how this is done.

Go to Manufacturing → Master Data → Bill Of Material → Create.

odoo mrp
Here we shall see how to create a BOM and how to add the components. Product: Add a product for which you need to create a Bill Of Materials.

Product Variants:  Add variants if needed.

Quantity: Add quantity.

Routing: Select the Route of production for the product.

Reference: Add Reference.

BOM TYPE: Select the type of the BOM as required for the production of the product either ‘Manufacture this product’ or ‘Kit’.

You can add the raw materials required for the product in the Component under the Components tab. Select the work center operations for the raw material in Consumed in Operations.

odoo mrp

If there are by-products in your manufacturing order, you will need to enable them in manufacturing settings.

Odoo mrp
Once the by-products are enabled you can see a by-products tab next to the component.

Add the products, and quantity & select the operations. Under by-product enter the details (if there were any to produce the product).

After adding all the details click on the ‘save’ button.

Unbuild Orders
Unbuilding is yet another innovative feature in the Odoo 17 manufacturing app. Here we can unbuild a manufactured product in case of damage caused to any of its parts. This way we won’t be scrapping the entire product and we can unbuild the product to utilize all the good components of it.

 To do this, go to manufacturing → operation → unbuild orders → create.

odoo mrp


Fill the necessary fields and click the ‘unbuild’ button.

Scrap Orders

The Odoo MRP app allows you to scrap the product at any stage of the production line. When you click on scrap you can immediately transfer the product to scrap and see it in the scrap order tab.

We can also create scrap manually by going to manufacturing → operations → scrap orders → create

Here fill up the below details

Product: Select a product that is scrapped.

Quantity: Add quantity.

Source Location:  Add the location from where the product was scrapped.

Scrap Location: Select the scrapped location.

Once all the fields have been filled you can click on the ‘validate’ button.

odoo mrp
Planning, processing, and costing are the foundation stones of a robust manufacturing business. Odoo MRP can make this process simpler for manufacturers across. With more than 200 developers across the globe with vast experience in Odoo apps, we at Bista Solutions understand your unique manufacturing needs. Reach out to us and schedule your free consultation now!


Robotics Process Automation (RPA) benefits you did not know about.

RPA benefits

As automation advances, it will usher in a flux of disruptors and trends, altering the way organizations operate. On one hand, this progression promises economic growth, higher productivity, and greater efficiency. While on the other hand, these new technologies raise concerns and questions about the broader impact on jobs, wages, skills, and even the nature of work. Key decision-makers believe that Robotics Process Automation (RPA) is one such technology that has unlimited benefits leading to a more efficient and productive work environment by eliminating repetition and duplication of work. A Forrester and UiPath surveyed around 270 decision-makers who were responsible for operations at their firms. All these leaders from different lines of business highlighted that organizations are planning to use RPA to meet key business priorities. RPA benefits are vast and still being explored across industries.

RPA benefits

One of the key RPA benefits is that is bolsters human-agent productivity. It is spearheading automation across enterprises by increasing process automation and helping deliver differentiated experiences. Another key RPA benefit is that is uncovering new revenue streams by eroding repetitive work, ushering the need for super agents, and reskilling and upskilling the workforce. Forrester predicts that the RPA services market will reach $7.7 billion, and eventually balloon to $12 billion by 2023.

So, what are these RPA benefits that are transforming businesses across?

RPA

  1. Increasing employee productivity – Employee satisfaction is one of the key emotions that help maintain employee retention. Conducting menial and repetitive tasks can have adversely negative affects on employees and their happiness and output. This in turn, affects the organization’s capacity for growth. Carrying out more meaningful work is something that increases productivity, engagement, and performance levels, at the same time increasing job satisfaction.

So, a key RPA benefit is that it demonstrates an organization’s commitment to its employees by helping them evolve, learn, and acquire knowledge around RPA, further, creating a more loyal and appreciative workforce. By training employees, allowing access to vocational courses, or even encouraging them to pursue newer digital qualifications, they can overcome fears around automation and embrace it as a productivity-boosting asset.

  1. Increasing the quality of customer experience – Businesses are increasingly prioritizing customer experience. By leveraging RPA, organizations are better able to serve their customers by creating personalized experiences. This can be done with customer-facing chatbots and emerging channels such as mobile apps or social media.

So, when organizations automate the repetitive, rule-based tasks enables employees to channel their energies on higher-value activities that require advanced skills. It further improves employee engagement and translates to happier, more satisfied customers.

  1. Equipping employees with the right knowledge – Customer service representatives across the business need access to account details while dealing with client. Most of the time, they need to access multiple systems to get what they need. One of the key RPA benefit is that it can make information readily available for your representatives and equip them well.
  1. Lightening the IT load and improving business results- If businesses enable employees to perform repetitive and administrative tasks, they are reinforcing the IT team’s role in enabling workforce productivity. Few of the best RPA benefits include automating repetitive tasks that are usually prone to errors (such as resetting the password or fixing help desk issues) can be completed relatively faster with more accurately. This means that employees can then turn to higher-value tasks that improve business metrics.

The non-invasive characteristic of RPA is perhaps its greatest strength. According to a Forrester report that quotes the director of IT operations, saying that, “One of the biggest advantages of using a virtual workforce or an RPA robot is that it does not require you to replace your existing systems. Instead, RPA can leverage your existing systems the same way a human employee can.”

This application of RPA is not just limited to one business unit, it can be applied to multiple repetitive tasks across business departments like marketing, HR, IT, So this is how RPA can help you reduce manual labour and also save your time.

As an increased number of decision-makers believe that RPA will lead to more productive and efficient working environments, we at Bista are constantly helping businesses to lead this change. With a strong team of developers who can drive this change seamlessly, we can help you understand how RPA can transform your business.

Reach out to us and book a free consultation session now.

Managing your product’s life cycle with Odoo PLM

Odoo PLM

One of the most important functionalities for a manufacturing business is to manage the lifecycle of a product from its inception to the delivery or disposal. By recording all their product related data in a unified system like Odoo – manufacturers have access to the different versions of their products at any point in time. This data can also be shared with different departments to facilitate accurate financial planning. With Odoo PLM you can maintain BOM & track product life cycle based on engineering change orders.

The Odoo PLM feature can be used to  manage entire product data, maintain bill of materials (BOM) revisions and track product lifecycle based on engineering change orders, and product files.

Odoo PLM optimizes enterprise social networks to help you communicate efficiently with various departments of your organization. It enables easy approvals and real-time discussions on documents. 

Odoo PLM also helps to create ECO (Engineering Change Orders) to do the following:

  1. Make BoM revisions.
  2. Make MO route revisions.
  3. Update BOM component attachment.
  4. Generate multi-level approvals from higher authorities for any revision (BoM or Route) before making changes in MO
  1. Manage BoM and routing versions.
  1. Configured ECO Type

Odoo PLM

  1. Configured ECO Stages

These are the four stages that you can use to configure multiple approvals.

New: For creating new engineering change orders.

In progress: For the ECOs which are in progress.

Validate: As per configured the stages this will be the final stage to apply changes based on ECO apply on selection.

Effective: This stage is used for confirmed ECOs. Here one can apply changes and this stage will be marked as the final stage in the stage settings, also select allow to apply changes for applying ECO changes in odoo plm app

Odoo PLM

  1. Generate Engineering Change Order(ECO)

Odoo PLM

You can select ECO type and apply based on that column. Once the record is generated click on the “Start New Revision” button for further process.

  1. Update BOM

You can even update your BOM using the Update BOM button. Once saved, it will reflect on the ECO form.

Odoo PLM


After getting the approval, the user applies the corresponding changes.Odoo PLM

The effective stage is the final stage. After getting the approval, you can drag the ECO to the final stage and apply the corresponding changes.

Odoo PLM

Companies with an ERP system usually need to find ways to organize their most important business unit – the product record. When aligned, ERP and PLM systems can give business leaders complete control over their manufacturing processes.

Building your manufacturing process with an effective PLM system like Odoo PLM will minimize organizational inefficiencies and transition costs. It can also drastically help to optimize the capabilities of each system across the entire business. There are few odoo apps available for manufacturing business like Odoo PLM, Odoo MRP, Odoo Quality management etc.

In-case you looking for Odoo implementation, reach us now!

Robotic Process Automation (RPA) Invoice Automation

RPA Invoice Automation

Are your employees conducting repetitive tasks?
Are you looking for ways to increase their efficiency and save their time?

If so, this video is the answer for you. Robotic Process Automation or RPA is software that executes routine transactions and makes data-driven decisions by replacing repetitive human activities. As software, RPA mimics and automates business processes and tasks exactly as if they are being carried out by humans – at the same time removing the scope for human error. Serving as a faster and reoriented workforce, RPA can be built around repetitive computer-based tasks, decision-based tasks, or tasks that require accessing more than one system to complete a process and conduct an information search.

In the video below we have shown how you can automate multiple supply invoices using UiPath.

Instead of manually processing each invoice, we used uiPath to the following process which could drastically help you reduce repetitive tasks and also save your time.

RPA Invoice Automation

  1. This intelligent software first logs into your Gmail and then reads all your unread emails.
  2. After this, it downloads all the attachments in the email which has the word ‘invoice’ in it.
  3. It then logs into Odoo and reads and extracts the Purchase order number and the total amount from the attachment.
  4. It will then search for the purchase order number and match it to the total number.
  5. Once that verification has been made, the invoice will be processed.
  6. And the software will send a confirmation email.
  7. If the invoice doesn’t match, it’ll still you an email stating that the invoice cannot be processed due to a mismatch.
  8. This loop continues till the system reads all the attachments.

When you execute this entire flow, you will be able to see how fast this process can be conducted and how the system uses its intelligence and this entire process gets automated.
The software matches the PO numbers for all the attachments in your email to check for matches and process the invoice so they can be ready for you in your inbox. Even if the invoice does not match so it will send an email with the information about the mismatch.

This application of RPA is not just limited to one business unit, it can be applied to multiple repetitive tasks across business verticals like marketing, HR, and IT, So this is how RPA can help you reduce manual labor and also save your time.
As an increased number of decision-makers believe that RPA will lead to more productive and efficient working environments, we at Bista are constantly helping businesses to lead this change. With a strong team of developers who can drive this change seamlessly, we can help you understand how RPA can transform your business.
Contact us to book a free consultation session.

How RPA is transforming businesses with customer service automation

customer service automation

At a time when accurate analytics and quality performance are shaping business across, RPA comes in as a software that enables reliable and fast task completion. This automation shifts human effort away from mundane tasks to apply themselves to core business objectives and to focus on more challenging, higher-order tasks that can be of greater value to the business. RPA systems are not just more accurate; but also available 24/7. Which is why they can be seamlessly integrated into customer service to strengthen and automate customer engagement and even target potential customers. Leading to a quiet technological revolution, customer service automation is a sieve that helps filter data through a simple process without much intervention of human beings. With RPA’s improved accuracy and efficiency, organizations can allay their concerns for satisfied customers.

customer service automation

So how can RPA help businesses strengthen customer services?

  1. Strengthening customer communications: The key to maintaining strong customer relations is through continuous contact with customers through every touch point across the customer lifecycle, this includes all their preferences, needs, and pain points. RPA can help give automated reminders to customer service representatives about follow-up calls or emails for certain customers or even send automated messages to customers regarding new products or services. By integrating customer service automation into the most redundant tasks conducted by customer service agents or sales representatives, RPA ushers a golden opportunity to focus more on strengthening the relationship with customers. With predictive analytics, it also fosters a wider awareness of customer expectations.
  2. Increasing employee efficiency: Customer service representatives mostly deal with various tools, applications, and desktops. As they respond to queries from customers, they need to seamlessly switch between these tools and provide the information required by the customer. In such situations, an RPA implementation and customer service automation can help in assisting your agents by preloading customer information from the various applications that they would otherwise have to switch between. This is not only provides an easier interface for your employees, but also faster query resolution time for your clients.
  3. Eliminating errors across the customer lifecycle: According to the Harvard Business Review, erroneous data inputs by humans cost about $3 trillion annually in the US alone. RPA’s customer service automation tool can drastically help eliminate this human error and increase accessibility of data for customer service representatives. For instance, bots and other RPA tools can capture all process details and store them for potential auditing later. If a customer service representative, for instance, gets a follow-up call from a previously contacted customer, the RPA tool will automatically provide data from the customer’s account. In a typical setup, employees usually enter the data manually and sometimes even enter it multiple times. However, with RPA they can make a single-entry that will be recorded across all databases, thus eliminating the duplication of work.

While RPA has all these customer service benefits to offer, business leaders need to recognize which types of transactions can be performed well by robots and which ones fall in the appropriate sphere of human intervention.
As an increased number of decision-makers believe that RPA will lead to more productive and efficient working environments, we at Bista are constantly helping businesses to lead this change. With a strong team of developers who can drive this change seamlessly, we can help you understand how RPA can transform your business.

Contact us to book a free consultation session.

How robotic process automation (RPA) can help your business drive growth

RPA

In today’s day and age, when ‘digital transformation’ is the buzzword for every successful business, there is increased pressure on business leaders to optimize technologies that can serve as efficiency levelers. To do this, CIOs and CTOs need to utilize their workforce optimally and build a robust virtual workforce with the bricks of technology. This means a revolutionized workforce where software programs reduce the need for repetitive human efforts. The proliferation of Robotic Process Automation (RPA) in the business environment is one such change that can alter the business paradigm.

So, what is RPA? Simply put, RPA is a software that executes routine transactions and makes data-based decisions by replacing repetitive human task-based work. As a software, RPA mimics and automates business processes and tasks as if they are being carried out by humans – but removes the scope for human error. Serving as a reoriented workforce, RPA can be built around repetitive computer-based tasks, decision-based tasks or tasks that require accessing more than one system to complete a process and conduct information search.

How robotic process automation (RPA) can help your business drive growth

In fact, RPA’s application is not just limited to one business vertical, it can be applied to multiple repetitive tasks across business functions like finance, HR, IT, etc. Let’s see how RPA can help drive business outcomes:

1. Lighten the load on the workforce to focus on top business priorities:

RPA enables your employees to perform repetitive and administrative tasks quickly so that they can focus their energies on higher-value tasks that improve business metrics. With rule-based tasks that are now error-free, RPA not just increases your business efficiency, but also, helps wrap up tasks with more accuracy. Some tasks that RPA can seamlessly automate are:

  • Support IT tasks such as password reset, software testing, or help desk issues
  • Support customer-facing chat bots that use speech or text recognition to transcribe a conversation, take commands from humans or participate in a conversation
  • Natural language understanding and text analytics applied to unstructured content

2. Provide better customer service with customer engagement:

Your customer’s journey begins with the first impression that he forms of your brand. This encompasses all interactions and experiences at every touch-point across the customer lifecycle. The key to improved customer service is to keep a high rate of customer satisfaction through responsive teams. This is where RPA can be truly transformative. One way this can be done is by leveraging RPA to equip your employees with the right data for answers to your clients. This can help drive efficient conversations and help improve customer service. Moreover, many companies are now even deploying RPA to deliver personalized interactions and increase customer engagement through customer-facing chatbots.

3. Increase employee efficiency and productivity:

Conducting out menial and repetitive tasks can negatively affect employee happiness and productivity, in turn, affecting the organization’s capacity for growth. More meaningful work for employees subsequently increases engagement, productivity, and performance levels.

According to a Forrester survey titled ‘The Future of Work Is Still Being Written’, 64% of employees said that they prefer their employers to keep refreshing organizational technology for them to feel more satisfi¬ed and fulfilled at work. Moreover, 57% of employees even stated that they would be willing to increase their current skill set to keep up with the evolving nature of technology.

As observed by many businesses across the globe, one of the biggest advantages of using RPA or a virtual workforce is that it does not require you to replace your existing systems. Instead, it can leverage your existing systems and be identical to your human employees.

As an increased number of decision-makers believe that RPA will lead to more productive and efficient working environments, we at Bista are constantly helping businesses to lead this change. With a strong team of developers who can drive this change seamlessly, we can help you understand how RPA can transform your business.

Reach out to us and book a free consultation session.

How to maintain business continuity in the times of a global pandemic

Corona virus
  • by bista-admin
  • Mar 19, 2020
  • 0
  • Category:

As the Corona Virus outbreak impacts individuals, countries and businesses alike, everyone across the globe is finding ways to navigate the consequences of COVID-19. At this point, maintaining business continuity while ensuring employee safety is of utmost importance. In times when this pandemic is causing major disruption in the global supply chain, it is imperative that business leaders continue operations and manage customer relations optimally.

Although the long-term consequences of this are yet to play out, there is an increasing realization among business leaders about the implications of this small virus on their profit margins. It is critical for businesses to have an aligned approach that integrates them in this disintegrated environment where most of their employees are working from home. Which is why, exceptional circumstances like these, call for exceptional measures that can help businesses leapfrog in this time of crises.

So, what can business leaders do to ensure free flow of work and logistics in times when there’s additional pressure on supply chain?

Coronavirus

Unify your diverse workforce

Increasing number of companies are upholding the safety of their employees and advising them to work from home. In times like these, a cloud-based ERP system that brings everyone together in one single screen can drastically help business leaders with capacity management. As most countries urge employees to quarantine and work remotely, workforce tracking might seem like a big roadblock. However, a cloud based unified system which is easily accessible and scalable can help bring together employees across the globe and give visibility into status of tasks undertaken by them. For instance, without any IT setup work, your ERP system can be accessed from anytime, anywhere via any web browser, whether Chrome, Safari or Firefox, and any mobile device and help you can track the status of your  what your sales team is doing at the click of a button allowing transparency among the entire organization.

Maintain seamless customer service

Having a complete view of your customer is more critical than ever in this time of heightened customer expectations. A cloud-based ERP solution unifies sales force automation, marketing automation, customer support, opportunity management and renewal and upsell management systems. This allows your employees to get visibility of the entire customer experience and transaction history.

When the entire organization is disintegrated, it is important to have aggregated data in one place with visibility of all functions across departments to ensure that customer service is not impacted. CRM and sales modules of a cloud-based ERP solution allow you to get a holistic view of your prospective customers as well as well current customers that are built into the company’s CRM. In such a case, anyone across the organization has access to the customer stage of sales, enabling seamless tracking of customer journey, simple external communications with the client and also user insights based of the customer’s behaviour, no matter where you are.

Measuring and mapping at home

An early prediction of any disruption can help many businesses prepare for a macro crisis. According to Financial Times, 60 per cent of executives have no knowledge of the items in their supply chain beyond the tier one group. Having a robust ERP system not only allows supply chain managers to be aware of core suppliers who are in the front line of disruptions. That is why it is important for businesses across industries to invest in an ERP system that allows them to map their suppliers several tiers back. Companies that fail to do this are more vulnerable and less responsive when a crisis erupts.

According to Havard Business Review, companies that had mapped their supply chain, in the first few weeks of January 2020 already knew which parts and raw materials were originating in various areas in China. As a result of this, they were able to fast-track their responses and bypass the frantic hunt for information. Which is why adopting to an ERP system that gives you visibility into your suppliers can help you take preventive actions and future-proof you from large-scale crises.

As every business and individual across the globe finds ways to fight this deadly virus, we at Bista are committed to support your business through the course of this pandemic to help you maintain its continuity no matter what. We understand the criticality of business continuity and are here handhold you with your ERP needs to ease the problem of accessibility and transparency. We want you to know that we are available for your unique business needs in this exceptional time and you can count of us to support your business needs.

Filing 1099 tax forms now easier with odoo 1099 tax form!

1099 Form

For any company in The United States, contract workers or non-employees with a payment of $600 or more, must provide the 1099 income statement in order to report tax information for their services rendered during a calendar year. For most companies who rely heavily on external vendors, reporting payments to the Internal Revenue Service (IRS) as a 1099-MISC form is an extremely critical yet tedious task. While a unified and integrated tool like Odoo 1099 tax form allows you to manage payments to your vendors, it is extremely important to have the proper settings in your ERP system for any supplier who requires 1099 form generated for the year.

Odoo 1099 tax form

[su_button url=”https://apps.odoo.com/apps/modules/13.0/report_1099/” target=”blank” style=”3d” background=”#af85ce” color=”#fdfefd” wide=”no” center=”no” radius=”5″ icon=”icon: file-o”]Install Today[/su_button]

We at Bista have the capabilities to specifically customize and ease the process of filing the 1099-MISC forms. Keeping in mind the criticality of your accounting needs, we have designed a module in Odoo called as odoo 1099 tax form that allows you to –

  • Tag vendors as 1099 suppliers in Odoo 1099 tax form
  • Manage all payments made to these vendors and even classify it by transactions
  • Identify which transactions are 1099 eligible and which ones excluded
  • Record income type by transaction
  • Record federal tax classification
  • Encrypt and store Social Security Numbers (SSN) and Employer Identification Number (EIN) of your vendors securely and limit access to authorized users only.
  • Export the report and print directly into the 1099 form from Odoo 1099 tax form

When you enter search for your vendors or suppliers, our module allows you to classify them by vendor Odoo 1099 tax form configuration type using the vendor drop-down in the menu bar. At year end, you can report accumulated US 1099 payment information to the Internal Revenue Service, other tax agencies, and your suppliers, in standard format.

Odoo 1099 tax form

Our module has reporting capabilities that provide payments made to 1099 vendors during a fiscal year.

Currently being used by multiple Bista clients across US, our customized module enables you edit income types in a user-friendly interface or directly via reporting. With this module, you can even choose to exclude non-1099 payments from your financial reports to suit your business needs.
A completely secure module, we ensure that the SSN and EIN numbers of each vendor is encrypted and protected from any data theft.

Form 1099

This Odoo module aims to simplify your tax reporting tasks and tailor them according to your unique needs.

Odoo 1099 tax form

We at Bista are always looking for new ways to solve your complex problems. We understand that tax filing can be a complicated process, especially when it comes to external vendors who are hired for a short term. That is why, we are here to help ease this process for you.

If you are looking for unique solutions to your accounting needs, reach out to us and we will give you a free consultation session suggesting how you can best digitize your business needs.